Entries in recipes (9)
Borscht
Borscht (or Borshch)
Connecting with my Ukrainian roots
Nancy Hinton
This winter I was menu brainstorming and suddenly felt inspired to make borshch. (More commonly spelled ‘borscht’ in English, ‘borshch’ is closer to the Ukrainian pronunciation.)
Probably because last year I had contributed to a fundraiser in support of Ukraine and got a cookbook* in exchange, which I have picked up to peruse here and there over the slow season. Not to mention that I do have Ukrainian roots that I have barely explored.
Ok, I have made cabbage rolls before. When I found out that my birthmother was Ukrainian, the first thing I did was wonder what 'my people' ate... Cabbage rolls, sausage and borscht, dumplings and pickles!
Over the years, I recall playing around with some fancied-up fare on my restaurant menus, but not much that stuck. Although come to think of it, I am strong on canning, pickling and putting up and do use cabbage in my kitchen a lot, especially fermented.
I remember eating borscht at a Polish restaurant on Prince Arthur that we would go to on occasion in university – they had a daily menu that my boyfriend at the time claimed was the best deal in town to fill you up nice and cheap. I thought it was pretty heavy stuff, but it did taste like real cooking, and I liked the varenyky with onions and sour cream.
Even though beets are among my least favourite vegetables, being ‘soupnancy’, I have certainly made beet soups before – more like pretty pink concoctions – with ginger and citrus, or fennel, apple and dill, but not borscht per say, which is usually quite meaty. With the brutal winter we had, this classic version was suddenly a turn on. I had beets in the cold room and wild boar, house sauerkraut about to be ripe, so the timing was perfect. Plus, the reddish colour would be appropriate for Valentine’s Day.
Upon perusing multiple sources, I quickly learned that like most ‘national’ dishes, there are an endless number of recipes. I like to try to be true to the classic dish in the beginning, before ‘appropriating’ and going off in all directions. However, the existing variability gave me permission to do my own thing. I followed the template of what seemed to me to be essential and took it from there, following my fridge and feeling, as per normal. (I rarely make anything the same way twice, unless I have to as with our JS products).
What I have gleaned: Main ingredient - beets, always onions and cabbage too, usually carrots and potato, and either a chunk of meat or bone. Sour cream and dill to garnish.
I include a recipe from the book to give you an idea of the options, but below is a description of what I I did, and I wouldn’t want to change a thing myself.
BTW, the book I mentioned, ‘Babusya’s kitchen’ beyond being for a noble cause, is actually quite good, endearingly full of personal stories and hearty recipes that bring you into people’s homes, evoking an authentic portrait of Ukranian cuisine. Afterall, ‘Babusya’ means ‘grandmother’.
;)
;)
;)
My recipe: I braised a shoulder cut of boar (like leaner but tastier pork) in the oven, and boiled a couple of pounds of (peeled) beets whole in water, then used the cooking liquid of both to make my soup with a mirepoix (onion, celery, carrot), the shredded/grated beet, bacon and tomato), potato, and cabbage. I added my sauerkraut near the end along with a whack of dill. I served a wild herb crème fraiche to finish à la minute.
And it was really delicious, I must say. Although a rustic dish by nature, it took its place on the winter tasting menu at the restaurant as it was a hit according to customer feedback, tasting complex and different from anything else.
;)
Without an actual pork shoulder or beef blade roast, some bacon, a ham bone or chicken legs cooked in the soup would do the job. I think a good meat stock is essential in this case, if not necessarily the meat itself. Of course, a vegetarian beet soup could be great, but not really ‘borscht’ to me..
No stickler for recipes, I’m all for playing loose, but after this, I wouldn’t sub out the sauerkraut if I could help it. But, obviously you could, and just use cabbage and a splash of cider vinegar. I had cider, a touch of maple syrup and some tomato along with a bouquet garni (bay, thyme, peppercorn, clove) in my braising liquid/stock, so I didn’t need to add much more seasoning, but otherwise, I would always tweak at the end with a dash of salt, spice, acid, umami and sweet, if necessary to punch up and balance the flavours.. The sour cream garnish appears to be unanimously key, but I’m not sure I agree; however the dill is!
 Nancy Hinton
in Ukrainian, journal, recipes, recipes, winter, wintercooking
|
Nancy Hinton
in Ukrainian, journal, recipes, recipes, winter, wintercooking
|
 Post a Comment
'Beer can' Chicken
Beer-can Chicken
You might recall that this was a trendy thing in the food world in the 90’s..
Back then, I was all over the place, excited by everything food & cooking, but without a yard with a BBQ, or even a big enough oven, I never tried; besides, I was more into the likes of JG Vongrichten and Charlie Trotter for inspiration at the time, haha..
In case you missed out - the idea is that you perch a whole chicken on a can of beer (after having taken a few swigs) and then roast it on the BBQ (or in the oven), resulting in a bird that roasts from the outside while steaming on the inside - so ultimately crispy, yet tender and moist.
I am not a gadget girl, and this all sounds very messy, especially on the grill, but I did get into it once I got into pottery (and slightly less finicky cooking). You see, some creative potter had the brilliant idea to craft a vessel that replicates the cooking method, and it works like a charm.. I hear there is even a commercial version on the market now.
I was gifted with one magnificent original like twenty years ago - a beautiful piece of pottery from an artisan in Tewkesbury (Stoneham) – a big ceramic bowl with a short horizontal tube in the middle. The tube replaces the beer can and the bowl provides the sides of the roasting pan to catch the juices. I started seeing a simplified version at '1001 pots' (the famous pottery exhibition in Val David) shortly afterwards, without the bowl, just a tube on a base that you then place in any roasting pan. Enamored with this ingenious thingie that was more accessible in price, I gifted them to many friends who cook; and since, I have started making them myself.
Because I love pottery, and because I love chicken cooked this way. It really is the best way to roast a chicken: Fill the hole, season your chicken and plant it on top; 400F for an hour or a little more (Maybe 375F for a bigger bird) – until the juices want to run clear at the leg joint and the leg agrees when you give it a tug. Foolproof and forgiving, if you overshoot slightly, it won’t show.
Ever since I was a kid growing up in a big family when we had to scrap over the crispy, crackly, savoury skin, I’ve thought that it is the best part of the bird, and the main reason for roasting a whole chicken.
As with any bird, technically, for perfect ‘cuisson’, you would separate the quicker cooking breast from the legs which benefit from a longer, slower moist cook. I hate a dry breast and in our family we’re both dark meat people, so someone has to eat the white stuff! And since I’m nice (or at least the nurturer/nourisher-chef type used to offering the best to my guests, or boyfriend), often it’s me. Thankfully, with this method though, it stays pretty juicy.
However more practical and proper cooking the breast and legs separately may be (as I would do at the restaurant), roasting a whole bird is much more romantic, spectacular and festive, and something I enjoy doing at home. Plus, it calls forth a comforting ritual of chicken soup and extra leftovers to be used in sandwiches and fried rice..
A fun part of this activity too is that you can play around with the liquid in the equation. I like to put white wine or my homemade mead in the hole instead of beer, but you can equally put apple juice or whatever you like. I have even tried pickle juice! Which I have to say was pretty delicious if you dig dill like me.
I marinate my chicken first with our chimichurri vinaigrette (which is just a spicy, garlicky vinaigrette packed with herbs) for an hour or so while the chicken comes to room temperature, but season it however you would normally season your chicken. Steak spice is good. You can do this in advance if you like the 'dry-brine' technique (I approve), but I can't say I ever do more than an hour or two in advance. And you can always stick a few garlic cloves, lemon wedges and sprigs of thyme etc into the pot too.
The minimum would be: Salt, pepper, favourite dry rub or marinade; Beer, wine, cider or liquid of choice (the equivalent of half a can or 3/4c) ..
Preheat the oven to 400F. If your chicken is on the big side (more than 31/2 lb), lower to 375F right away. If not, wait until 45min in, when the skin starts to reach a nice brown. Start checking the doneness at the leg at the hour mark. It will probably take a good 15min more. And then give it a 15min+ rest before carving.
With a suitable pottery dish or roasting pan that fits snugly enough (just not too large), you should have a good amount of tasty ‘lovejuice’ that has accumulated- a mix of the wine/beer and chicken dripping to serve alongside or to make a gravy with.
If you aren’t lucky enough to have the pottery, and are using a beer can, you should take the top of the can off. As with the streamlined pottery tube, you want to set your beer can in a roasting pan that is perfectly sized for the chicken if with some wiggle room, but no more than a an inch or two on the sides so that the juices accumulate instead of burning. I guess you could always check and add a little water if need be, although I’ve never had to with this kind of setup. I’m an oven girl, but if you want to do it on the BBQ before the season is over, consult the internet for extra tips.
It's hard to believe that I have never taken a picture of my roast chicken! At least, you might think so if you're of a younger generation.. But no, I forget to, only taking minimal food photos at the resto, and even then, caught up in the moment, it escapes me most of the time..
But Trust me, Give it a try sometime!
;)
;)
;)
Here are some other recipes and instructions to complement mine:
https://www.bonappetit.com/recipe/beer-can-chicken
https://www.foodnetwork.com/recipes/beer-can-chicken-recipe-1939861
Bon appétit!
Nancy Hinton
in 2024, beercan, chicken, pottery, recipes
|
Post a Comment
|
 1 Reference
'Back pocket' Recipe Exchange
Although there are lots of interesting recipe ideas scattered throughout My Bits & Bites Post, here is a more personal list of Covid Confinement inspired Recipes – from an old fashioned Recipe Chain Exchange..
Simple ‘back pocket’ (or 'cupboard’) recipes and family favourites came to my inbox from all over the country, which I found fun and heartwarming. The unpretentious kind of stuff you just don’t really get on the hippest food feeds/websites, from apple cobbler to honey fudge and red lentil soup, beet wellington! - perfect for these times. So, let me share a few and their stories, with thanks..
I start with Carolyn’s 'buns' because she’s my 'aunt' and I love the idea of reviving and passing on an old family recipe, a piece of my Newfie heritage. I wasn’t in the habit of making scones because it’s just not a thing here in Québec; in fact, I’d kind of forgotten about them, although I do appreciate a good scone (thinking back to my time in England with clotted cream). Plus, my partner, François claimed to not be a scone fan, I guess his only reference being something chalky from a crappy café. To me, with still enough 'anglaise' in me, it’s ultimate comfort food with a coffee or tea. And they’re quick enough to whip up. François seems to have come around with this recipe, slathering them with maple butter, or typical guy move - more butter! and homemade jam. Like Carolyn, he likes to heat them up for a few seconds in the microwave. I like them plain. At least early in the day, if/or dressed up later..
‘This was my mother’s recipe . Nancy’s grandfather, my uncle named them “Dottie’s buns”. Since then they have become”Carolyn’s’ buns”. Hope you enjoy them. They are a family favorite.’ |
|
|
||
Newfie buns (scones)
2 1/4 cups flour
1/2 cup butter
3 tbl. sugar
4 tsp baking powder ( don’t level)
1/2 tsp salt
2/3 cup milk
1 egg ,stirred into the milk
Raisins or leave them plain
Cut the butter onto the flour mixture with a pastry cutter or your hands
Add milk mixture to bowl and raisins
Mix with hands until all flour has disappeared. Do not over mix. (Knead it 5-6 times, do not overhandle it!)
Form the dough into a round and place on a floured surface
Pat into a round with your hand to about ½ inch or more. (Don’t use a rolling pin)
Cut each bun without twisting the cutter
Repat and cut . You should have 12-13 medium buns
Bake at 400 for 17 mins or so
Let me follow with one more old Newfie family recipe in the same vein.. As its a similar paste/batter treated differently, with fruit/ jam.. (I guess they didn't have as much to work with back then..) Which is also why I find these recipes more than appropriate now, to show what you can do with the same few ingredients. I love the 'FatBack and Molasses' book!)
From Dorothy Latreille, St Johns Nfld: ‘Nancy, I am sending you a favourite family recipe called Mom’s apple pudding. A minister called Ivan Jesperson at Wesley United Church in St. John’s (the church that your Grandmother and all of the family attended) had a cookbook published as a fundraiser. Our grandfather George Gillingham and his brothers helped build the church! The cookbook was called Fat-back and Molasses! Wednesdays and Fridays were ‘fish days’ just about everyone had fish for dinner on those days for dinner! Guess it was a way to promote the cod fishery. “When we were young, what we liked best about Friday’s fish dinner was Mom’s apple pudding”….
This was a recipe Aunt Dot submitted to the cookbook!
Aunt Dot was the cook and my Mom Rita was the ‘handyperson’ who did everything including the painting of the trim on the windows as well as tarring the roof and bringing up the tar using the ladder and piece of rope!’
*No doubt, In every family, there needs to be at least one cook and handiman/woman! I reckon many people are figuring that out these days.. (my comment)
Mom’s Apple Pudding
Make apple jam or use a large size tin of apple pie filling, sweeten to taste and place in a casserole dish. The filling or jam must be hot. Then:
1 ½ cups flour
1/3 cup butter
1/3 cup of sugar (I use less then this whenever I make this)
2/3 cup water
3 tsp. baking powder
¼ tsp. salt
Sift dry ingredients together into a bowl, rub in butter well, add water and stir well. Drop by the spoonful on the hot apples and bake until nicely browned. (You could also use partridgeberry or blueberry jam). After serving, pour a little milk over pudding , if desired.
Moving West: Sweet and Elegant, Simple enough..
From Anita Stewart, Elora Ontario : http://fooddaycanada.ca/
Honey Fudge
OAC’s Bee Lab (a.k.a. Townsend House)is the oldest school for apiarists in North
America. This fudge tastes like buttered honey and is easy to make. The only special
equipment needed is a good candy thermometer. The results are worth it.
2 cups (500 mL) granulated sugar
1/3 cup (75 mL) OAC liquid honey
½ cup (125 mL) milk or half & half cream
¼ cup (125 mL) unsalted butter
1 tsp (5 mL) vanilla
In a heavy saucepan, stir together the sugar, honey and cream. Place over low-
medium heat stirring to dissolve the sugar. Attach the candy thermometer ensuring
the bulb does not touch the bottom of the pan but is immersed in the liquid.
Increase the heat and bring to a boil. Do not stir till the mixture reaches 240’F.
Remove from heat and stir in the butter and vanilla. With a wooden spoon, beat
constantly till the mixture cools and thickens slightly. Pour into a well-buttered 8 or
9” glass pan. Cool for 10 – 15 minutes, score slightly with a sharp knife. Allow to
finish cooling. Cover and refrigerate if not serving right away.
*Adapted from The Farmers Market Cookbook (General Publishing 1984) by Anita
Stewart, Food Laureate and Jo Marie Powers, Professor Emeritus
Pulla (Finnish Sweet Bread)
This recipe comes from the Finnish community of Sointula on Malcolm Island in north coastal B.C. The Finns settled there to build a 'place of harmony' in the early part of the last century. Tuula Lewis, one of the community's beloved matriarchs, often provided many loaves of this delicious sweet bread for the local museum. When I visited the museum, before I was even allowed into the collection of Malcolm Island memorabilia, I had to have a thick slice of this fabulous cardamom-scented bread, spread with butter and wild blackberry jam…a cup of tea was also de rigeur.
For me this is a festive bread, one that is baked at both Easter and Christmas...and with luck, lots of times in between.
If you are using Instant Yeast, the method will change slightly. See Insert Below:
The yeast puff:
× ¼ cup (60 mL) warm water
× 1 tsp (5 mL) granulated sugar
× 1 package / 1 tbsp (15 mL) active dry yeast
The Dough:
× 1 cups (250 mL) granulated sugar
× 2 cups (500 mL) very hot water
× ½ cup (125 mL) warmed table cream (18%)
× 2 eggs, well beaten
× 1 tbsp (15 mL) ground cardamom
× 2 tsps (10 mL) salt
× ½ cup (125 mL) melted butter
× 6 – 7 cups (1.5 – 1.75 L) all purpose or bread flour
Egg wash made with 1 beaten egg and 2 tbsps (30 mL) water, whisked together
In a small bowl, stir the water and 1 tsp (5 mL) sugar together till sugar is dissolved; sprinkle with yeast. Let puff for 5 to 7 minutes.
Meanwhile, in a large bowl, dissolve the sugar into the very hot water. Whisk in the cream, the beaten eggs, cardamom and the salt. Add the yeast mixture, stirring to combine. Add the melted butter, combining thoroughly.
Add the flour, a cupful at a time to ensuring that it is well blended after each addition. As you add the flour beat well.
(FOR INSTANT YEAST: Into a large bowl measure the sugar and then add all the wet ingredients whisking to ensure that the sugar is dissolved. Stir in two cups (500 mL) of the flour to make a slurry. Whisk in 1 tbsp (15 mL) instant yeast, another cupful or two of flour and then add the cardamom and salt. Continue beating till the all the flour is incorporated.
When the dough is dense and stiff, turn out onto a well floured board and knead in any remaining flour. Knead for 5 – 7 minutes until the dough is smooth and elastic. If the kitchen is warm, simply cover the dough with a kitchen towel and let rise until doubled. Otherwise transfer it to a well oiled bowl, cover and let rise in a warm place for 1 ½ to 2 hours or till doubled.
Punch down and divide into four. Roll each piece of dough into a flat rectangle, about 10” (25 cm) long. Make two lengthwise cuts to within 1 “ (2.5 cm) of the end of the rectangle. Braid the dough, pinching the loose ends tightly. Place on a parchment-lined baking sheet. Let rise a second time for about 50 to 60 minutes. Brush with egg wash and bake in a preheated 350’F oven for 25 – 30 minutes.
Makes 4 braids.
*Recipe is from Anita Stewart's CANADA: The Food, The Recipes, The Stories (Harper Collins Canada 2008/2014)
Going Savoury..
This recipe comes from Shawna Gardham in BC :
Shawna Gardham, Executive Director, Chefs' Table Society www.chefstablesociety.com
If you are like me, you have dried lentils and beans in your cupboard that have been neglected for ages. So here is a recipe to help..
Red Lentil Soup – 6 servings
1 cup red lentils, soaked overnight and drained
6 cups water or chicken broth
2 medium onions grated
2 carrots grated
1 tsp paprika
salt to taste
2 tbsp butter
2 cups tomato juice or 2 tbsp tomato pasted diluted in ½ cup cold water
Dressing
1 tbsp butter
½ tbsp paprika
Place lentils, water or broth, onions, carrots, paprika and salt into a saucepan. Cook until lentils are tender.
Remove from heat and press through a sieve or blend in a food processor or in a blender. (I like to use a hand blender right in the pot).
If you used the food processer or sieve put the liquid back in the saucepan.
Add butter and tomato paste and bring to a boil.
The consistency of the soup should be creamy.
Dressing – melt butter in a pan, add ½ tbsp paprika, stir and trickle over the soup.
|
|
|
|||
|
From Joy Shinn : Beet Wellington This is a vegan recipe I make for my daughters. I've been making a lot lately for some reason - but despite it's name and list of ingredients, it's pretty easy and flexible with ingredients. (Ingredients below with measures, but for the most part, not essential to have exact amounts) Bake the beets in oven to fully cook. Unpeeled, in foil or not. Good to have beets equalish size. 4 or 5 depending how big. While cooking finely dice the onions or shallots or leeks (whatever you have)/garlic & mushrooms -and fry in pan until nicely browned. If you have some spinach, fresh or frozen throw in pan until just warmed. Season with rosemary, or thyme, salt, pepper. If have panko you can add 1/4-1/2 cup to this. Also throw in some chopped walnuts (or pecans in lieu). Then set aside and have a sip of wine. When beets are cooked, slip of skins and chop off ugly ends if haven't already. Take your puff pastry sheet and lay flat on pan (to save hauling it over later). On the left long edge, spread some vegan cheese, or Boursin, feta or similar (optional) and then lay out 2/3 of the mushroom mixture on top. Arrange the beets on top of this (touching). Then add the remaining 1/3 mushroom mix on top of the beets. Likely it will fall between the beets but that's ok. If you have balsamic reduction you can drizzle 1-2 tbsp over the top of the beets, or just plain balsamic. Then cover the beets+ with the other side of the puff pastry and crimp the edges. That's it other than bake in oven mainly to warm the inside and cook puff pastry as everything else is cooked. Have more wine while you wait! Of course, you can sub the veg for other things you have like zucchini, squash, etc or apples. Most goes well with beets. INGREDIENTS · ½ cup walnuts
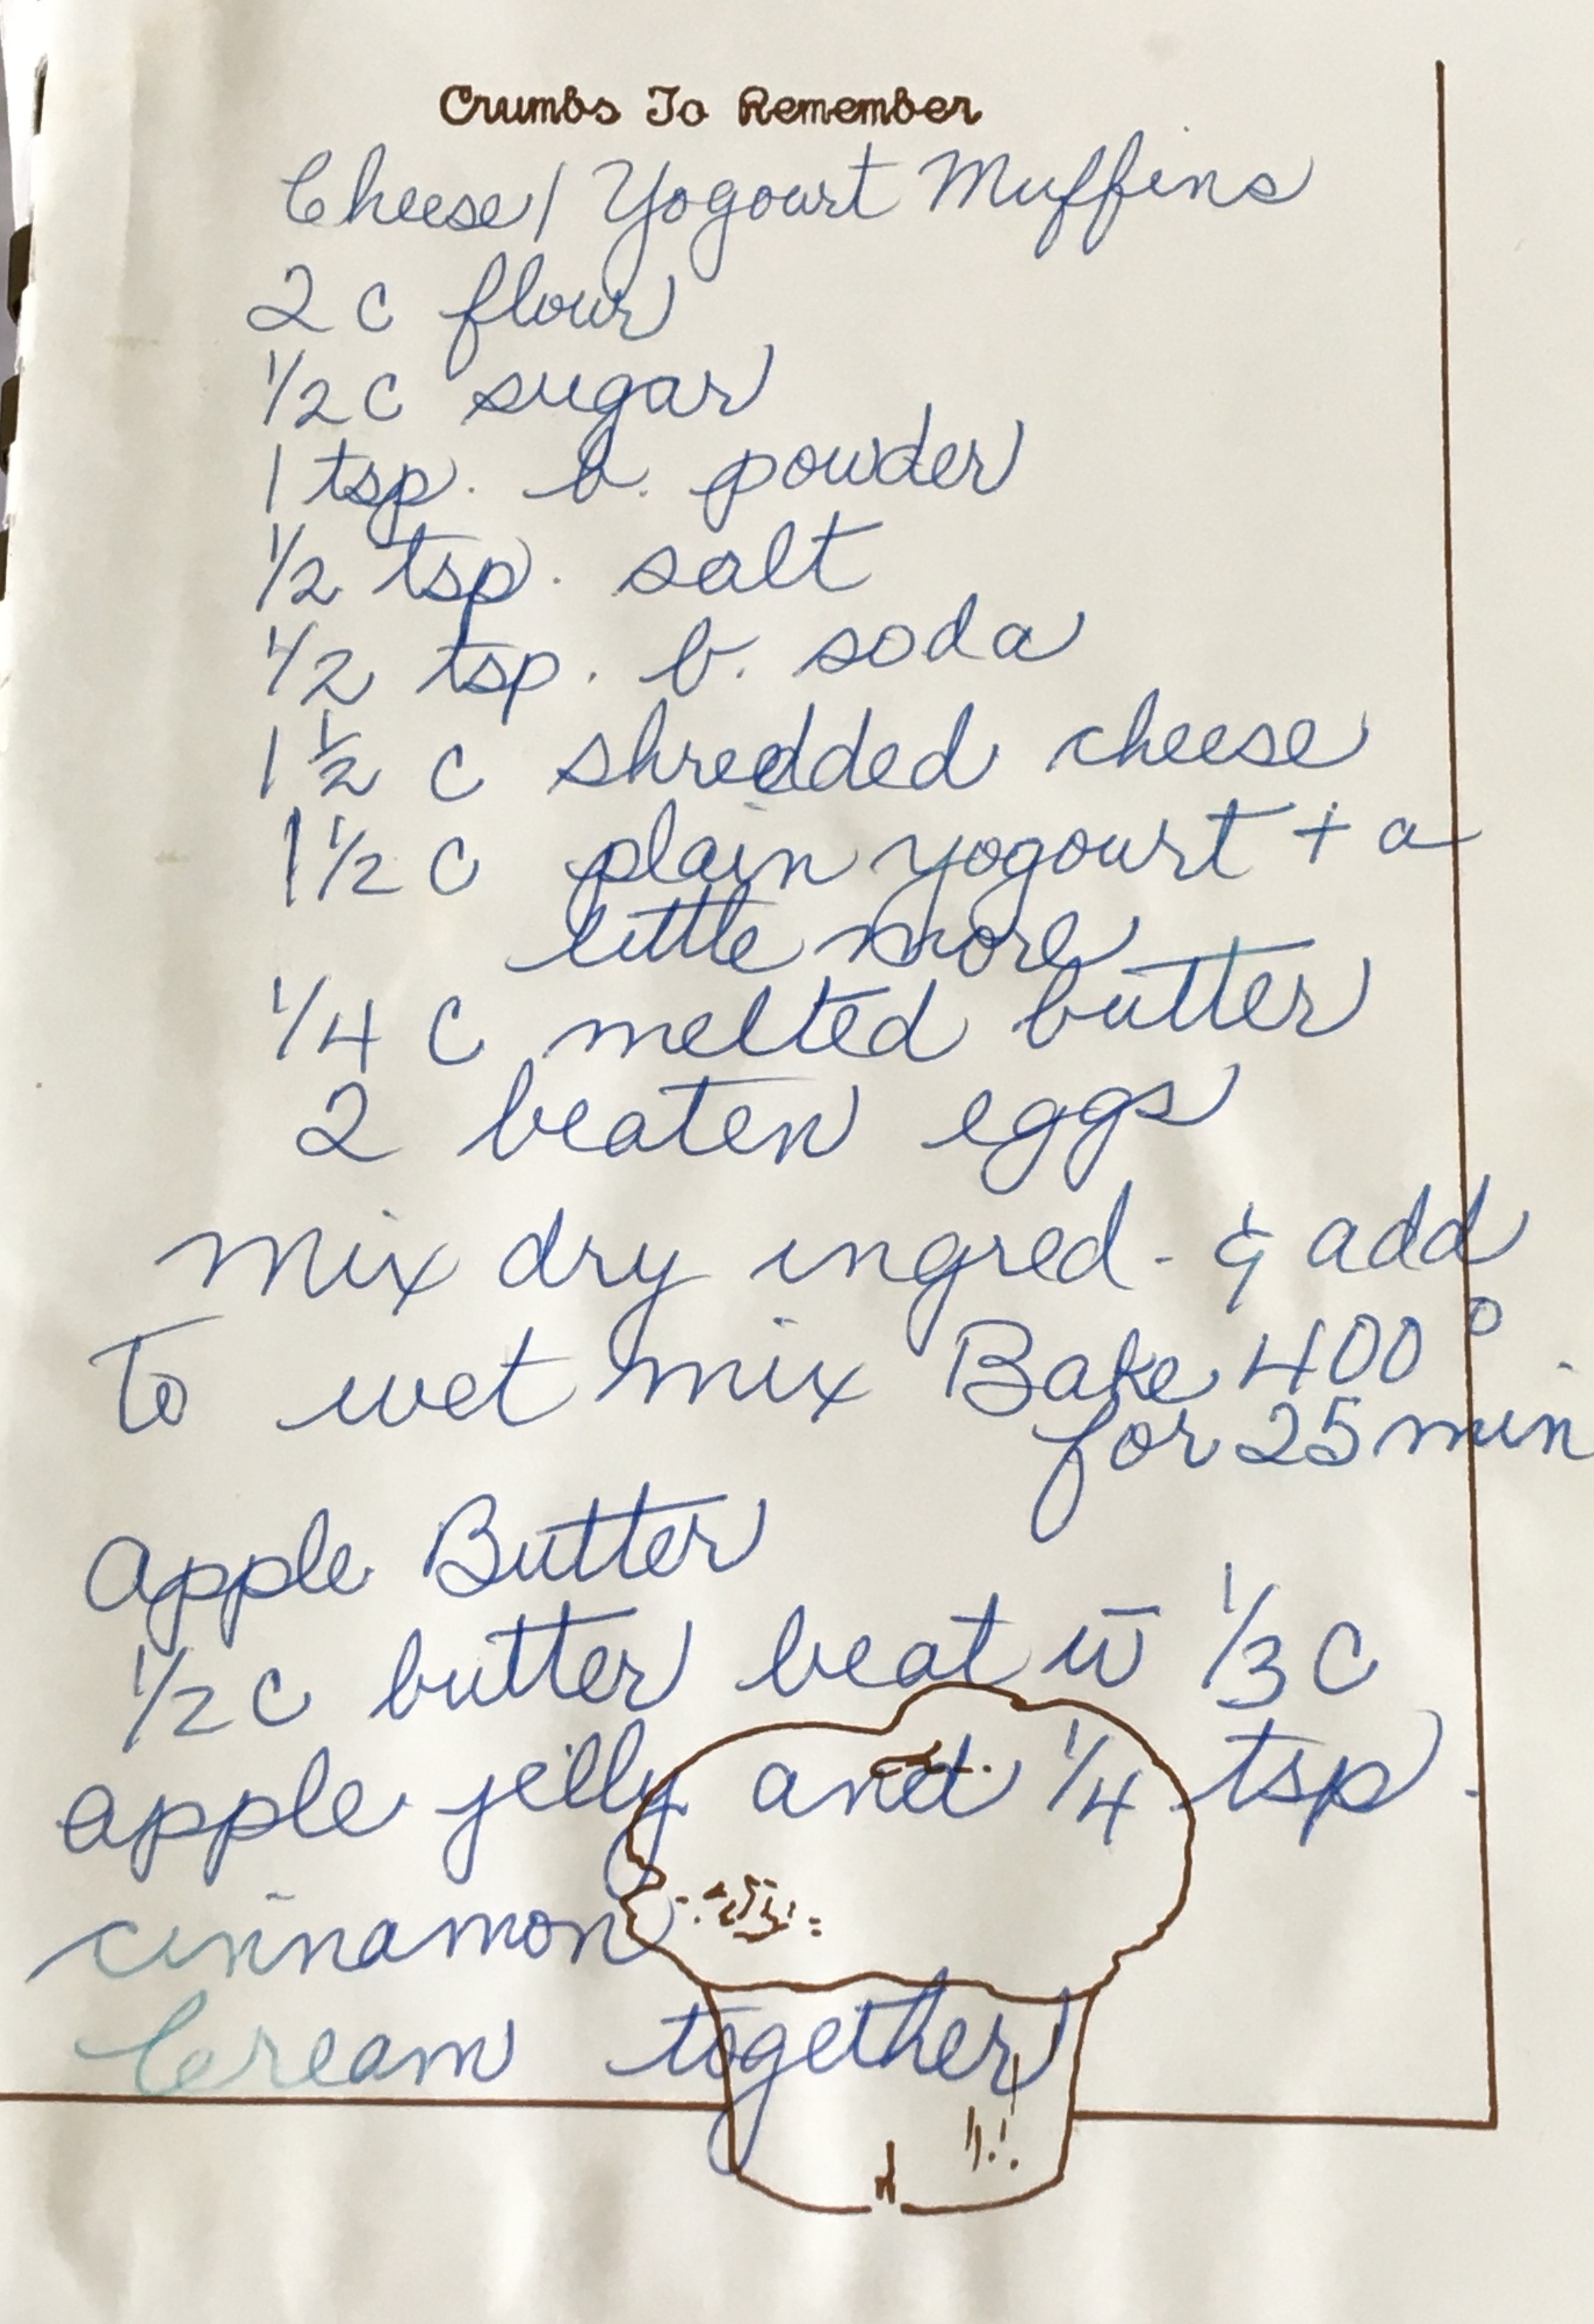
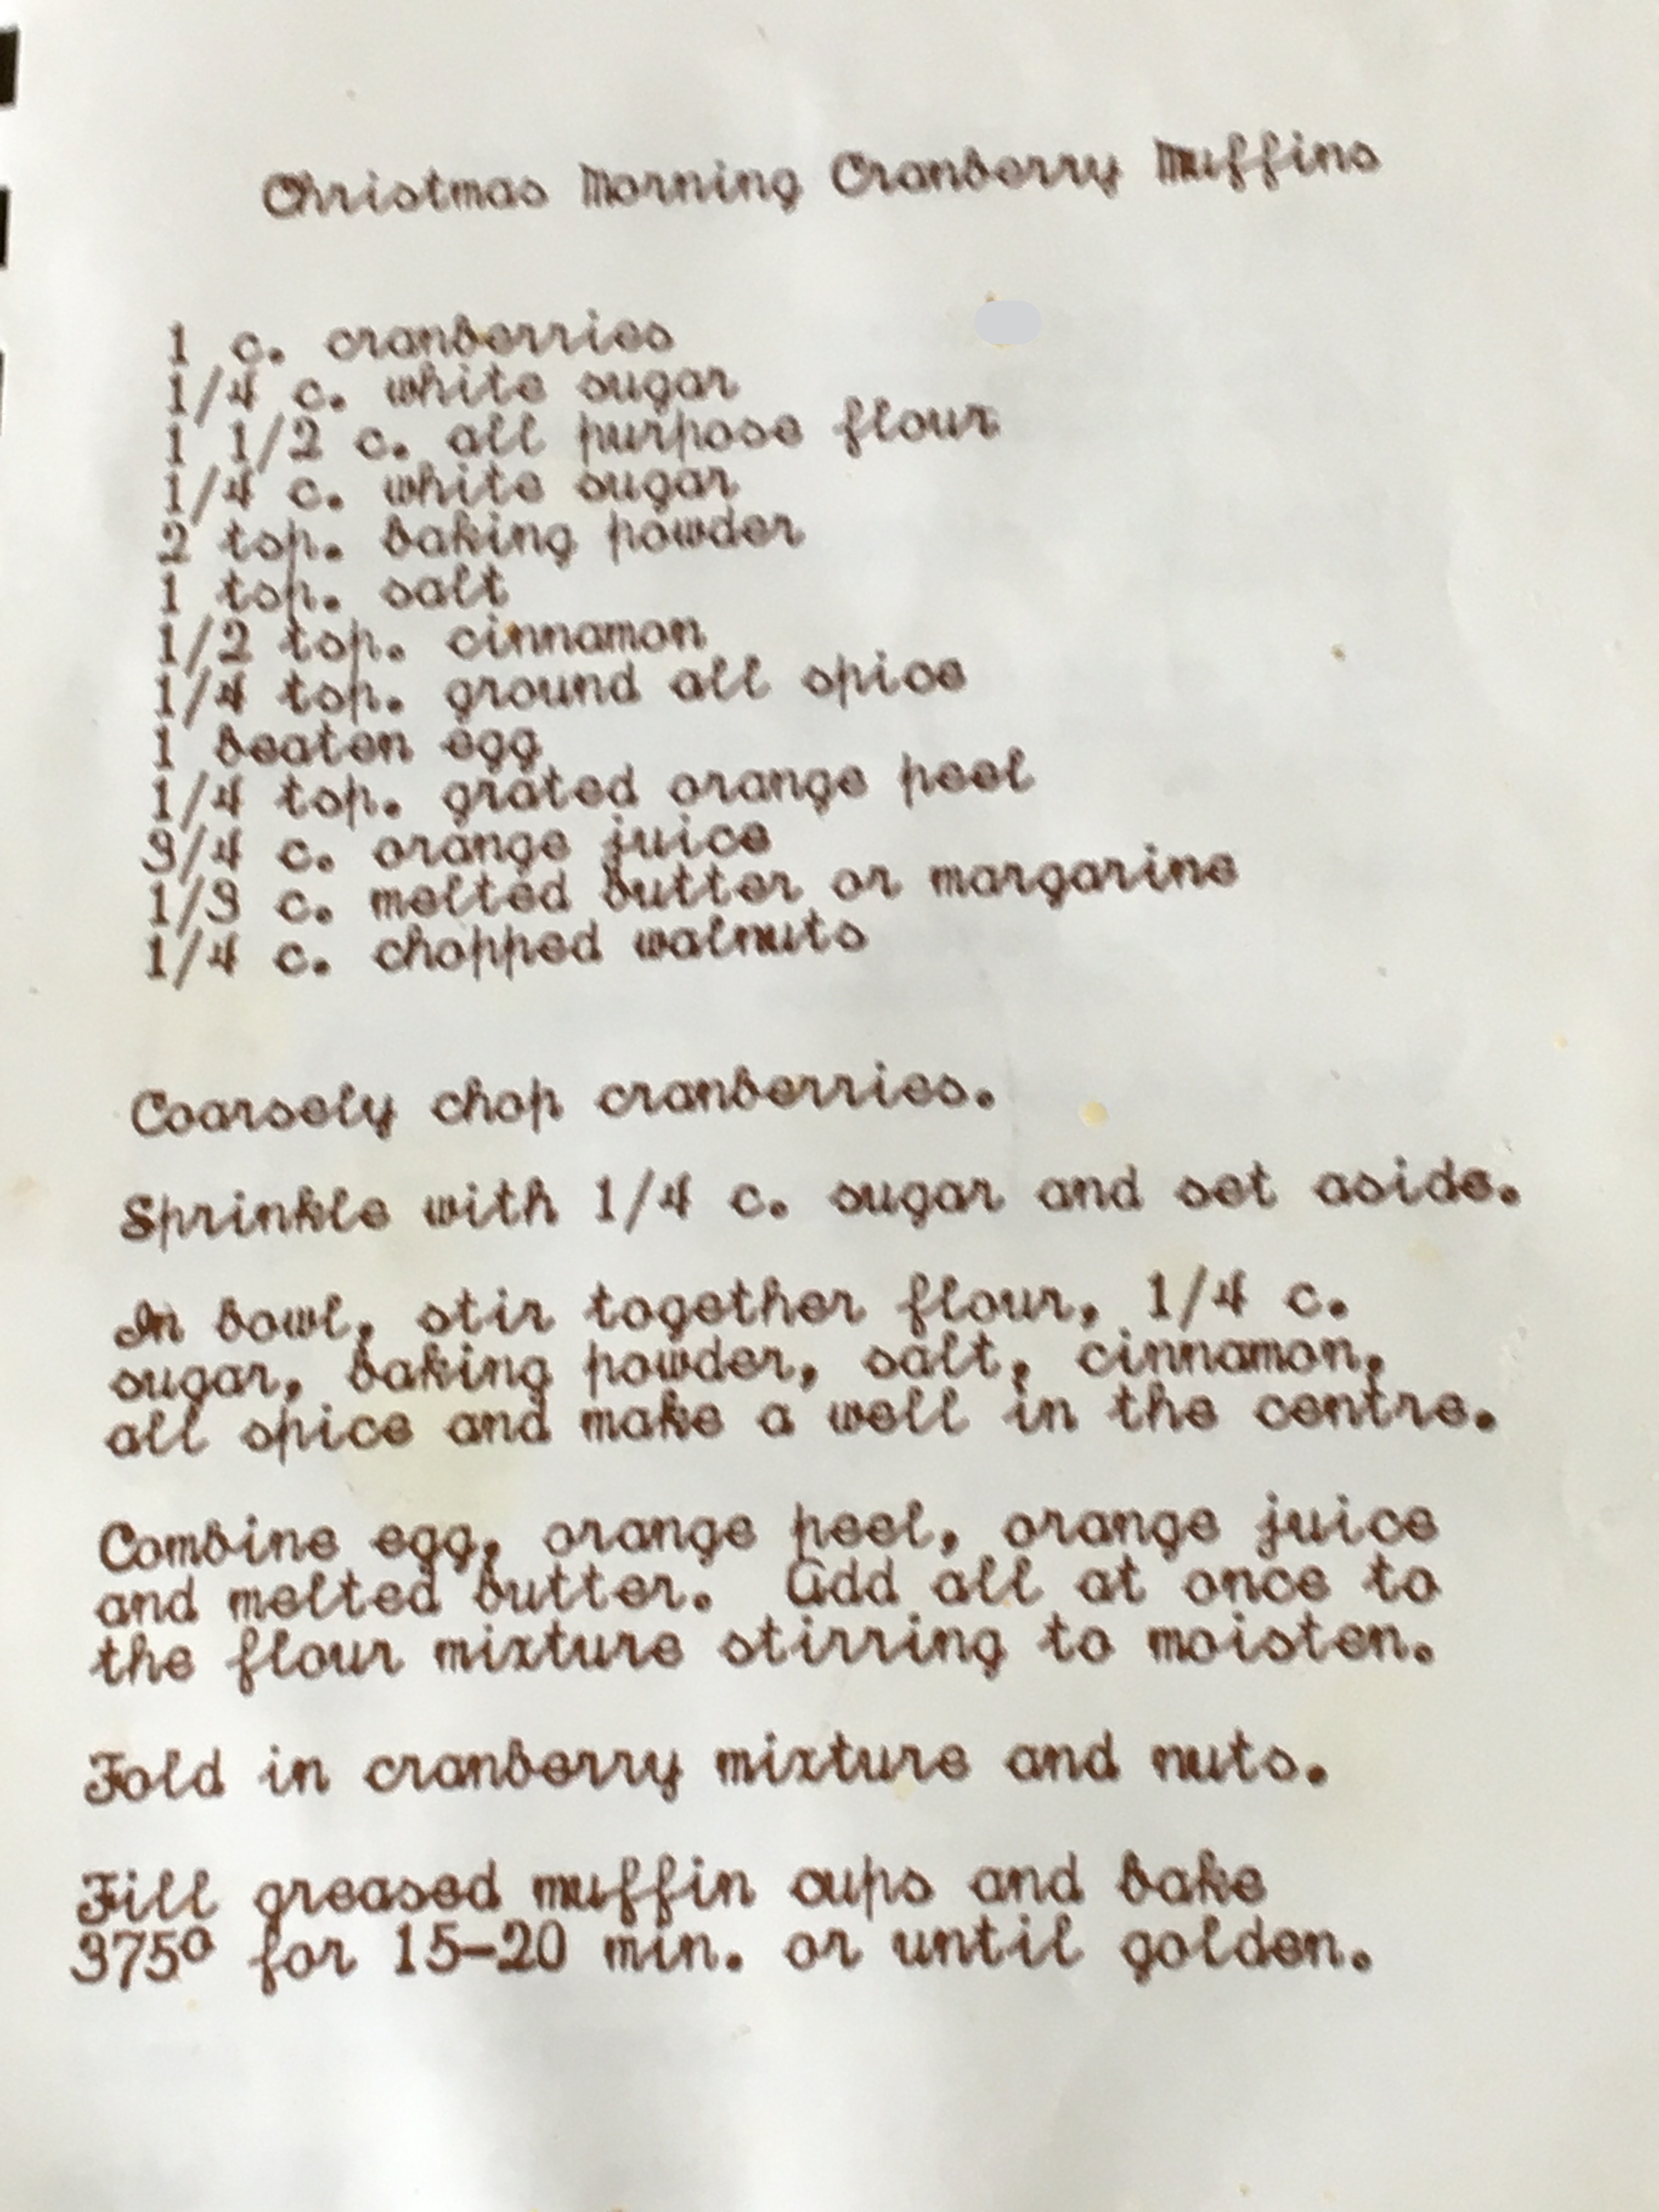
From Susan Vardy: I’ve attached a couple of muffin recipes that we really enjoy. The Christmas Morning Muffin Recipe – I’ve been making every year since Christmas morning 1985 - I have a little note on the recipe! I’ve also made them with blueberries and a local berry here in Newfoundland called partridgeberries. I try to keep cranberries in my freezer- it’s one of our go to recipes. The other cheese yogourt muffin recipe we enjoy as well- I don’t make the apple butter very often though. |
||||
Here are a couple of my own :
Buckwheat crepes (and/or Fried cheese)
Chef Nancy Hinton, Les Jardins Sauvages
I love buckwheat and we live right next to a mill, so that explains it as a back-pocket recipe for me. Plus it’s versatile in that you can just make crepes, straight up or stuffed, either savoury or sweet. Or use the batter to coat and fry cheese, which has been one of my classics for years.
8+ portions
1 cup buckwheat flour *or substitute half regular flour and another nutty flavourful flour of choice ..
1/3 cup AP flour
3 eggs
¾ cup milk
2Tbsp melted butter (+ s.q to cook crepes).
Pinch salt
Pinch sugar if so desired
Water s.q.(to desired consistency)
(s.q.=sufficient quantity)
Optional : A semi-firm ripened cheese that melts well ex. swiss/gruyere, cheddar, gouda style – cut into 2cm thick squares/pieces (50-60g ea)..
Make crepe batter by mixing dry ingredients together and wet ingredients separately (eggs and milk), then slowly mixing the wet into the dry while whisking, until smooth. Whisk in the melted butter. Let the batter rest for 30min at room temperature or longer in the fridge.
When ready to cook, adjust the consistency with some water. (up to about 1/2cup, like the flow of cream for a thin crepe).
If you’re frying cheese, keep the batter on the thick side, you probably won’t want to add much water. Lightly coat cheese pieces in flour then dip in batter and fry like a pancake.
Cook your crepes (or crepe coated cheese) in butter on medium-high heat to start, lowering heat when necessary, flipping when nicely set and coloured, a minute or two per crepe. For fried cheese, leave a minute more on low heat until cheese is warm/starting to melt. (Or you can finish/ reheat later in oven).
To serve, you can go savoury or sweet: Stuff or top your crepes with ham, eggs, cheese, tomato, cooked spinach or mushrooms etc, a dash of maple syrup, or with fruit and ricotta, jam.. I like to layer them in a vegetable ‘lasagne’ too.
If frying cheese, serve with pickles or on a salad with a punchy vinaigrette, or again with fruit preserves like cloudberry jam..
Use up any extra batter to make crepes for the freezer! Wrapped well, they freeze nicely/keep well.
Dorie Greenspan’s Apple Custard Cake
A grand dame of the sweet kitchen, Dorie Greenspan refers to this cake/pudding as ‘custardy apple squares’, one of her back-pocket recipes, and it has become one of mine. It’s not too sweet, the kind of thing that can serve as breakfast, a snack or dessert. I like it plain and cold/room temperature, François likes it warm with (whipped cream/ice cream) .
Nancy Hinton
in 2020, Covid, NFLD, confinement cooking, cupboard recipes, easy recipes, newfie recipes, recipes
|
Post a Comment
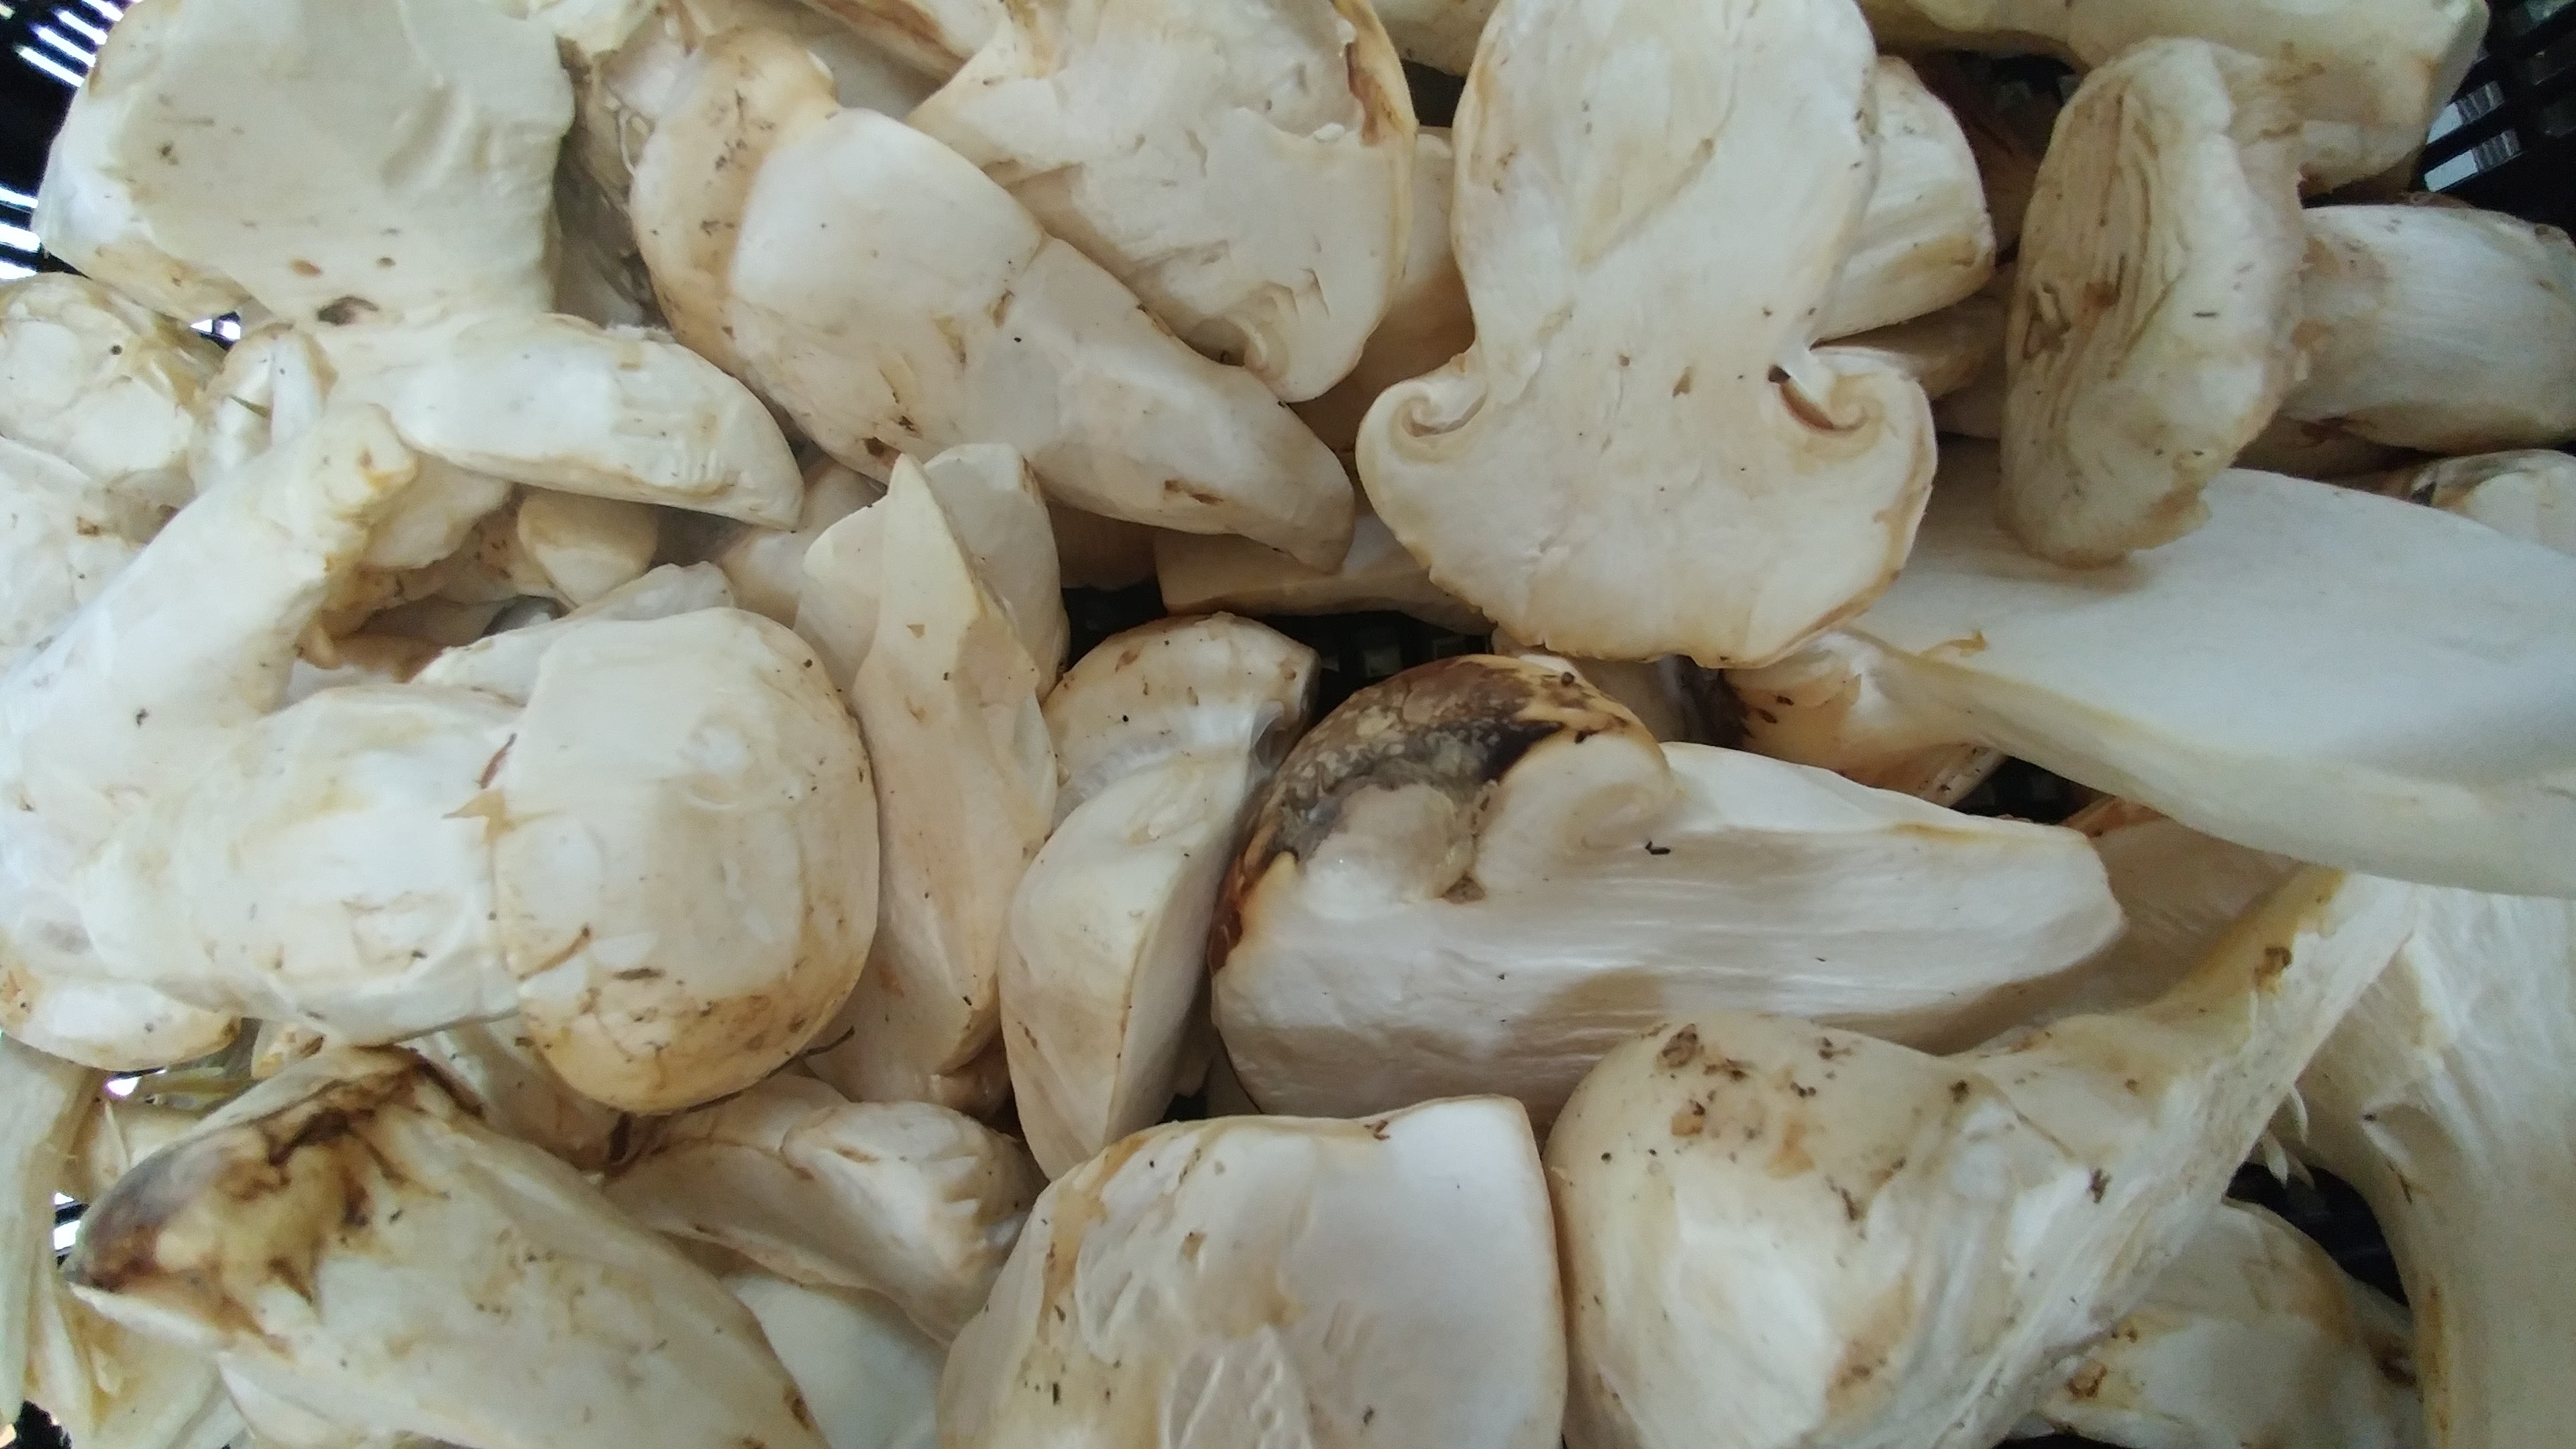
Fall Mushrooms and Puffballs
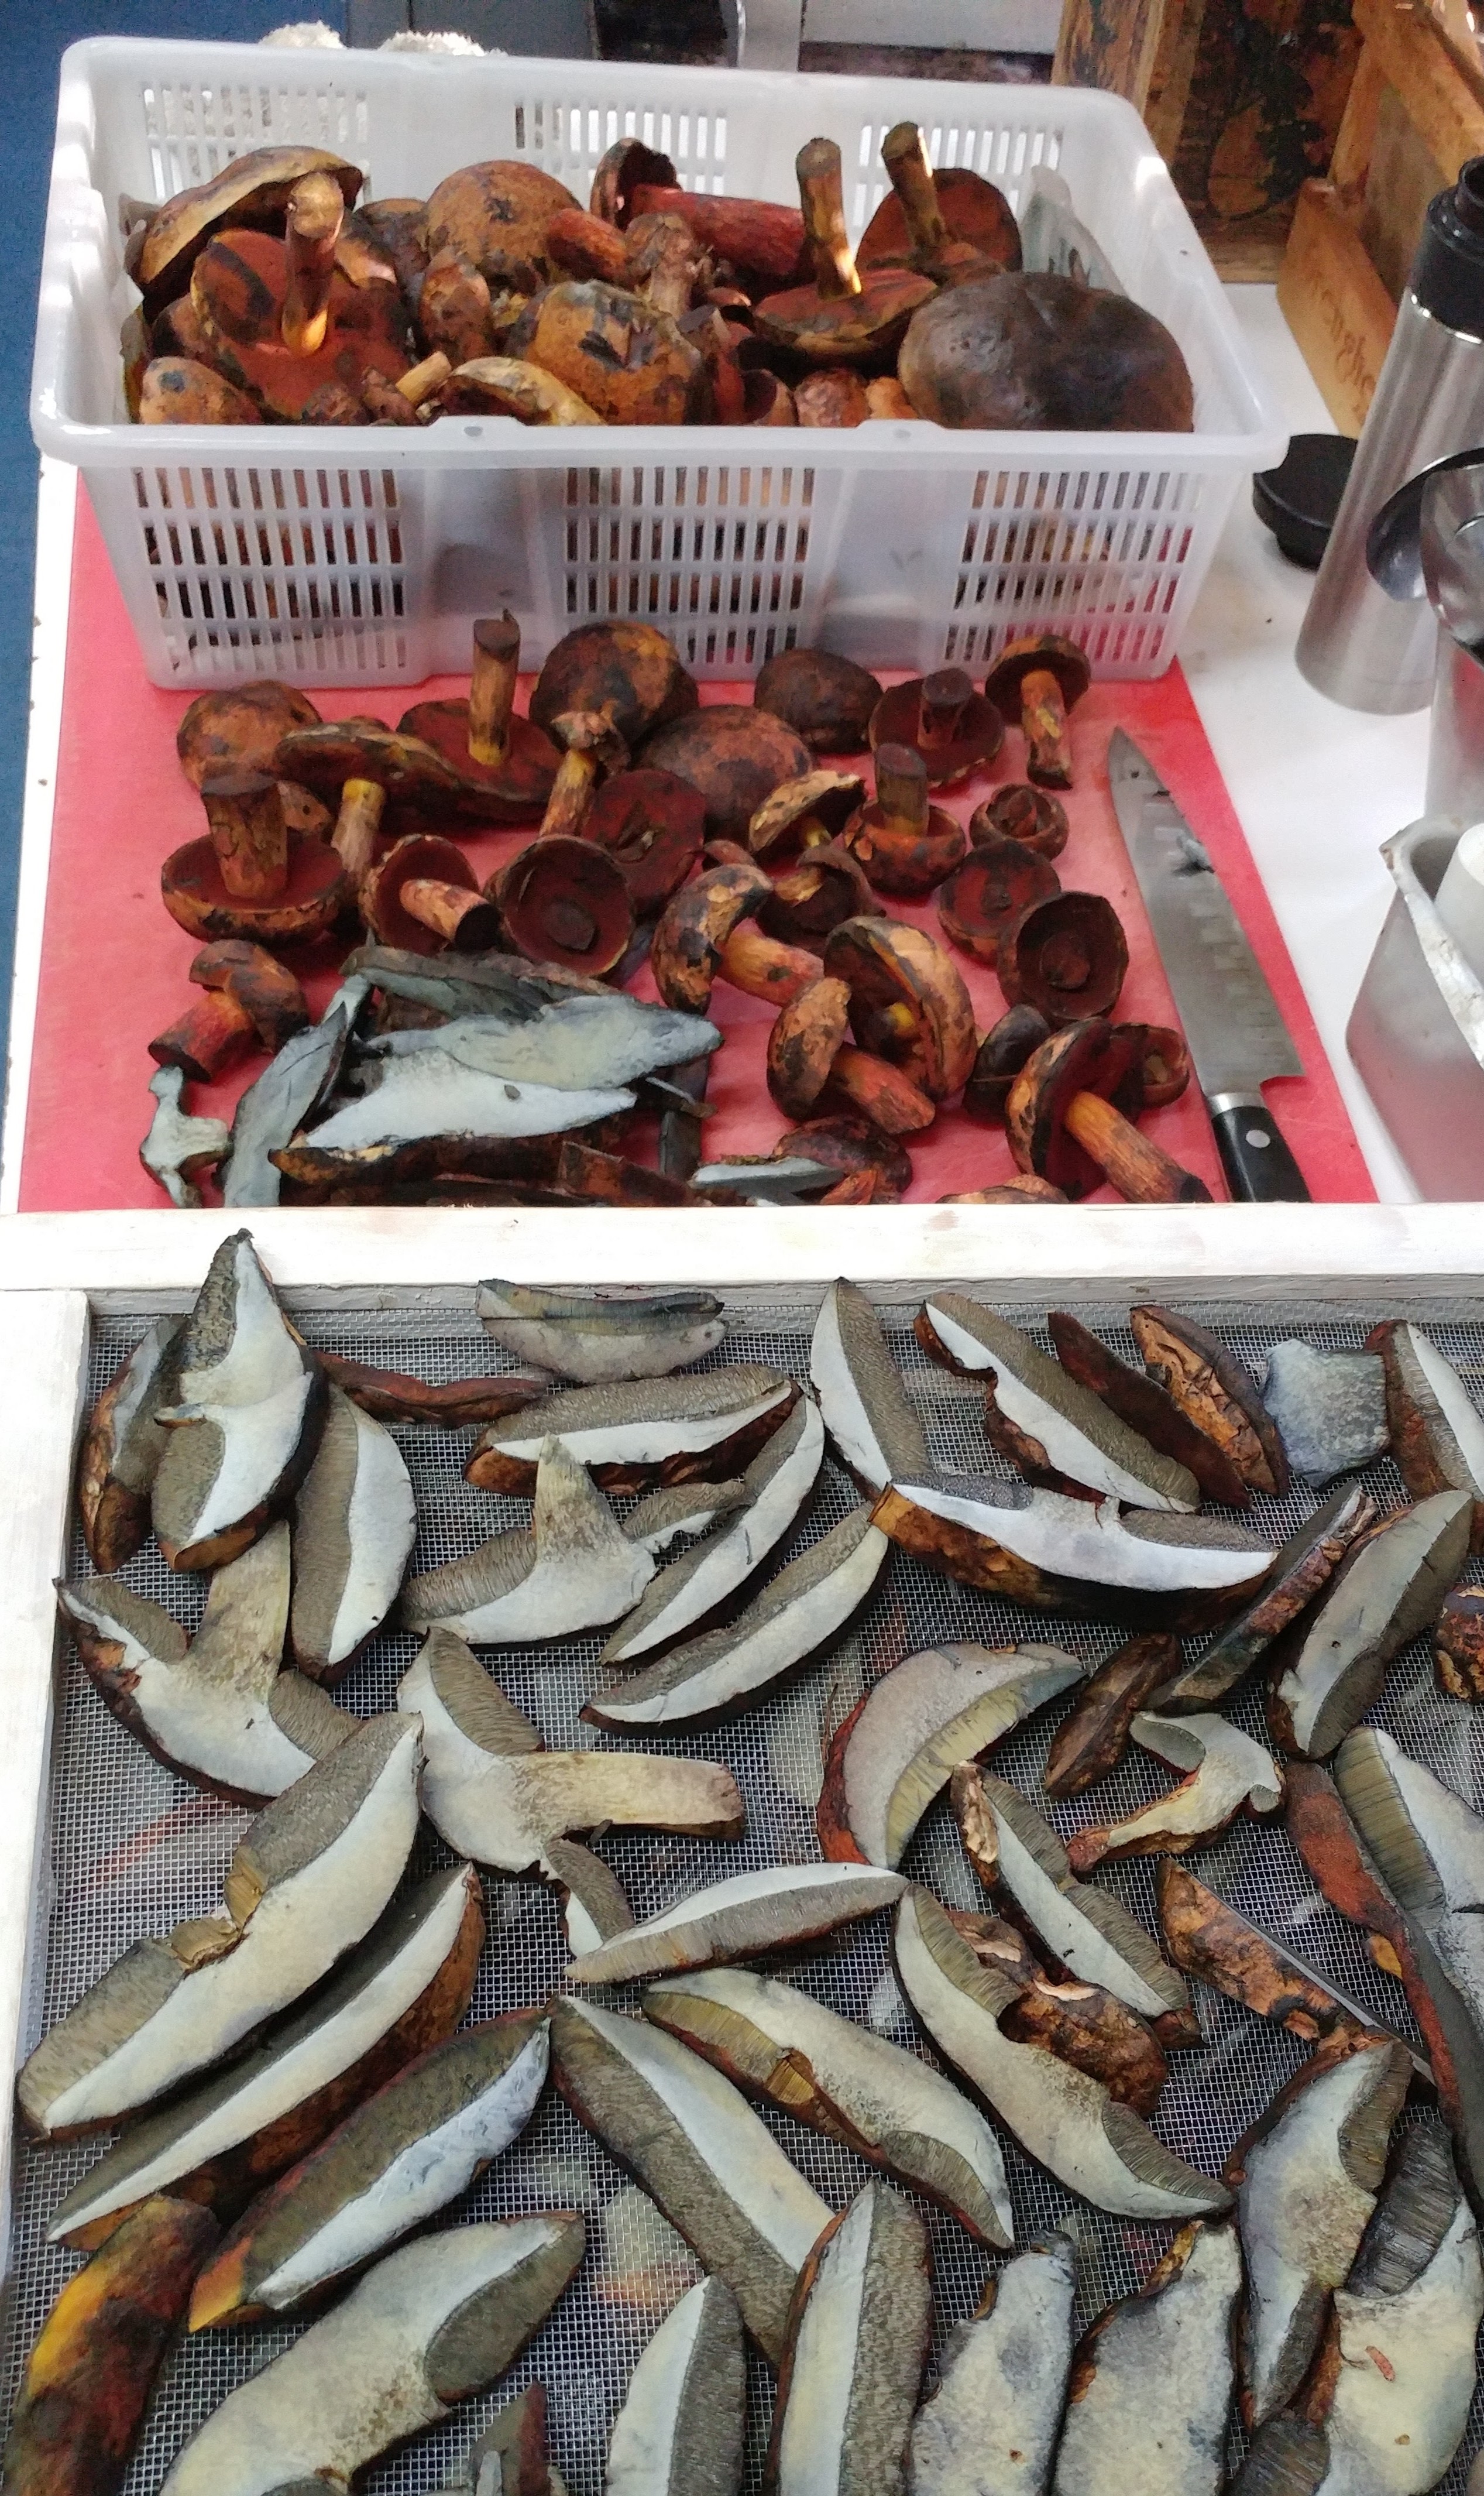
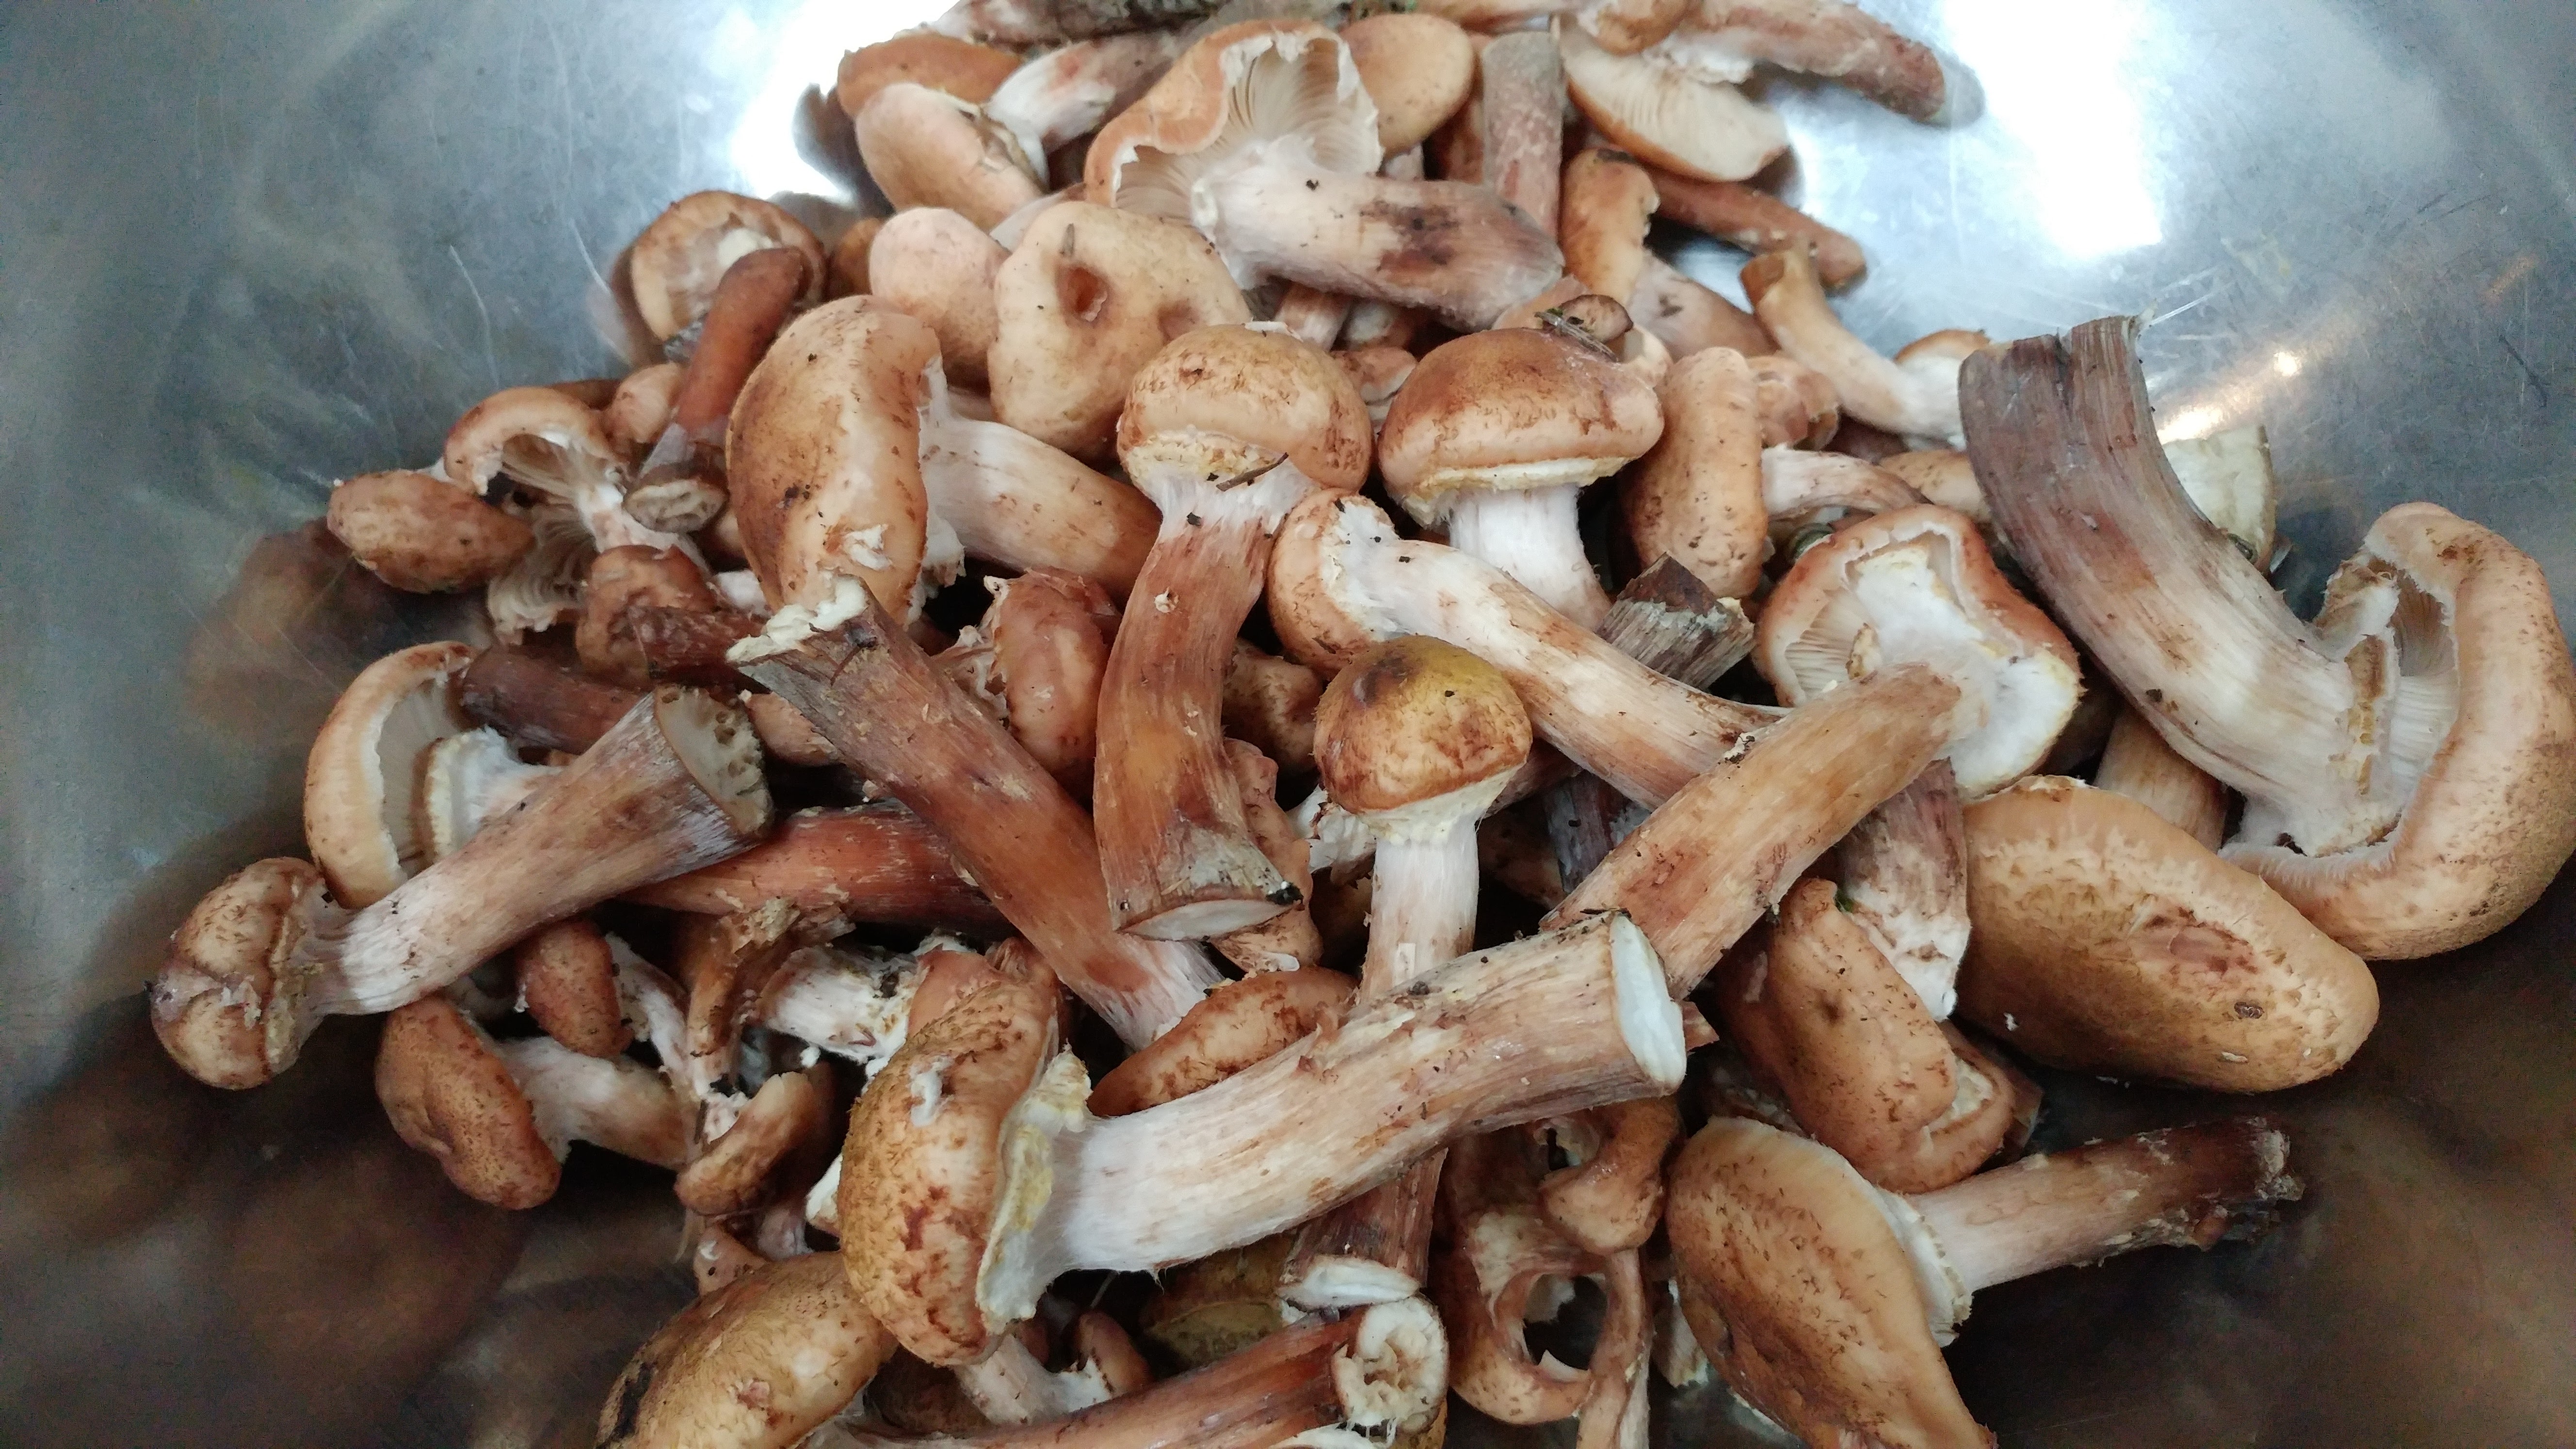
Finally, the local wild mushrooms are out in full force!
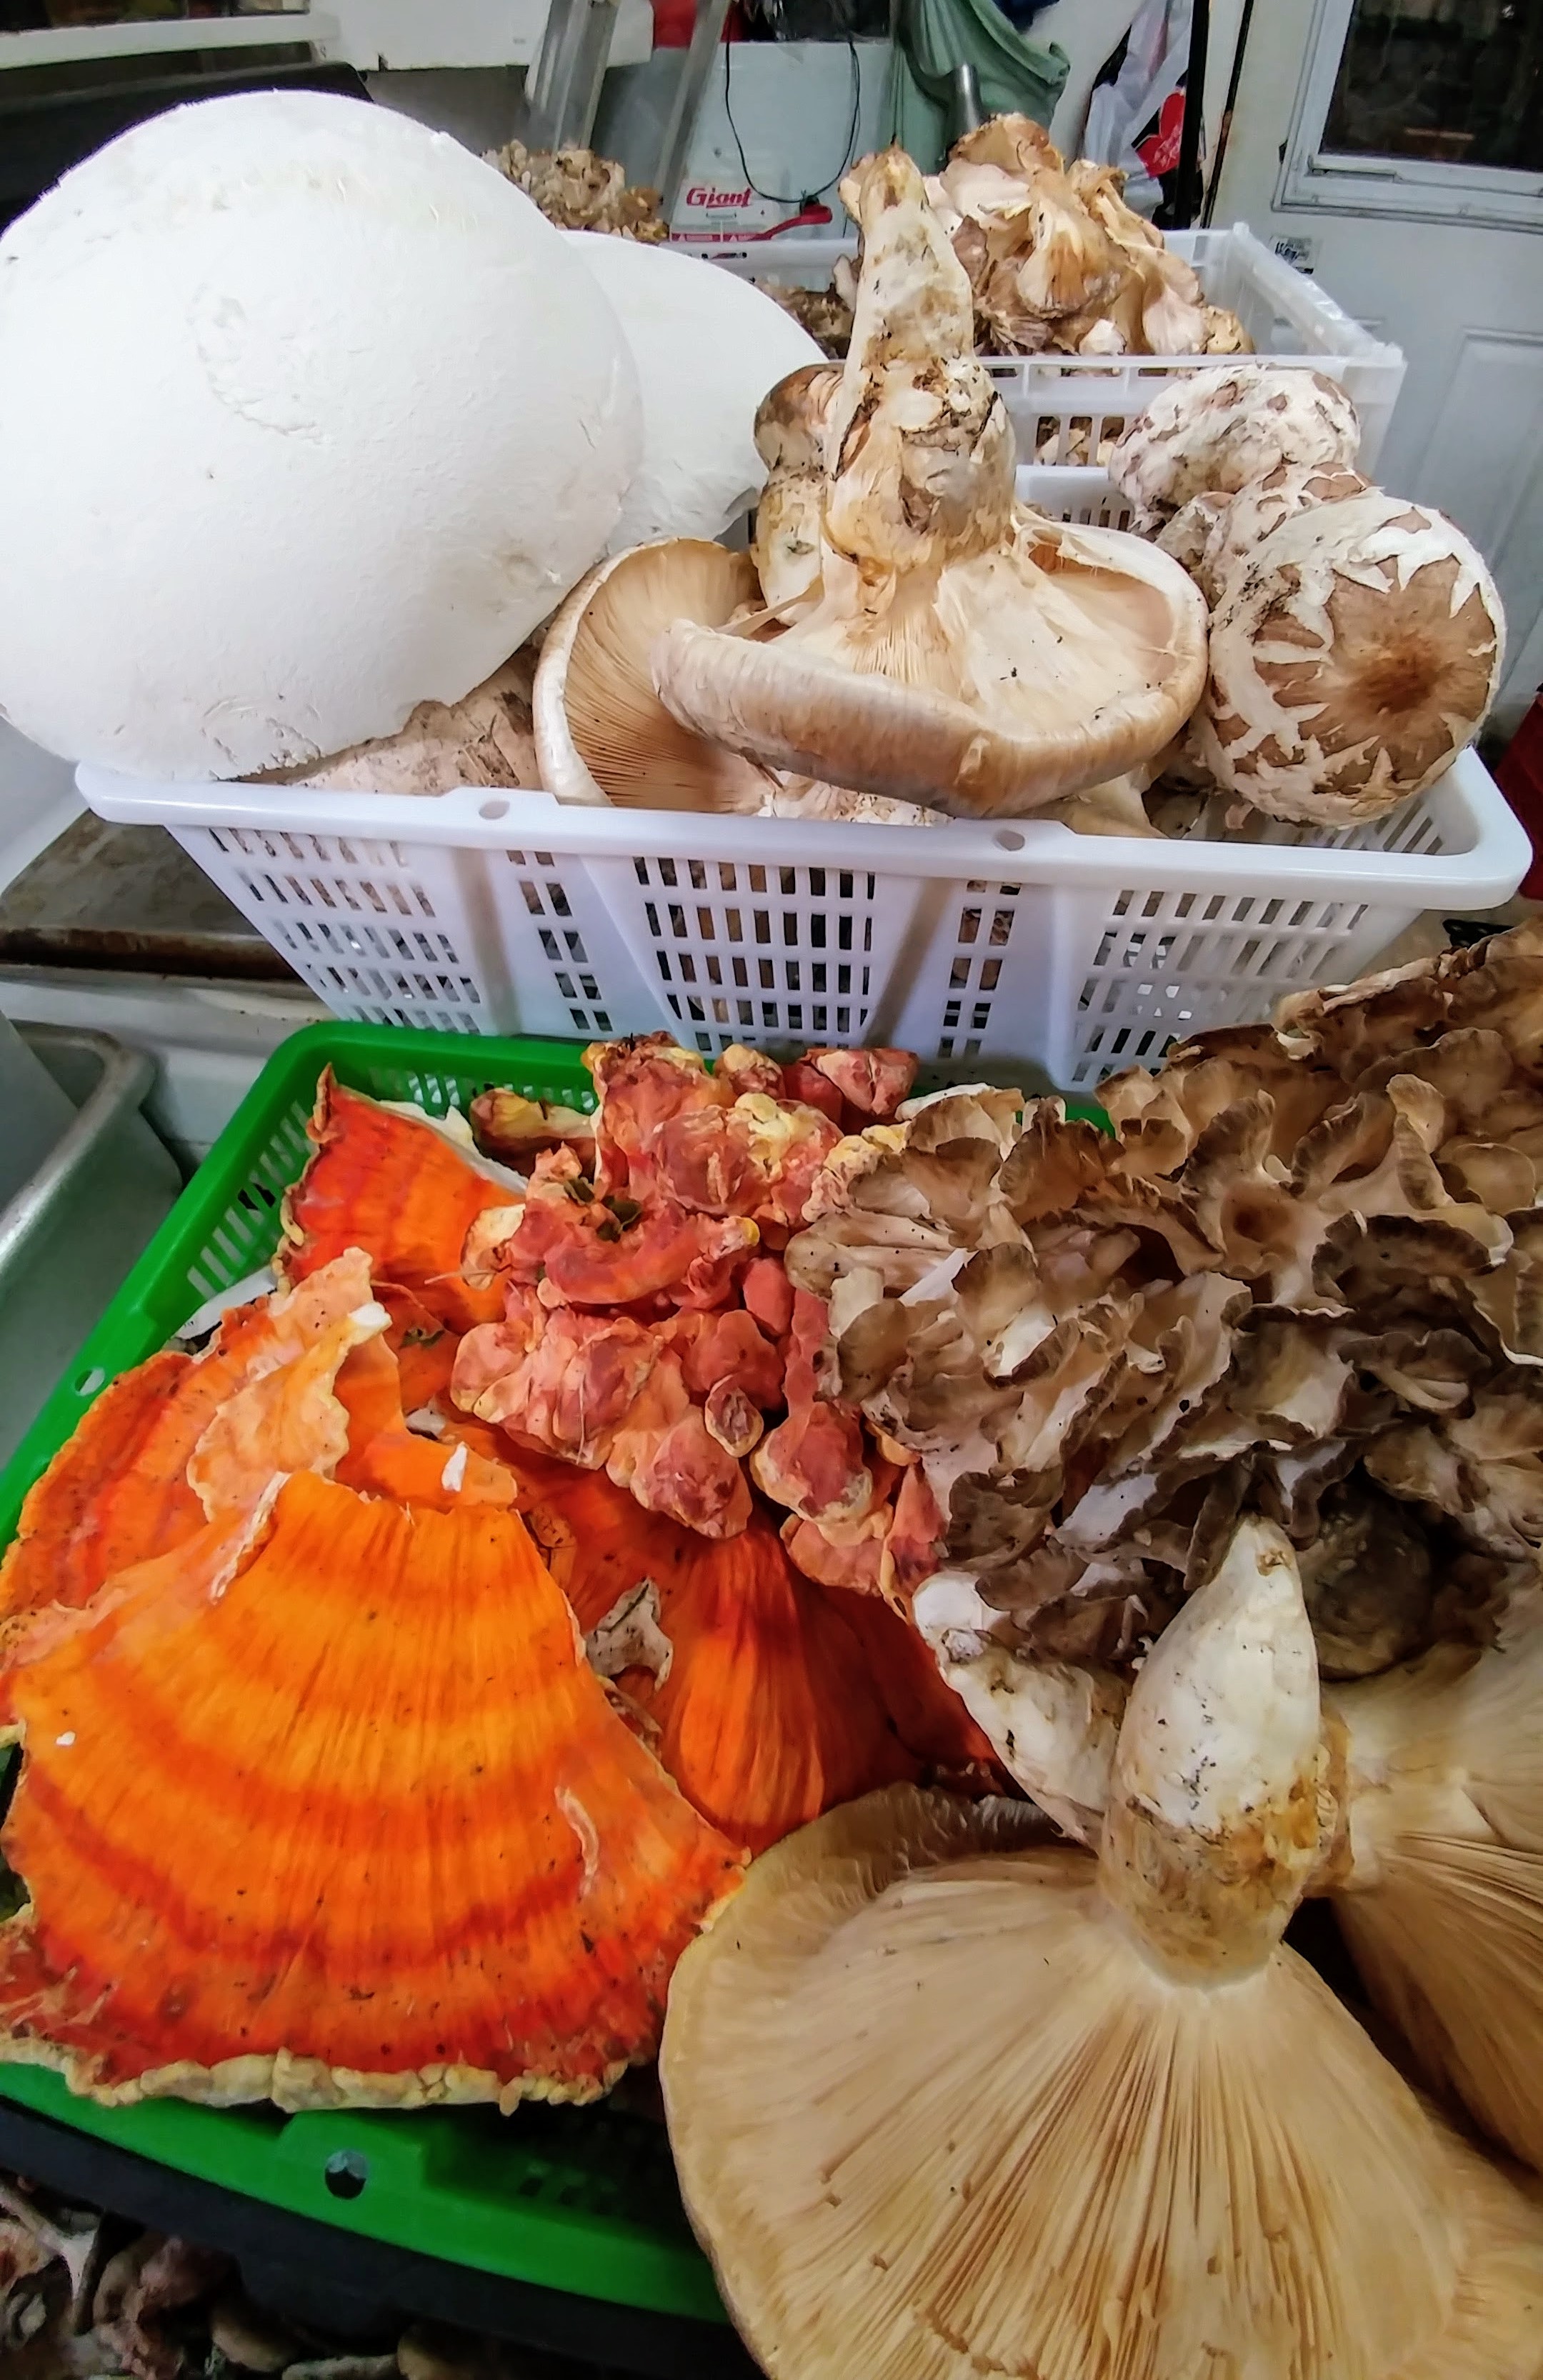 An autumn day harvest
 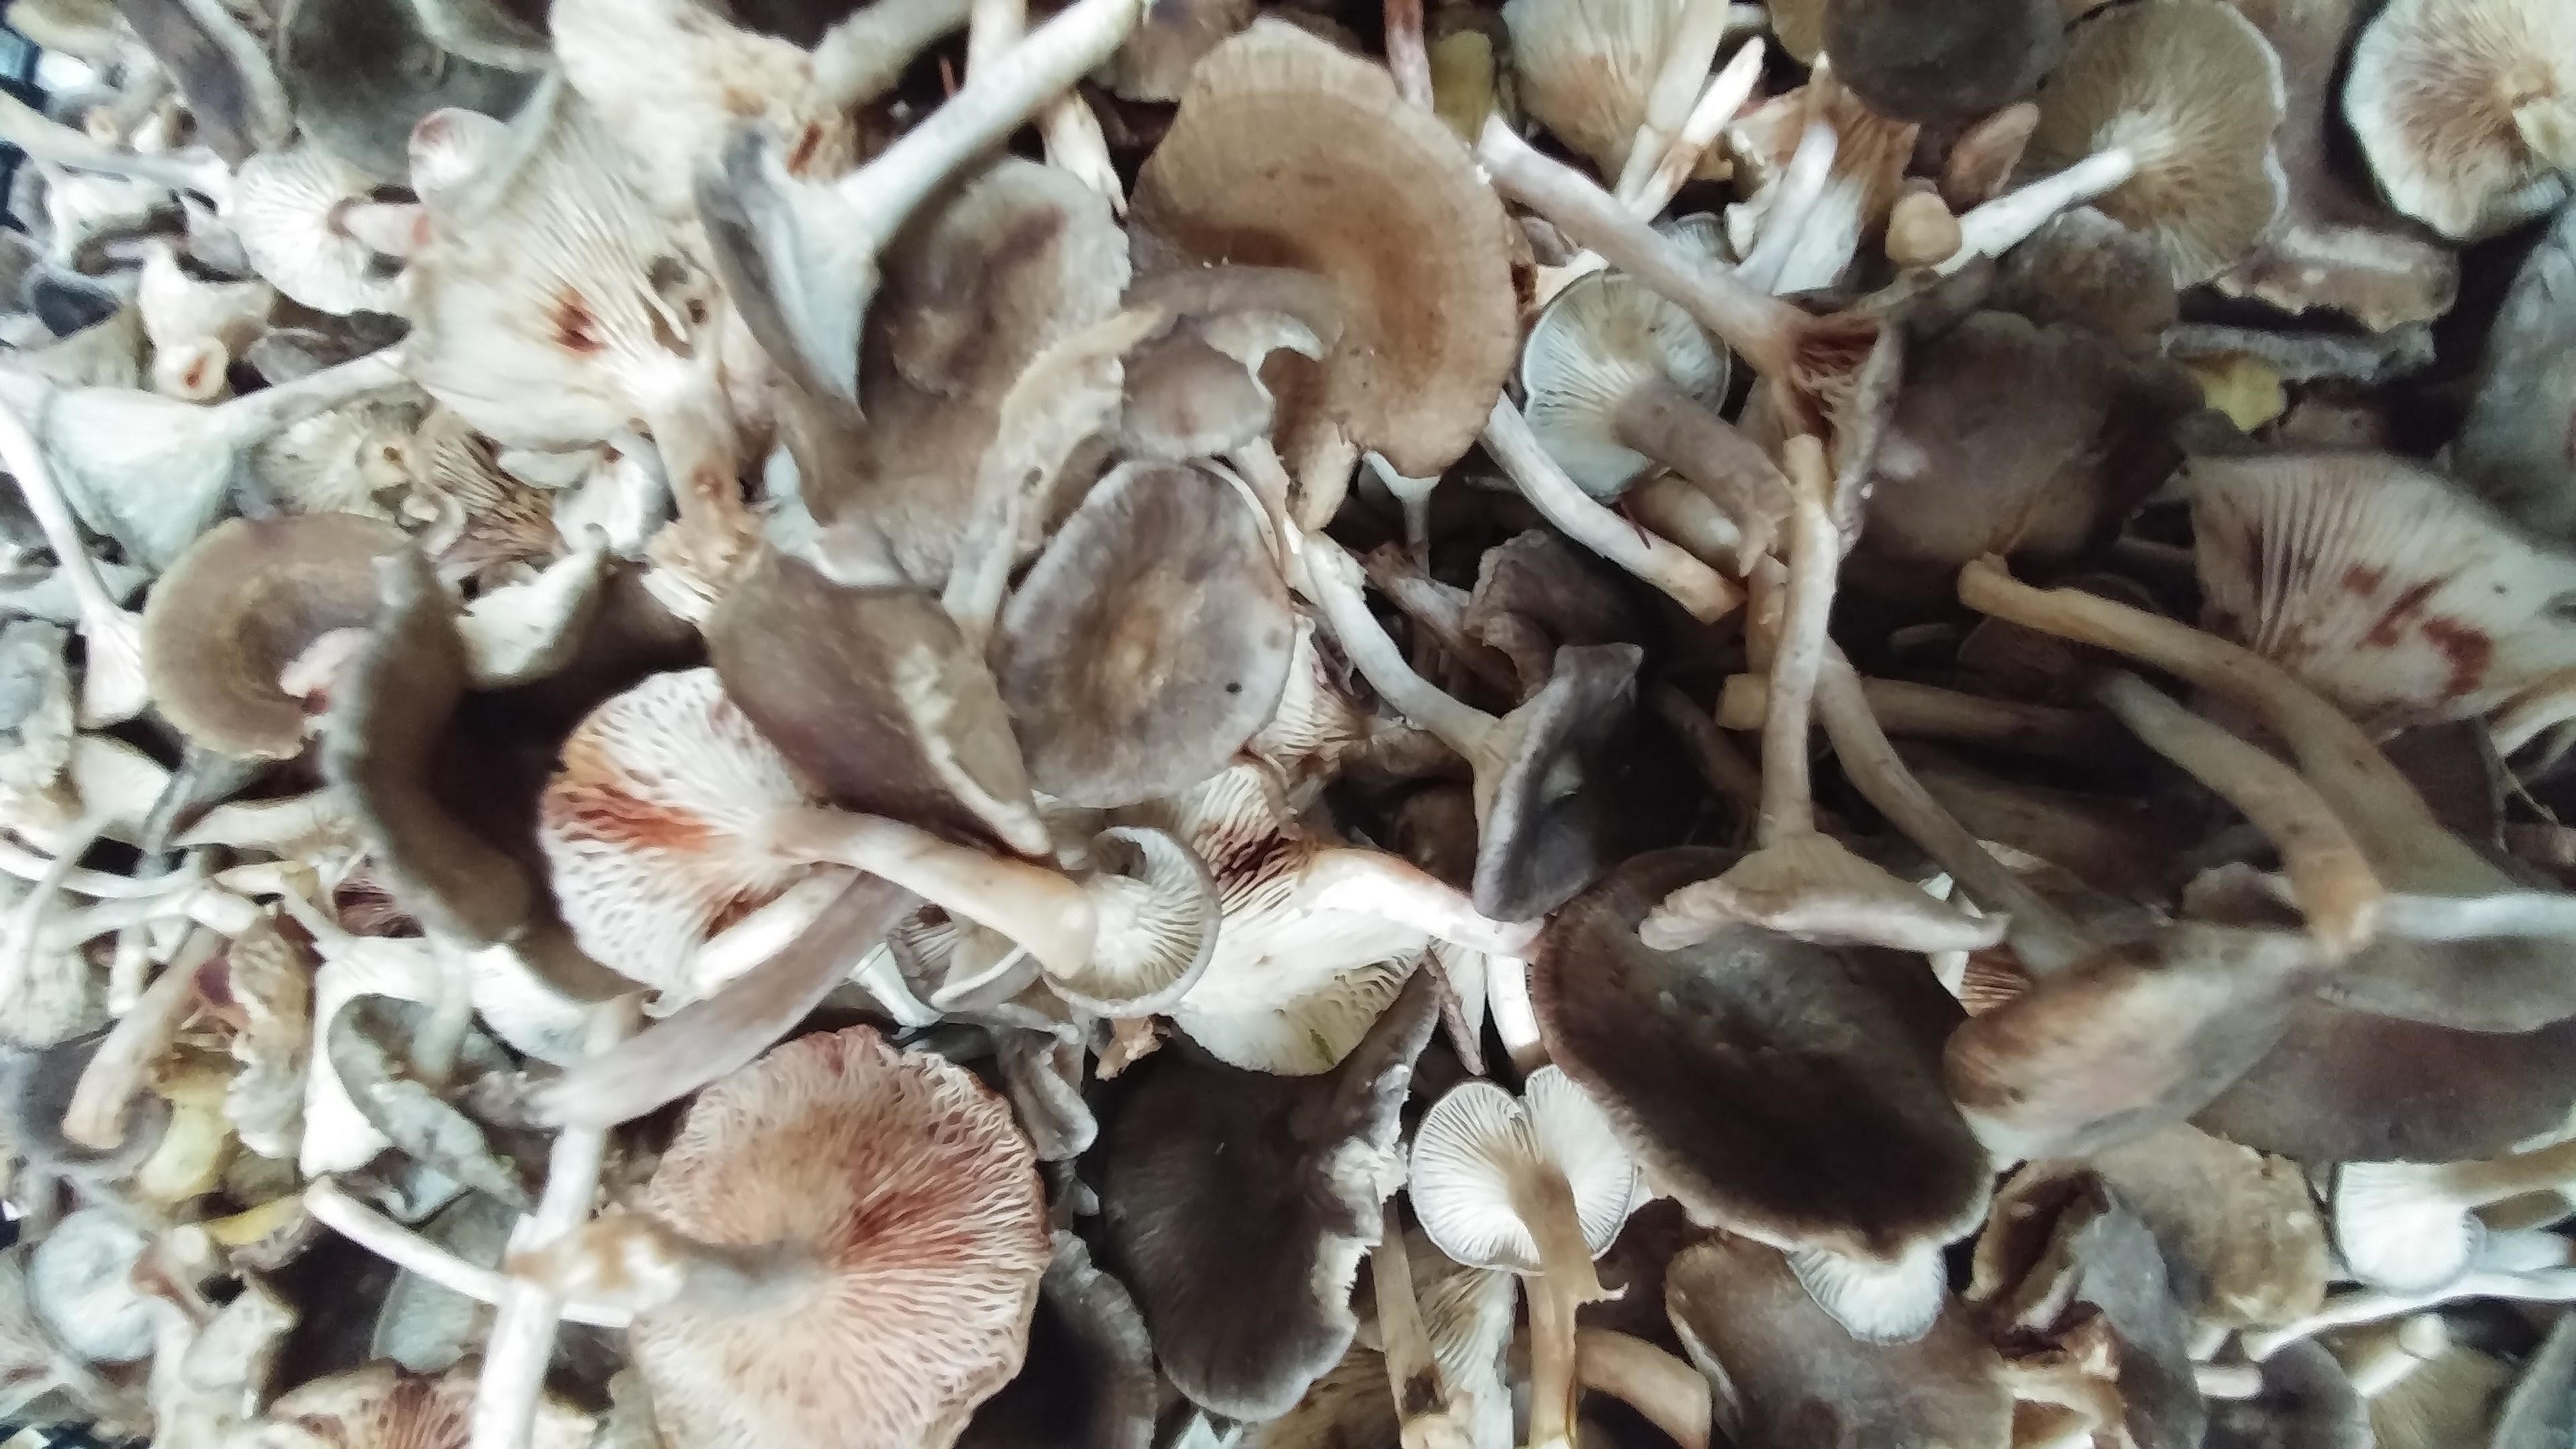 graylings - a rare treat in the chanterelle family
 Armillaire pesant; Swollen Stalked Cat
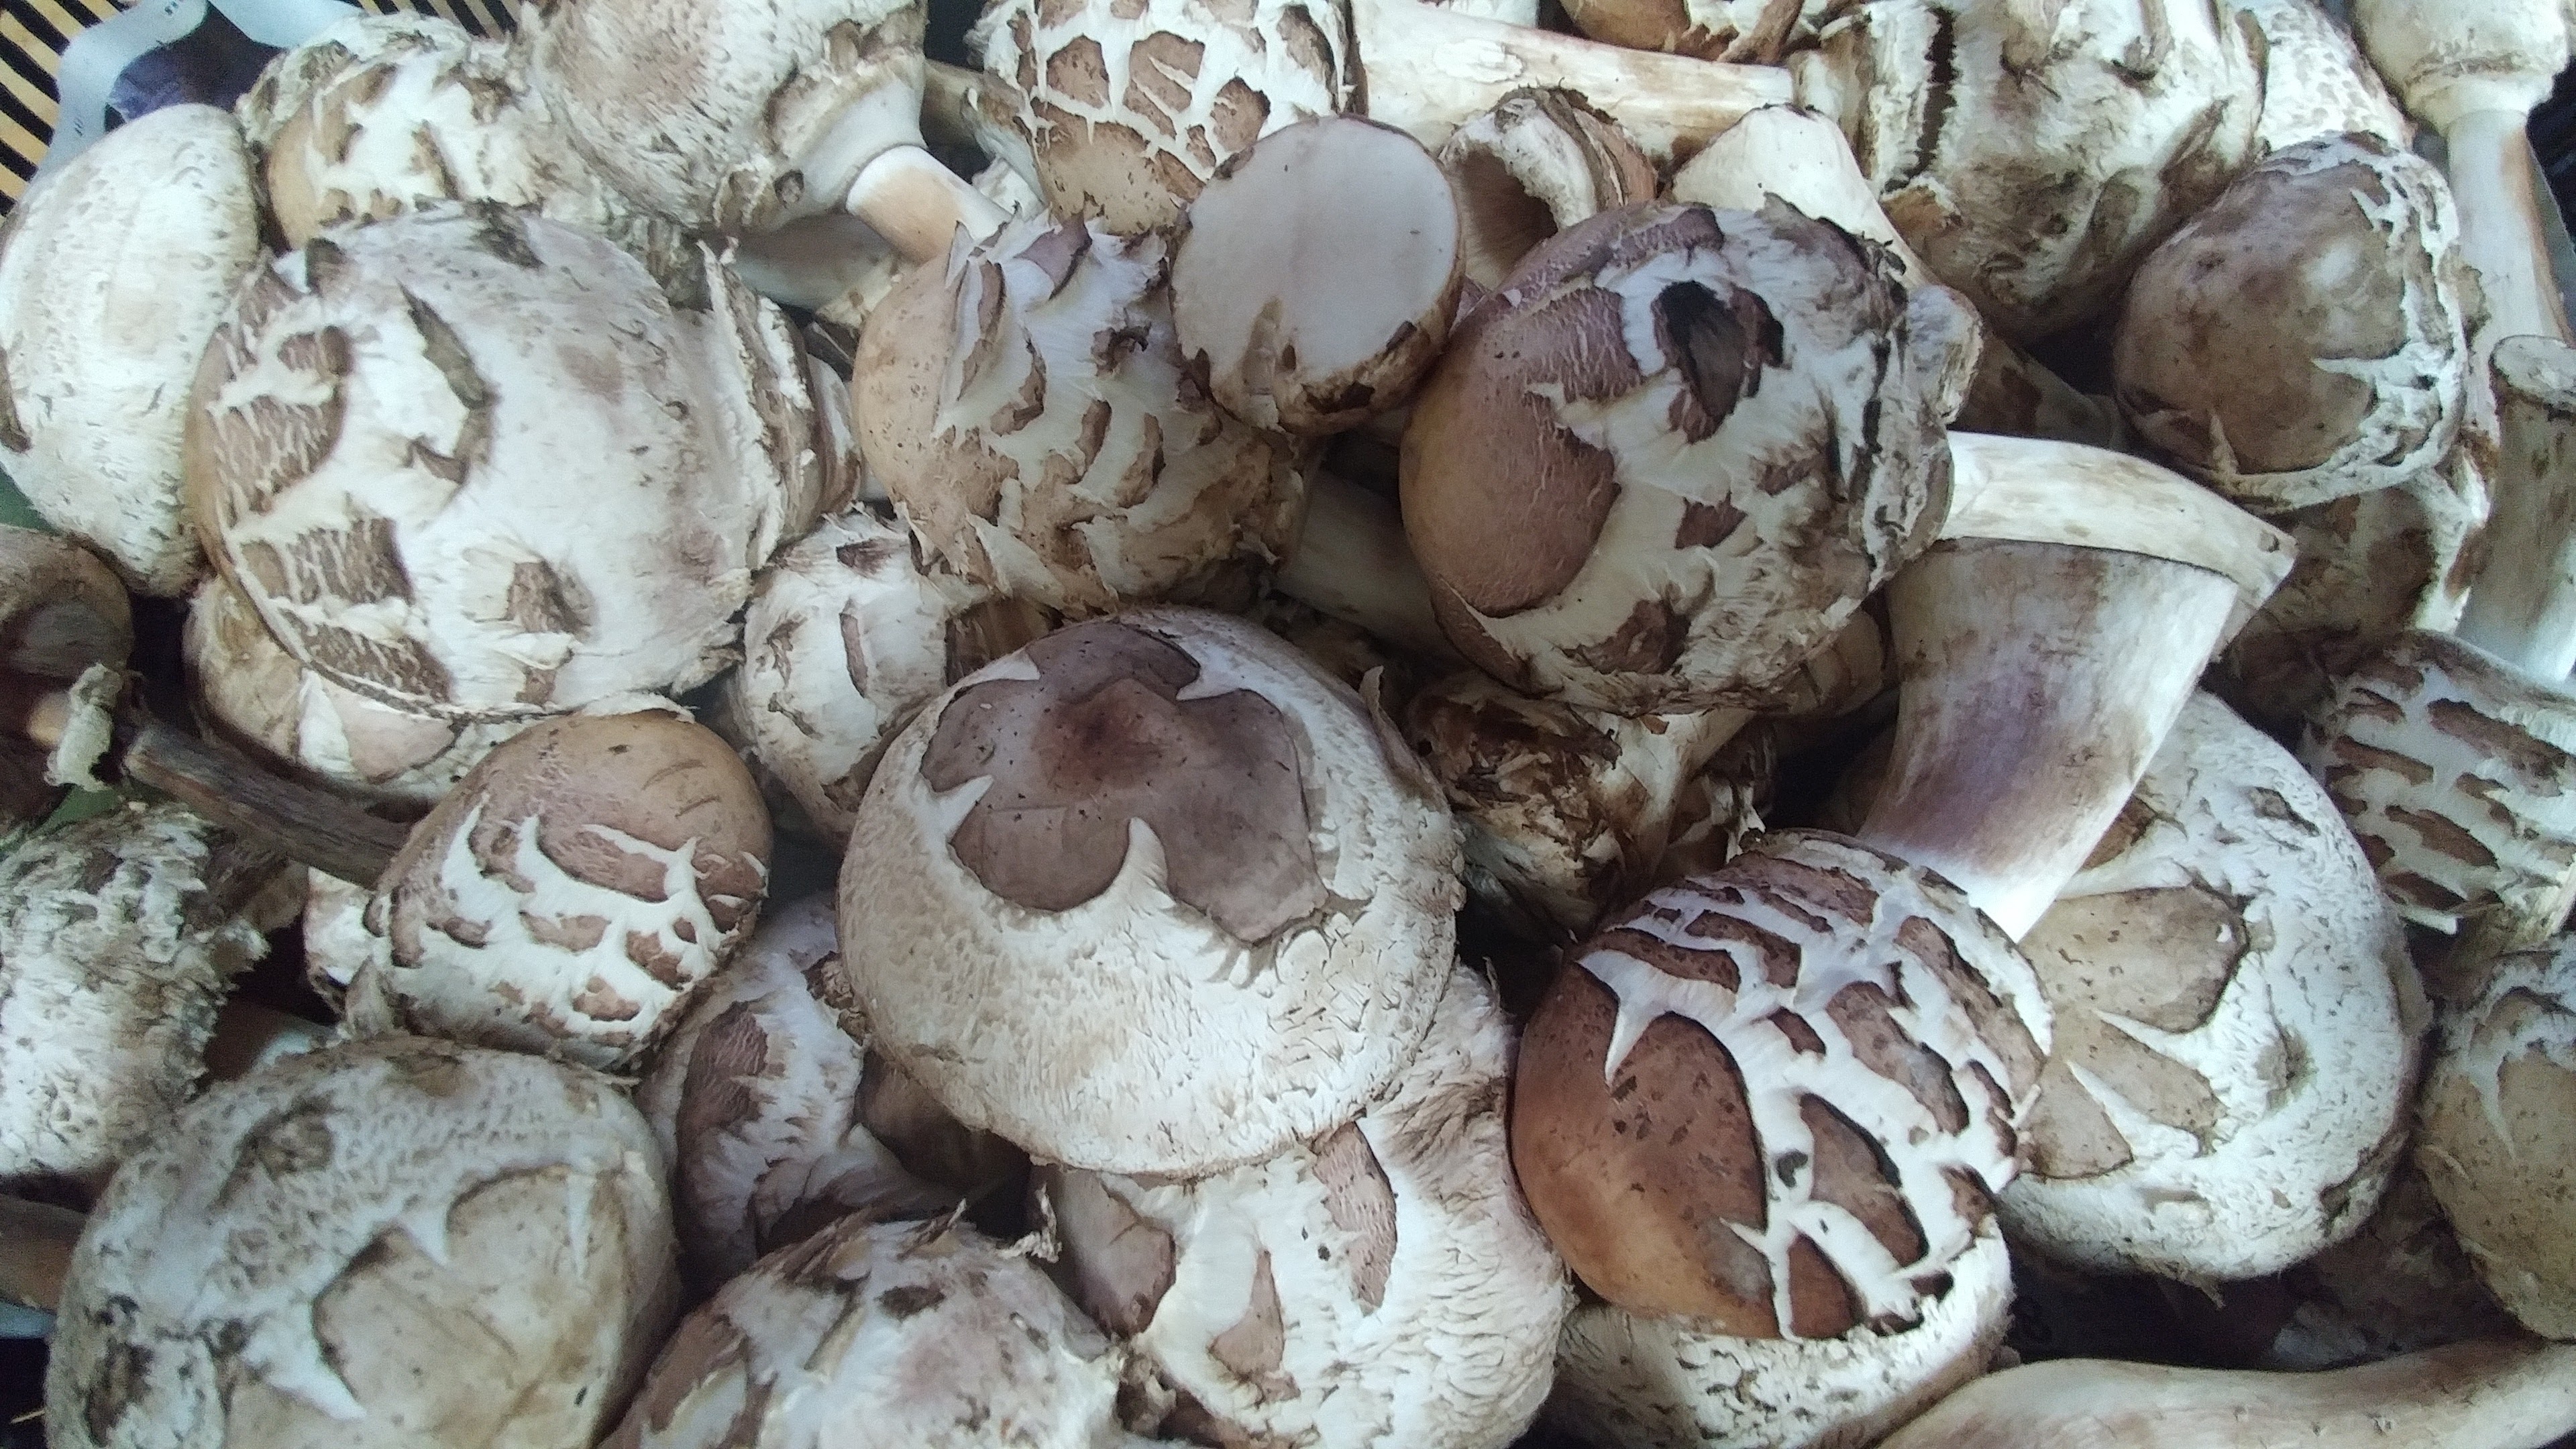 Parasol
 Hen of the Woods
 Slippery Jack - a yellow bolete that is especially good dehydrated.
 Poule des bois/Hen of the Woods haul
Besides the Hen of the Woods (our favourite), the most spectacular is always the giant puffball, in season now.

I have had multiple inquiries on how to cook it.
So, here’s the deal. It is easy enough to identify; if it is still firm and pristine white throughout when you slice it, it is good to eat. They go yellow and soft (not to mention) pungent smelling as they age past their prime.
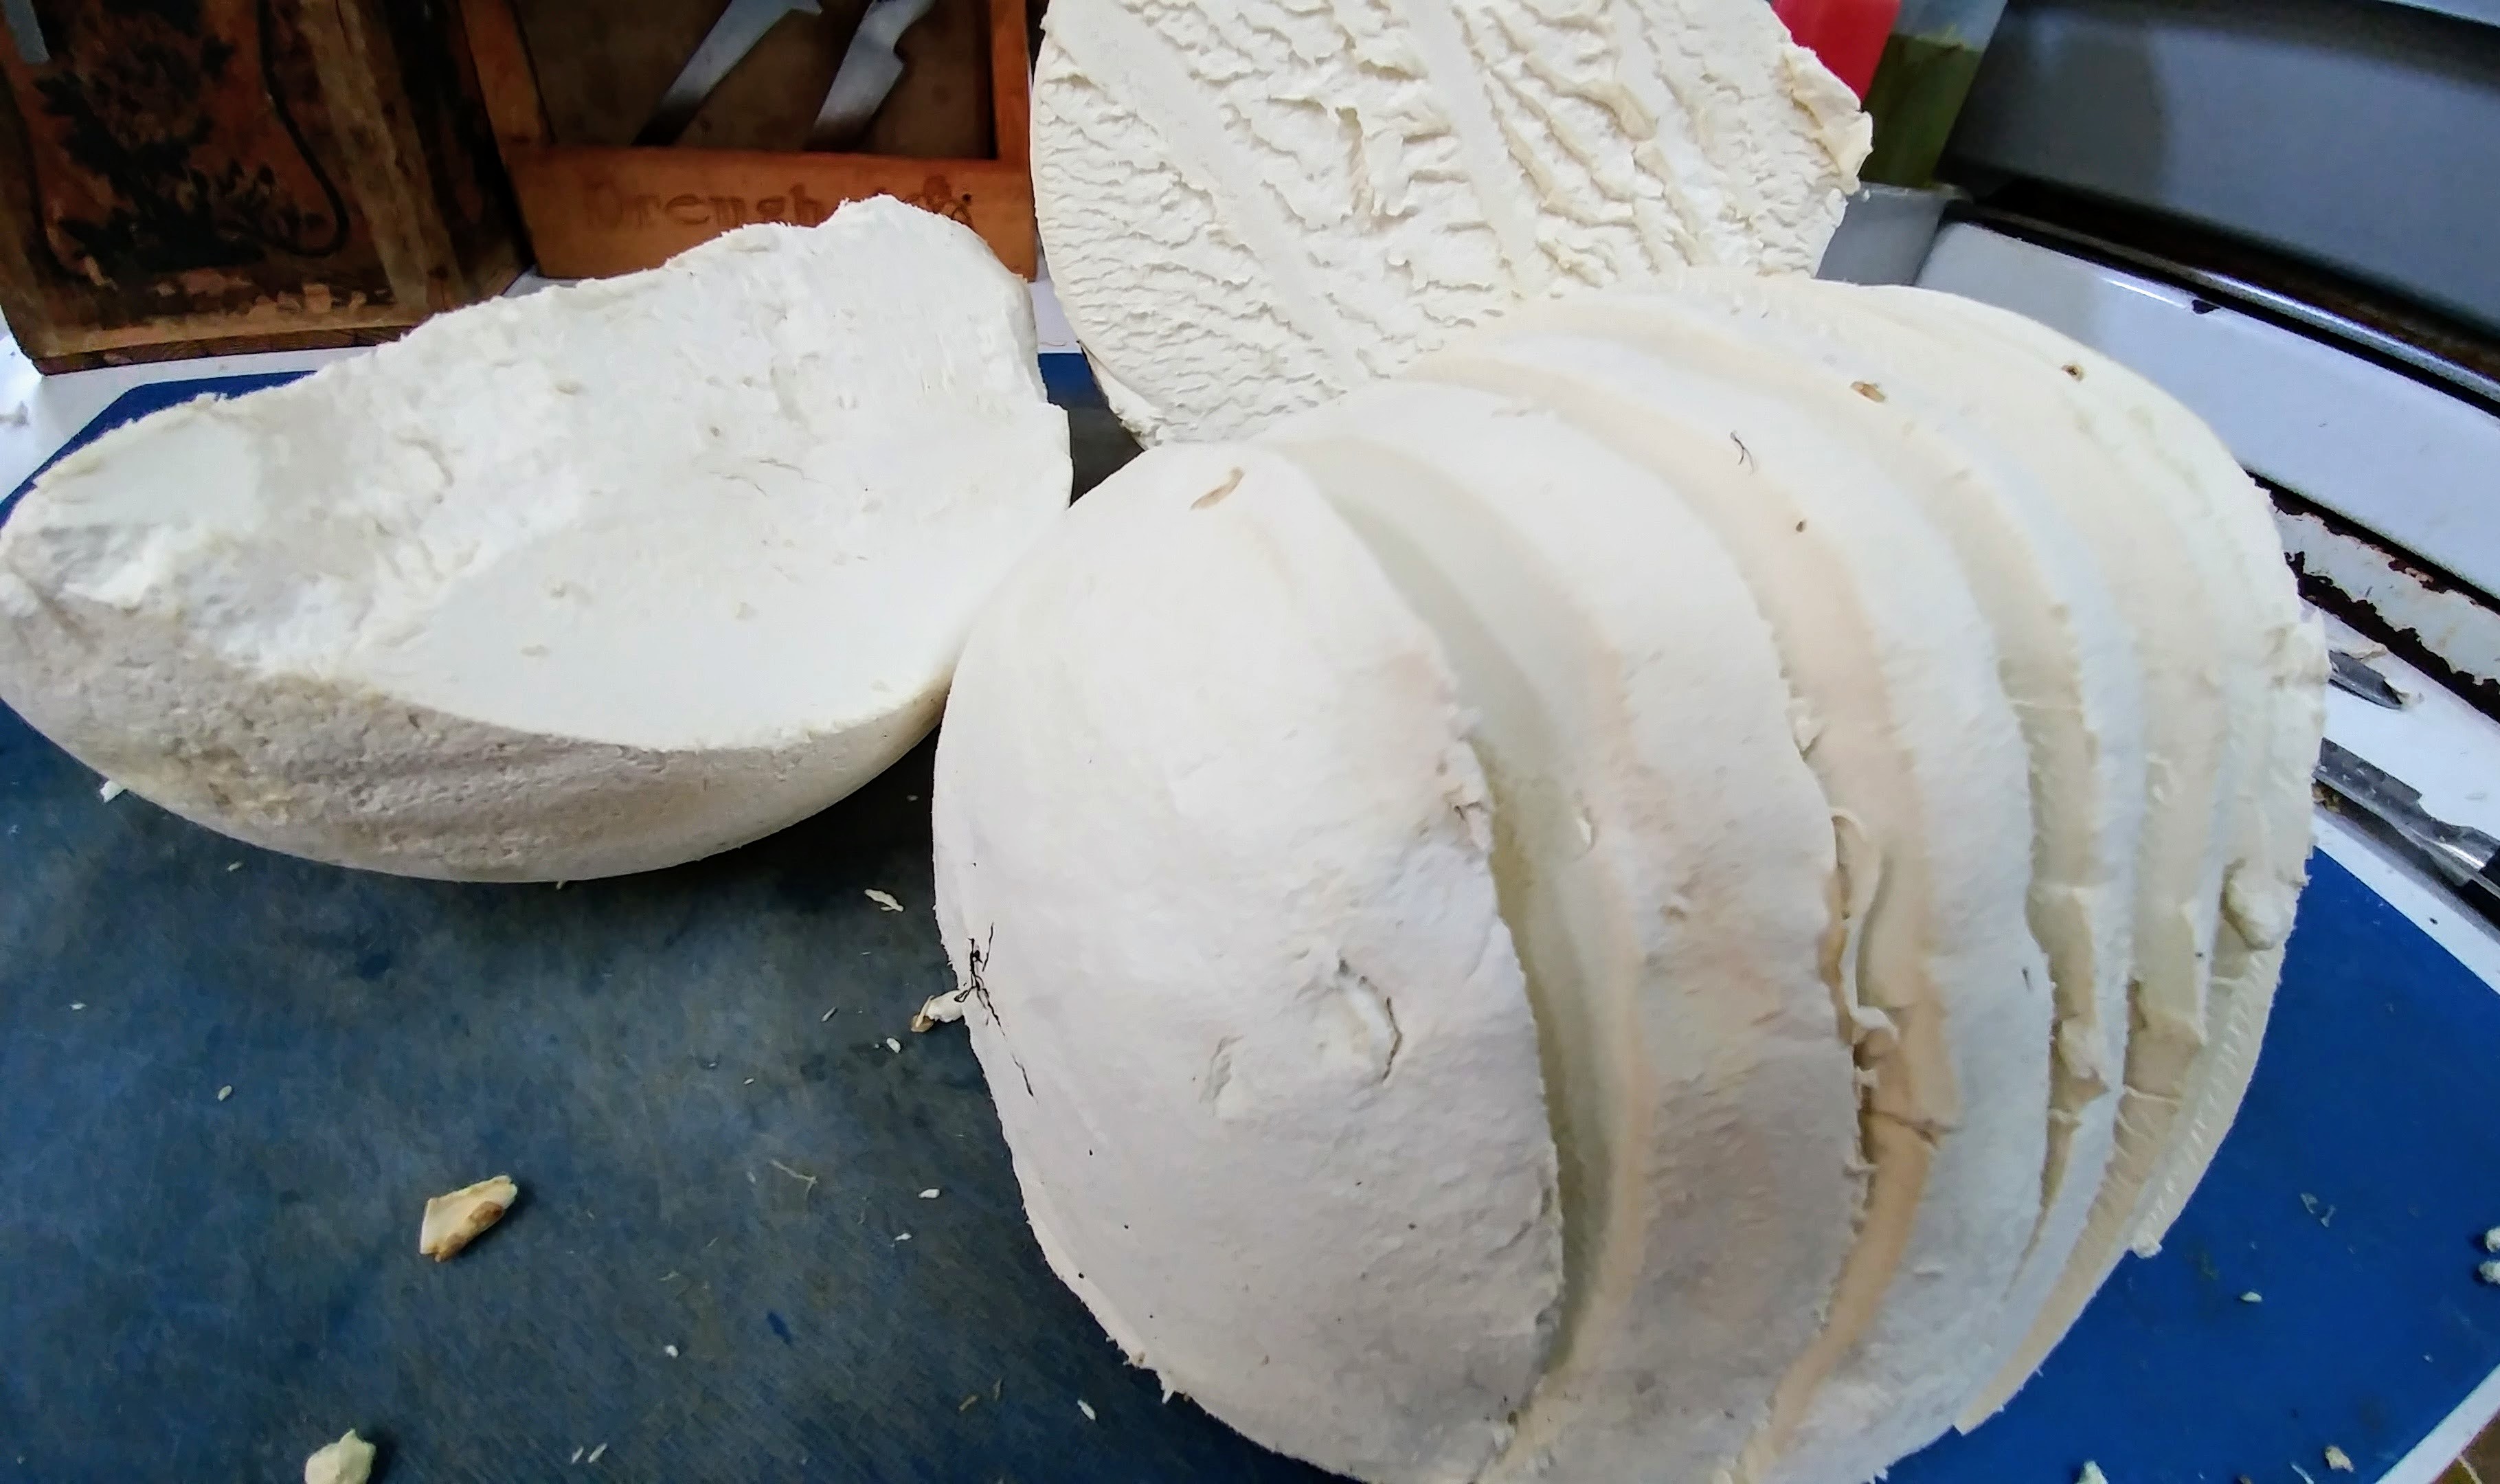
The best way to cook a giant puffball:
Peel and slice. Pan-fry or bake on parchment with a good amount of fat (I start with oil and finish with butter), flipping half way through. You want to gently brown it, on medium heat as opposed to high.
With its sponge-like texture, I find that it cooks up quite like eggplant. Best eaten straight out of the pan, it gets soft and loses volume as it sits, although it will taste good no matter.
It has a strong (ish) mushroom flavour, so I like to layer it with other flavours like tomato, cheese or root vegetables in a lasagne or gratin for example. It makes good soup too. You could dice it up and make spaghetti sauce, the options are endless.
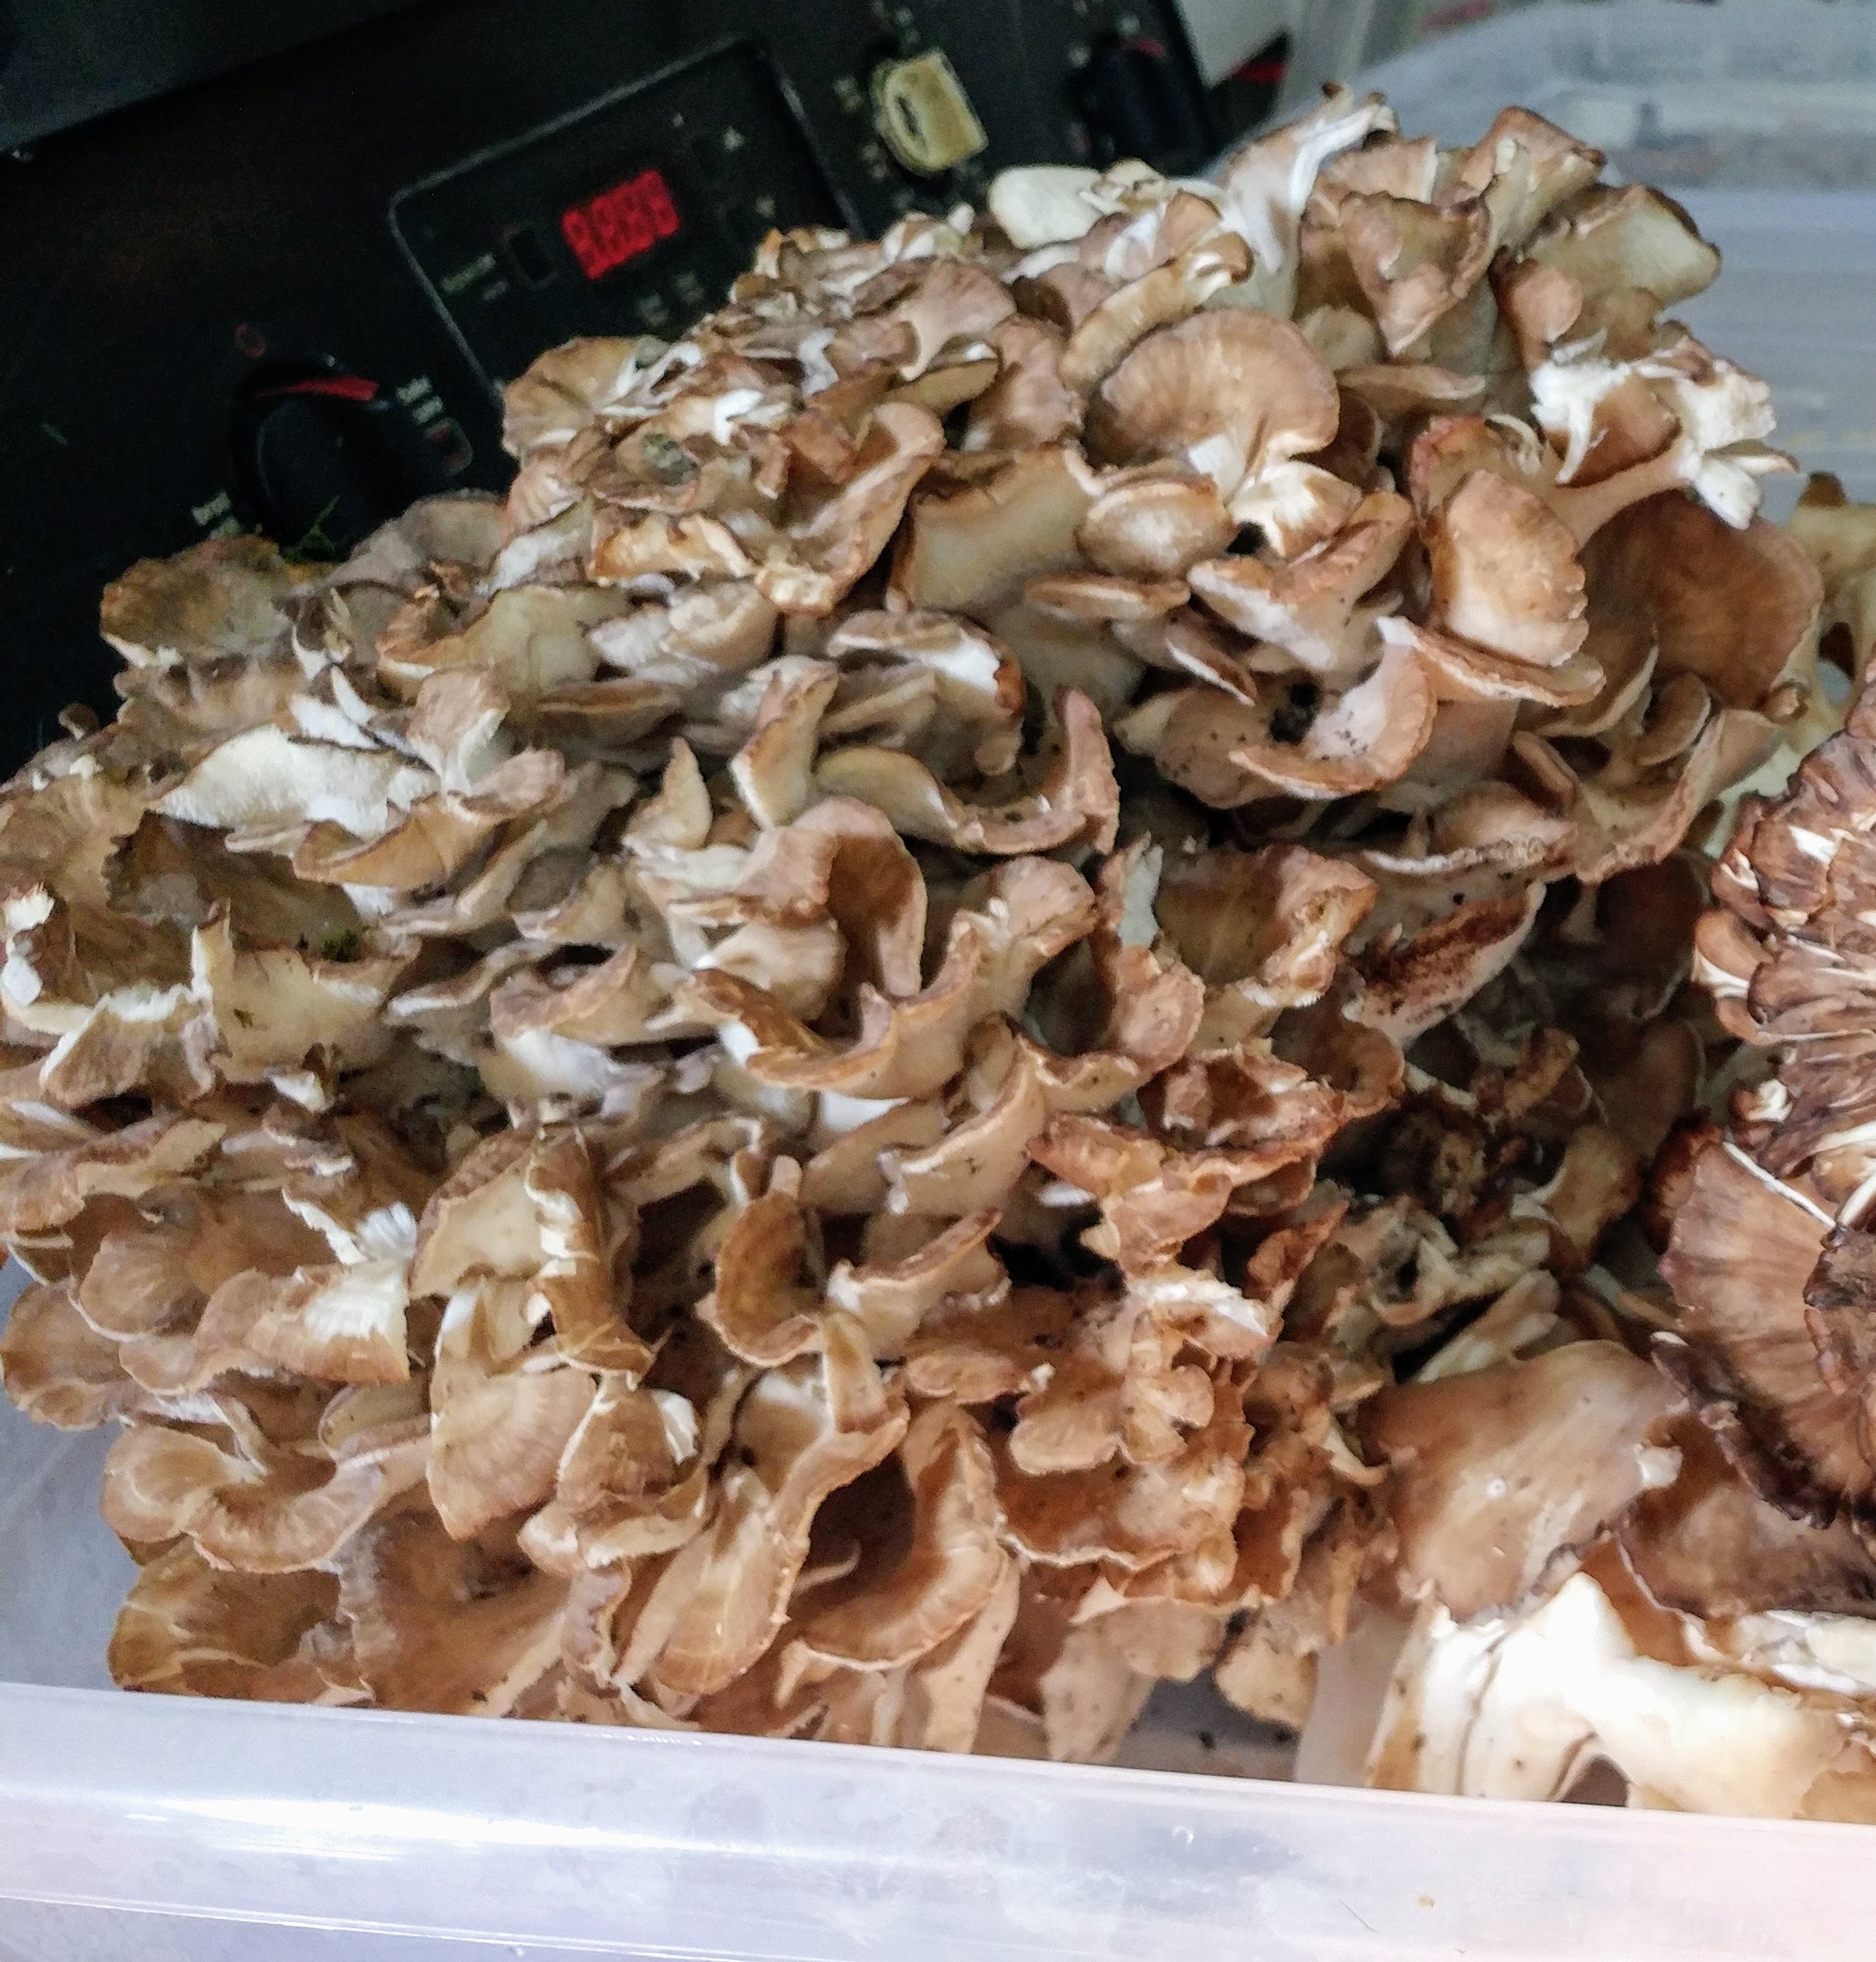
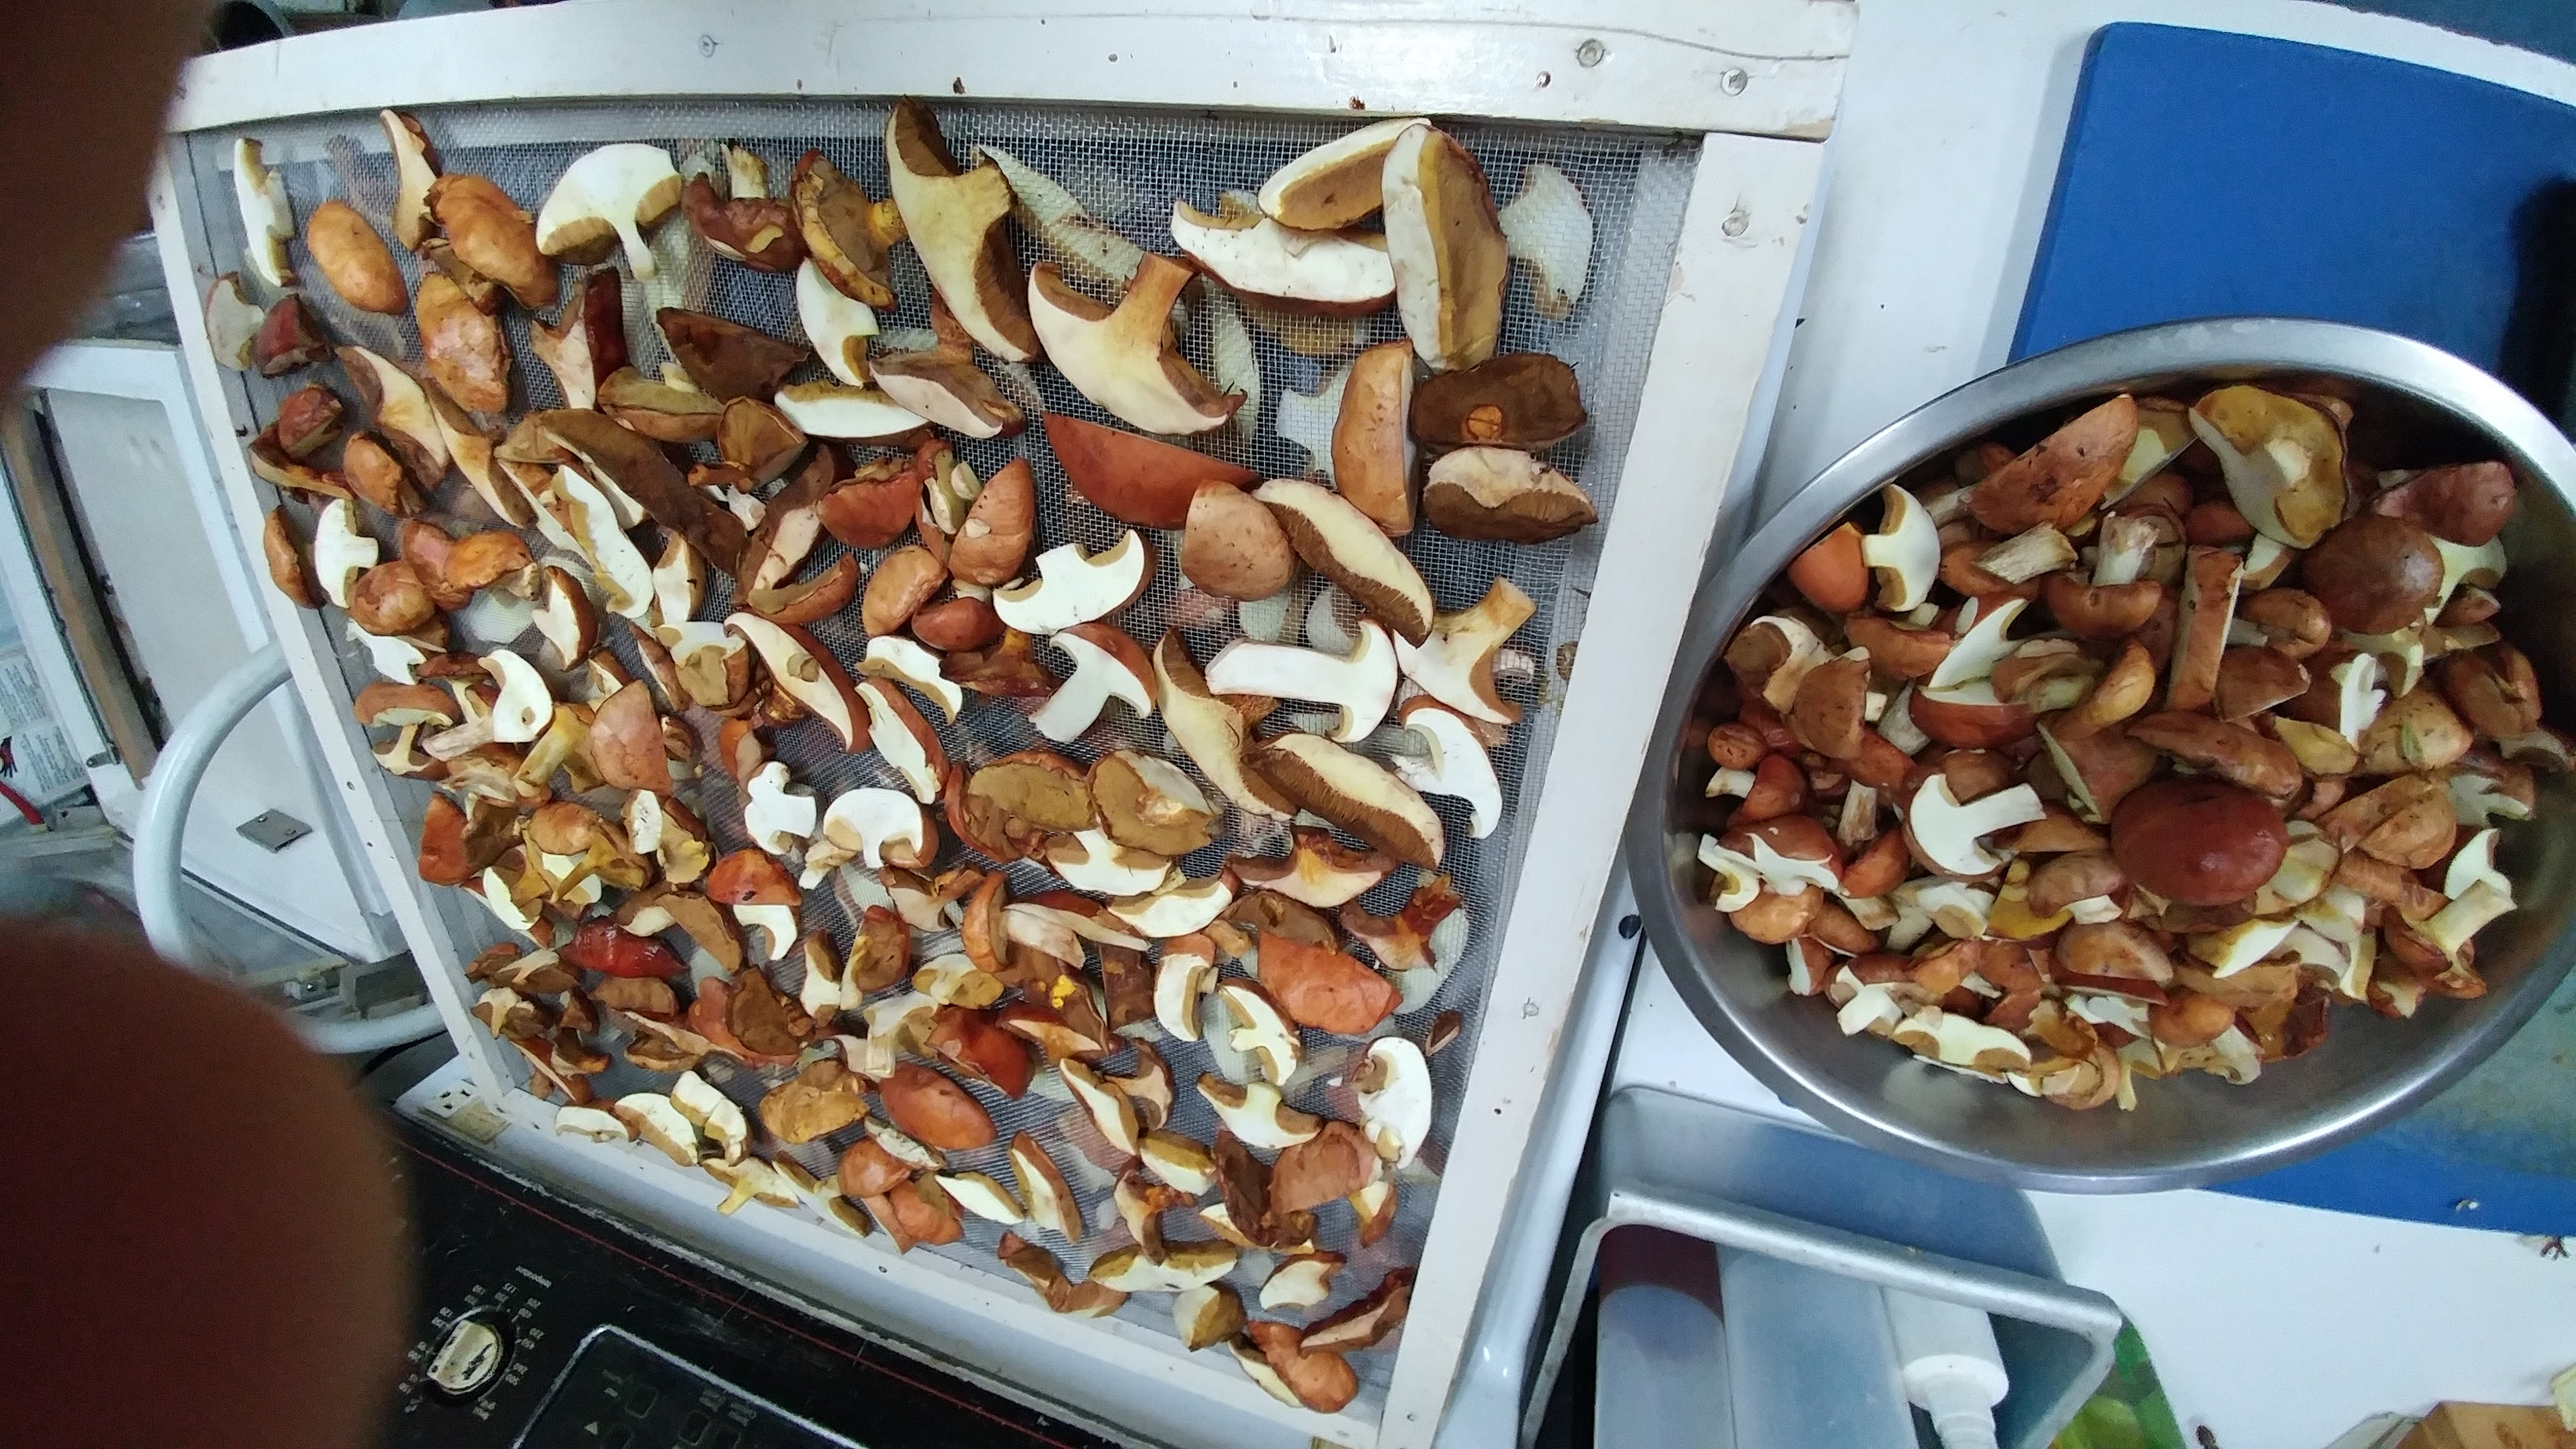
It's not all about the puffball, especially with Matsutake season starting. I'm busy putting up the fall boletes for our dried mixes and butter etc, as well as yellowfoot chanterelles and hedgehogs, hundreds of pounds a week. We are still waiting on the autumn oysters and another half dozen varieties to complete my upcoming annual mushroom fest menu.. http://soupnancy.squarespace.com/wild-mushroom-event-october/
Red Mouthed Bolete, a dessert fave
 Armillaires Couleur de Miel; Wild Honey Mushroom
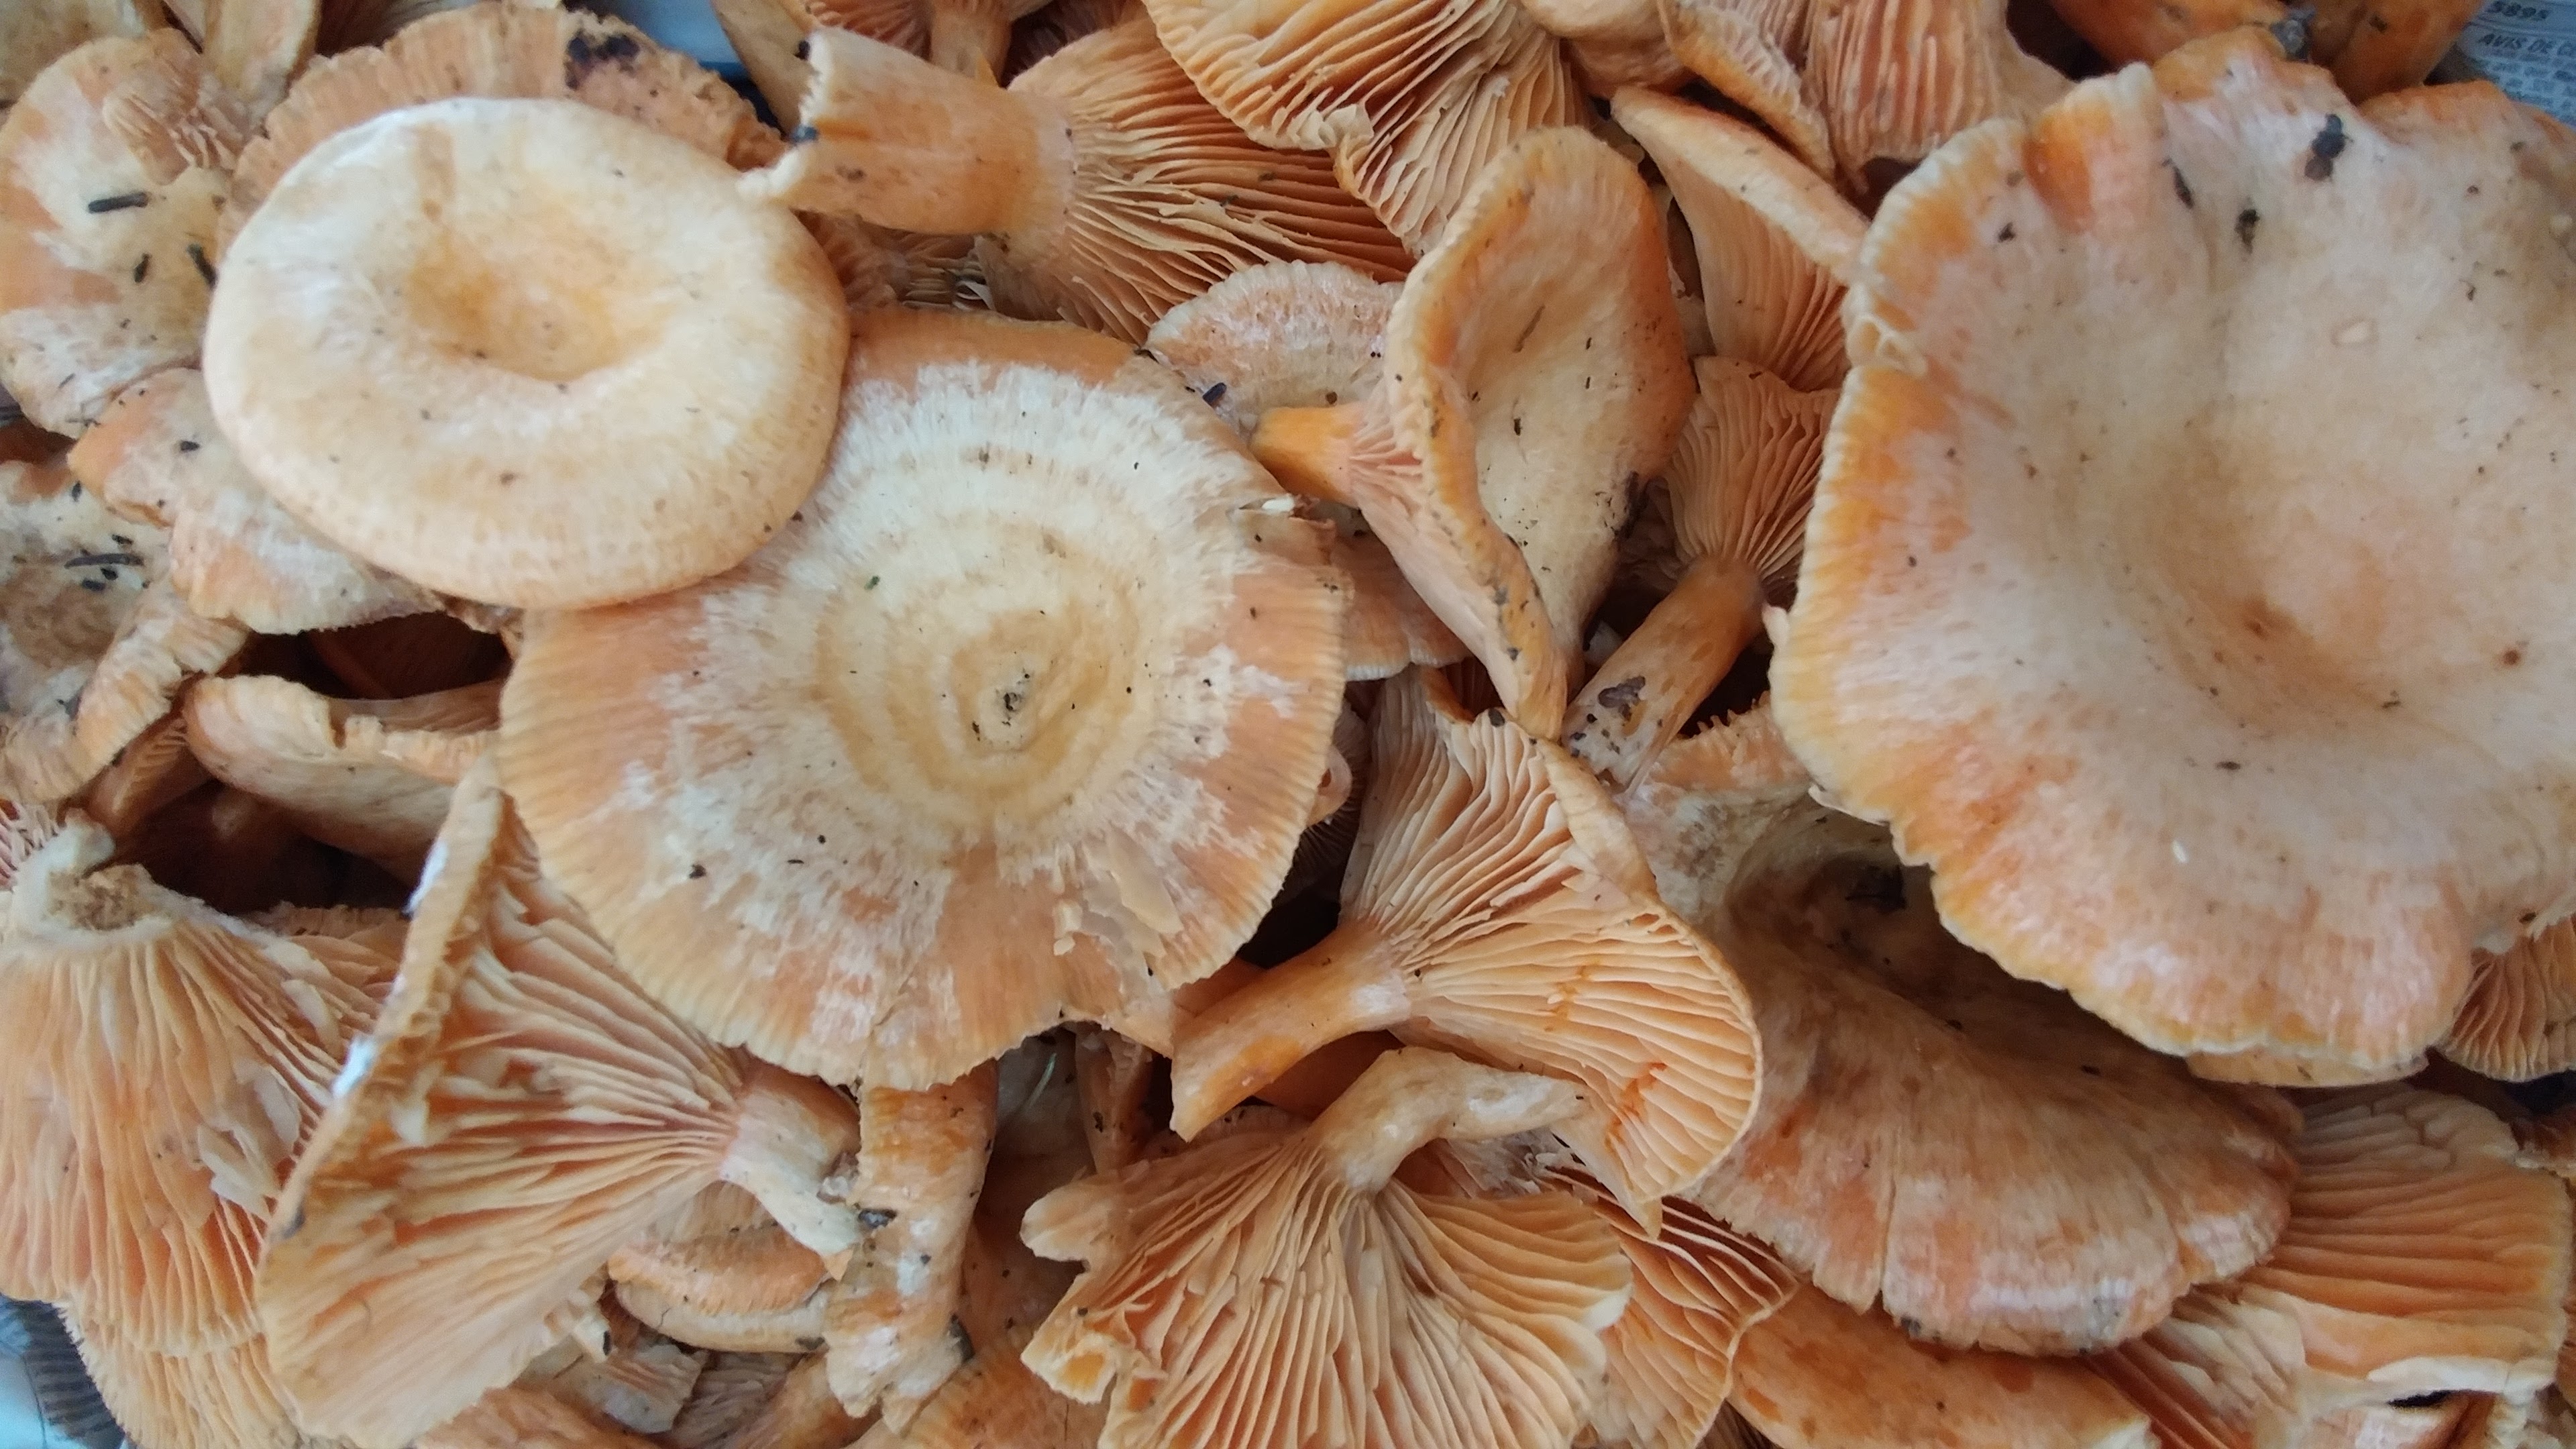 Lactaires Delicieux
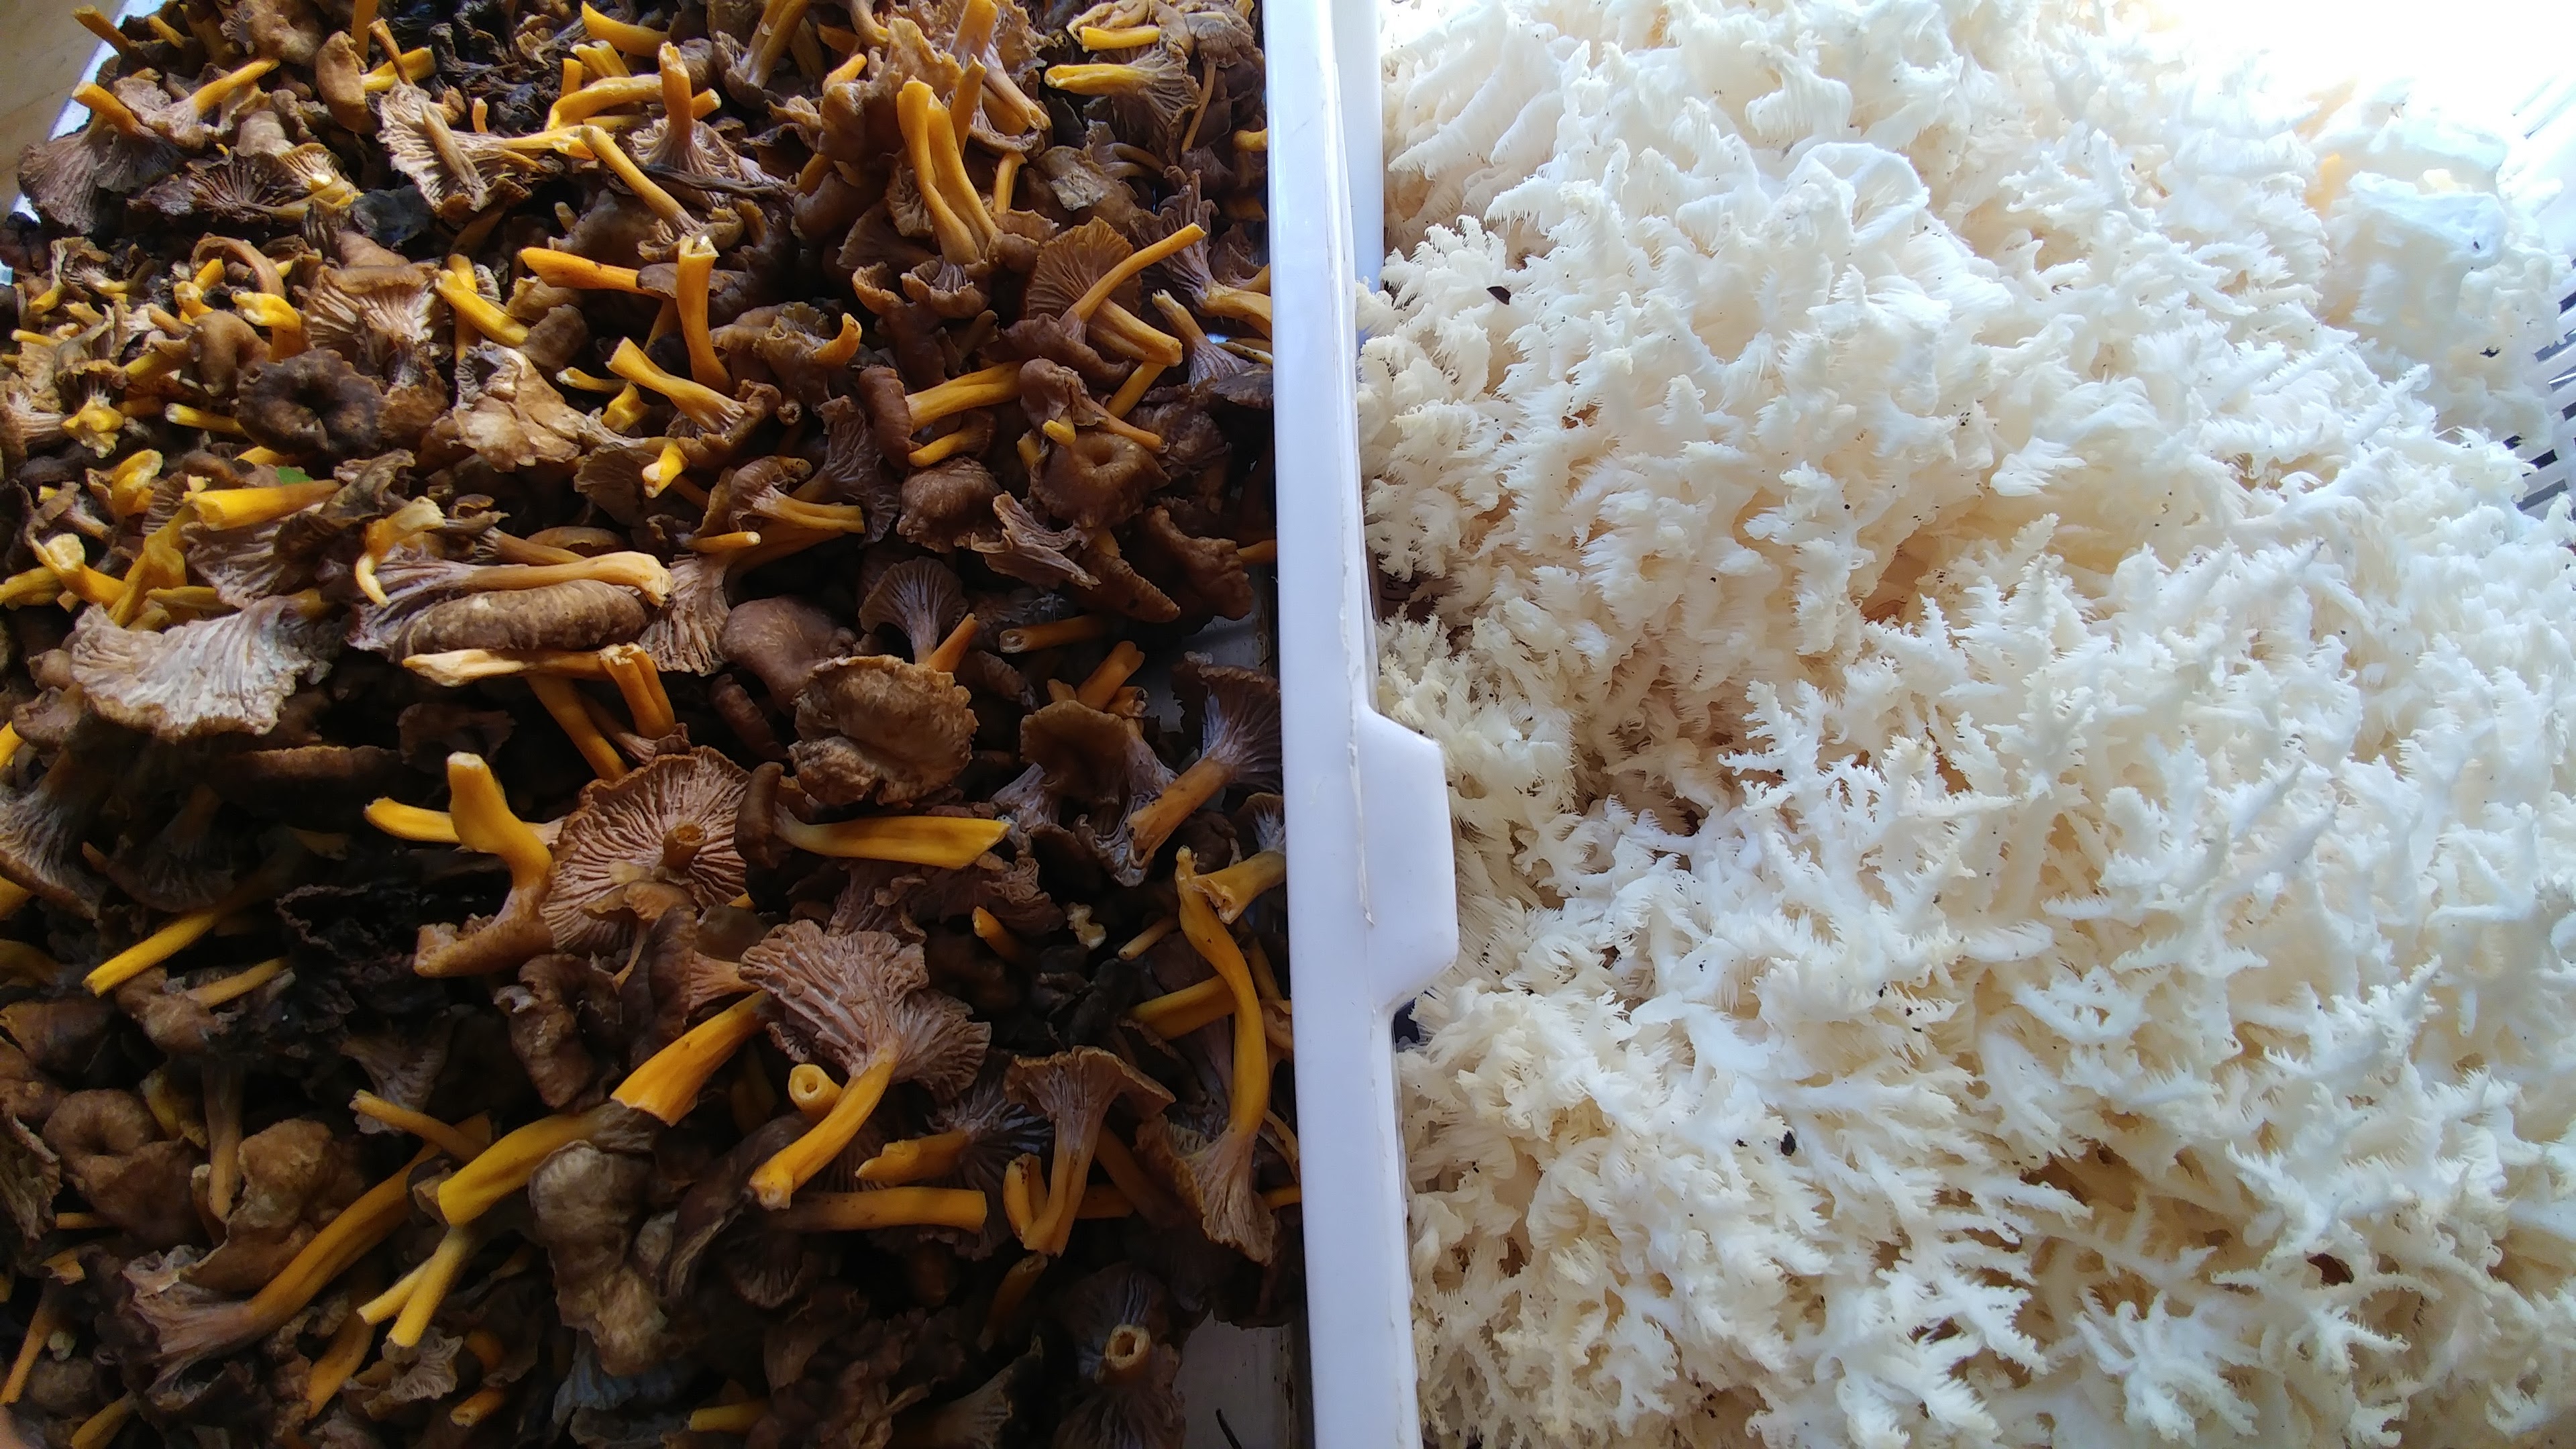 Comb tooth and Yellowfoot Chanterelles
Nancy Hinton
in 2017, How to, fall, ingredients, puffballs, recipes, wild mushrooms
|
Post a Comment
François' tomatoes, and a few summer recipes
 We may as well talk about tomatoes since there isn’t much going on in terms of local mushrooms. What a crappy season so far. I mean we’ve had a few good harvests but we are not meeting the demand at the market, and with a trickle for the restaurant menu, I haven’t started putting up. When you consider that I typically process 2 tons of mushrooms for our year (to supply the restaurant and make our products), I will have to get started soon enough.. Pretty frightening. Fingers crossed.
 ;)
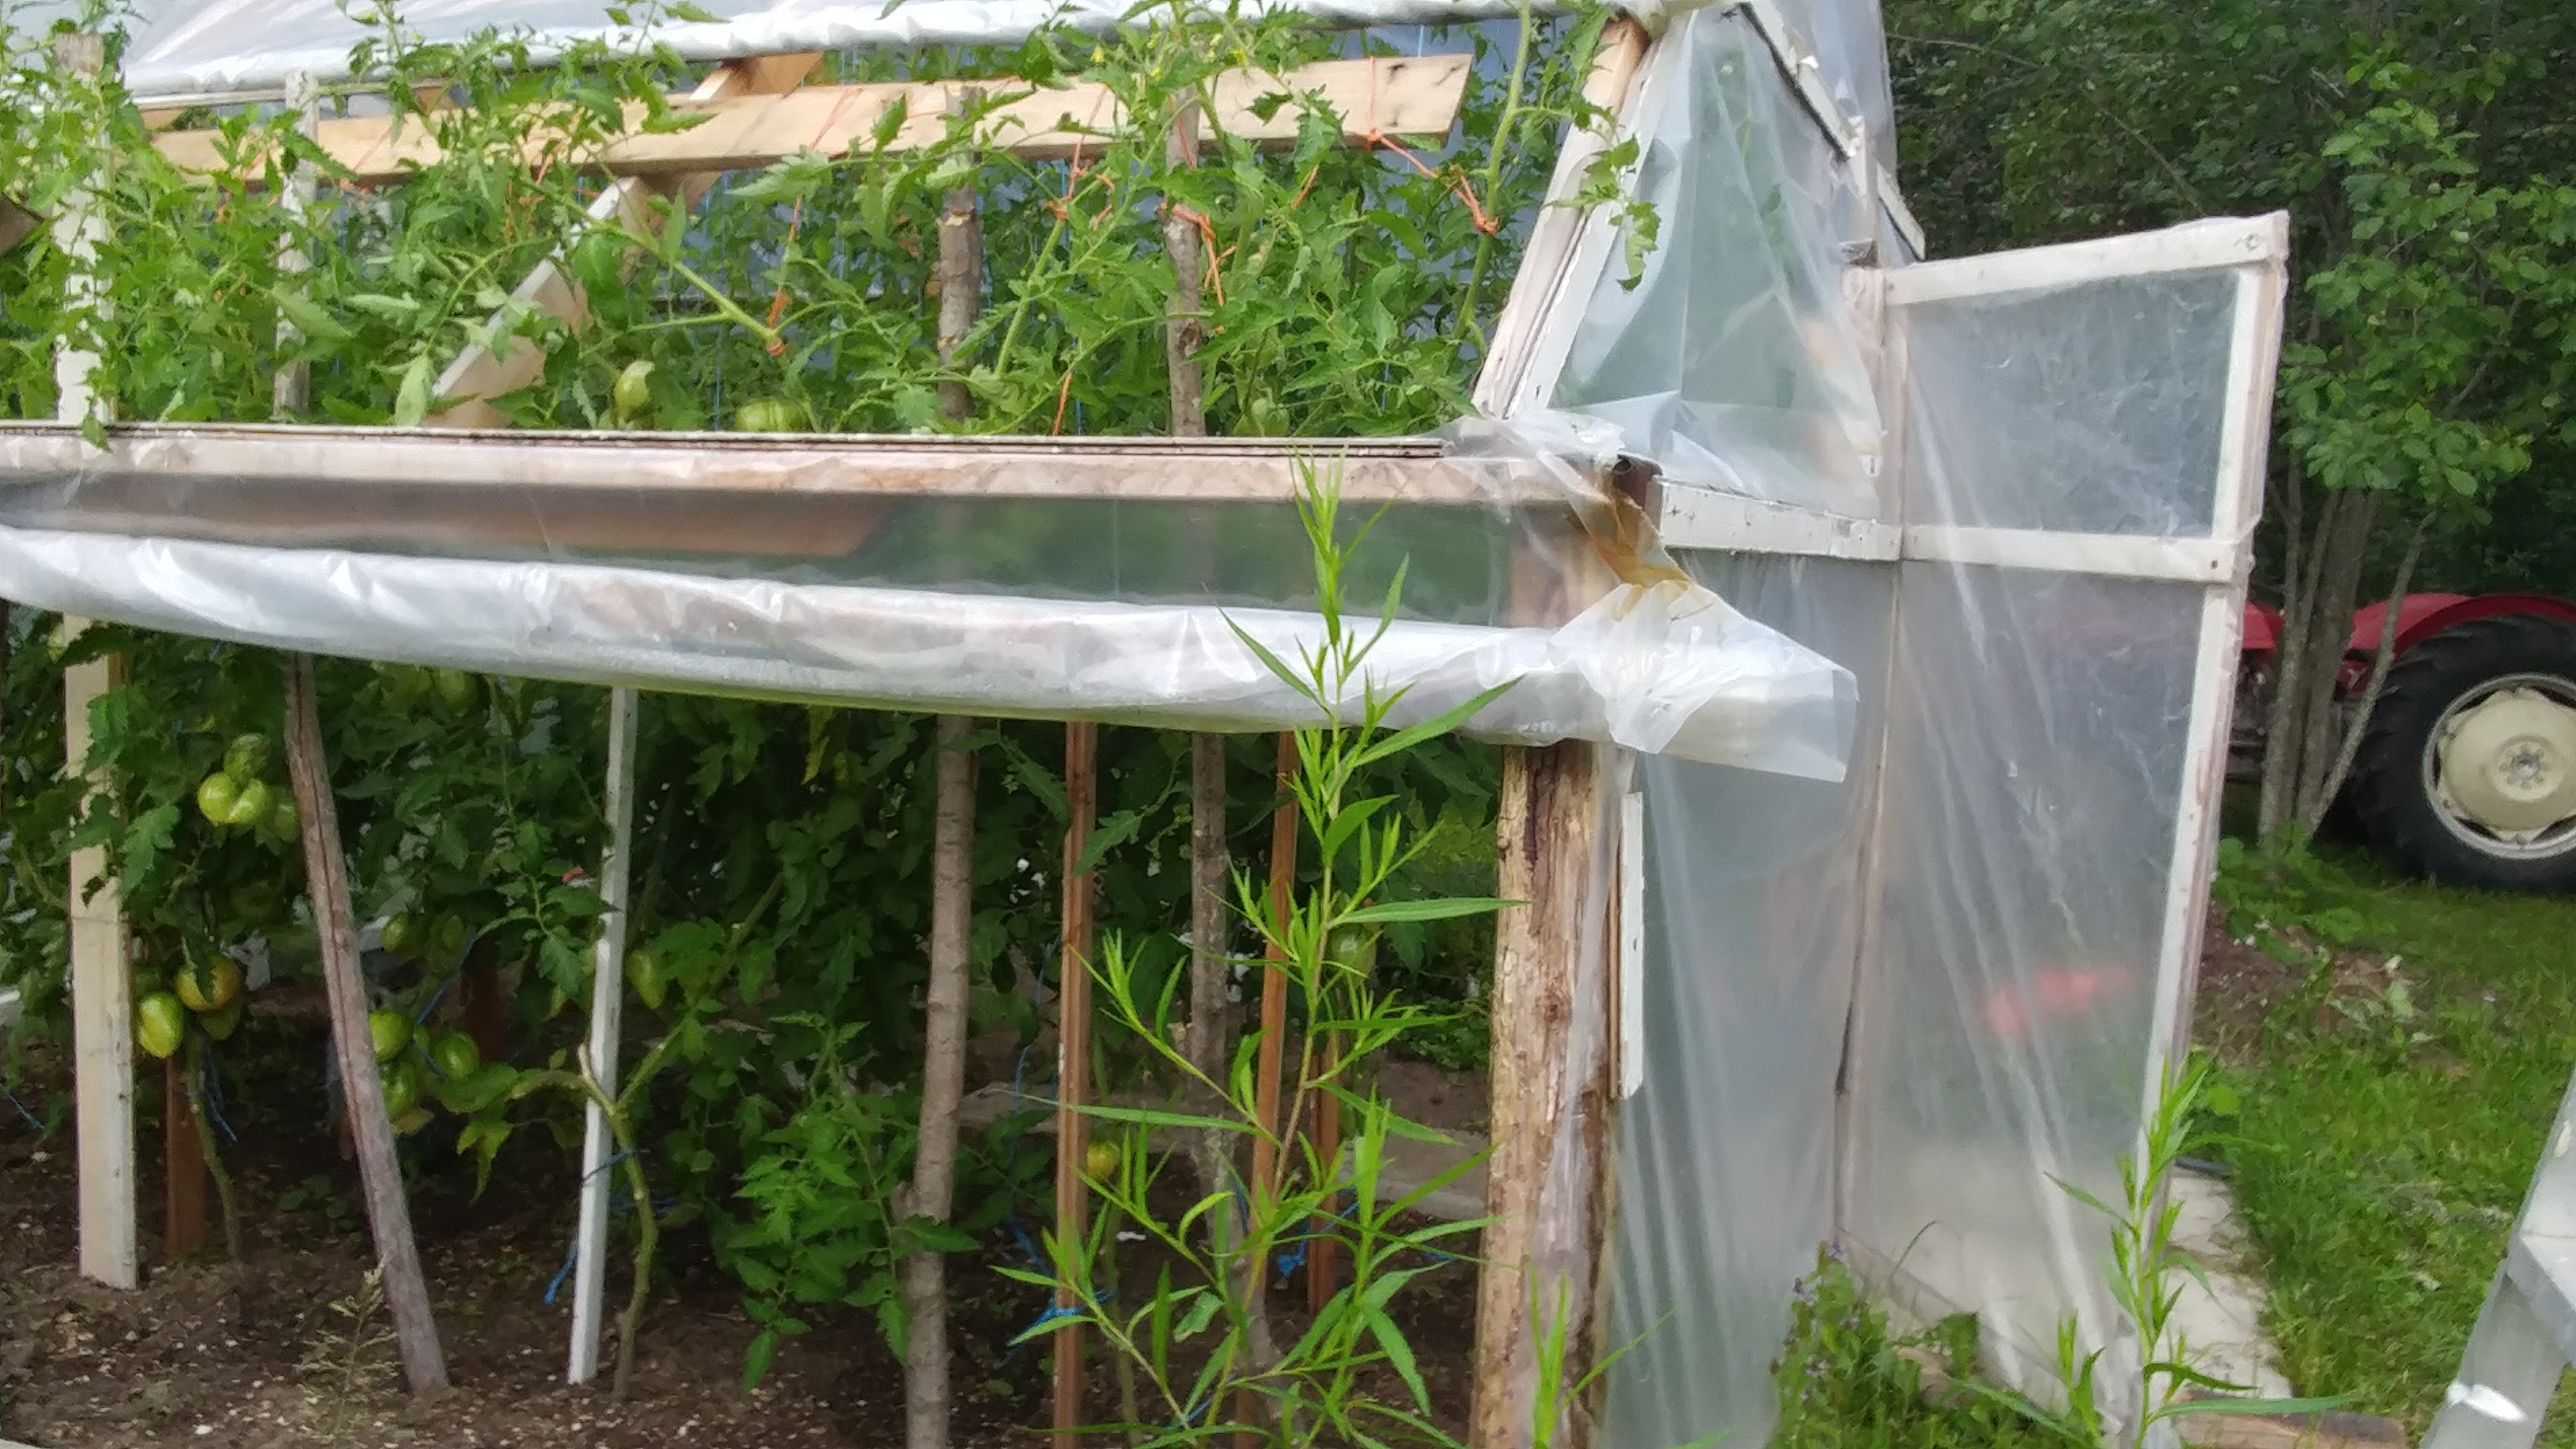
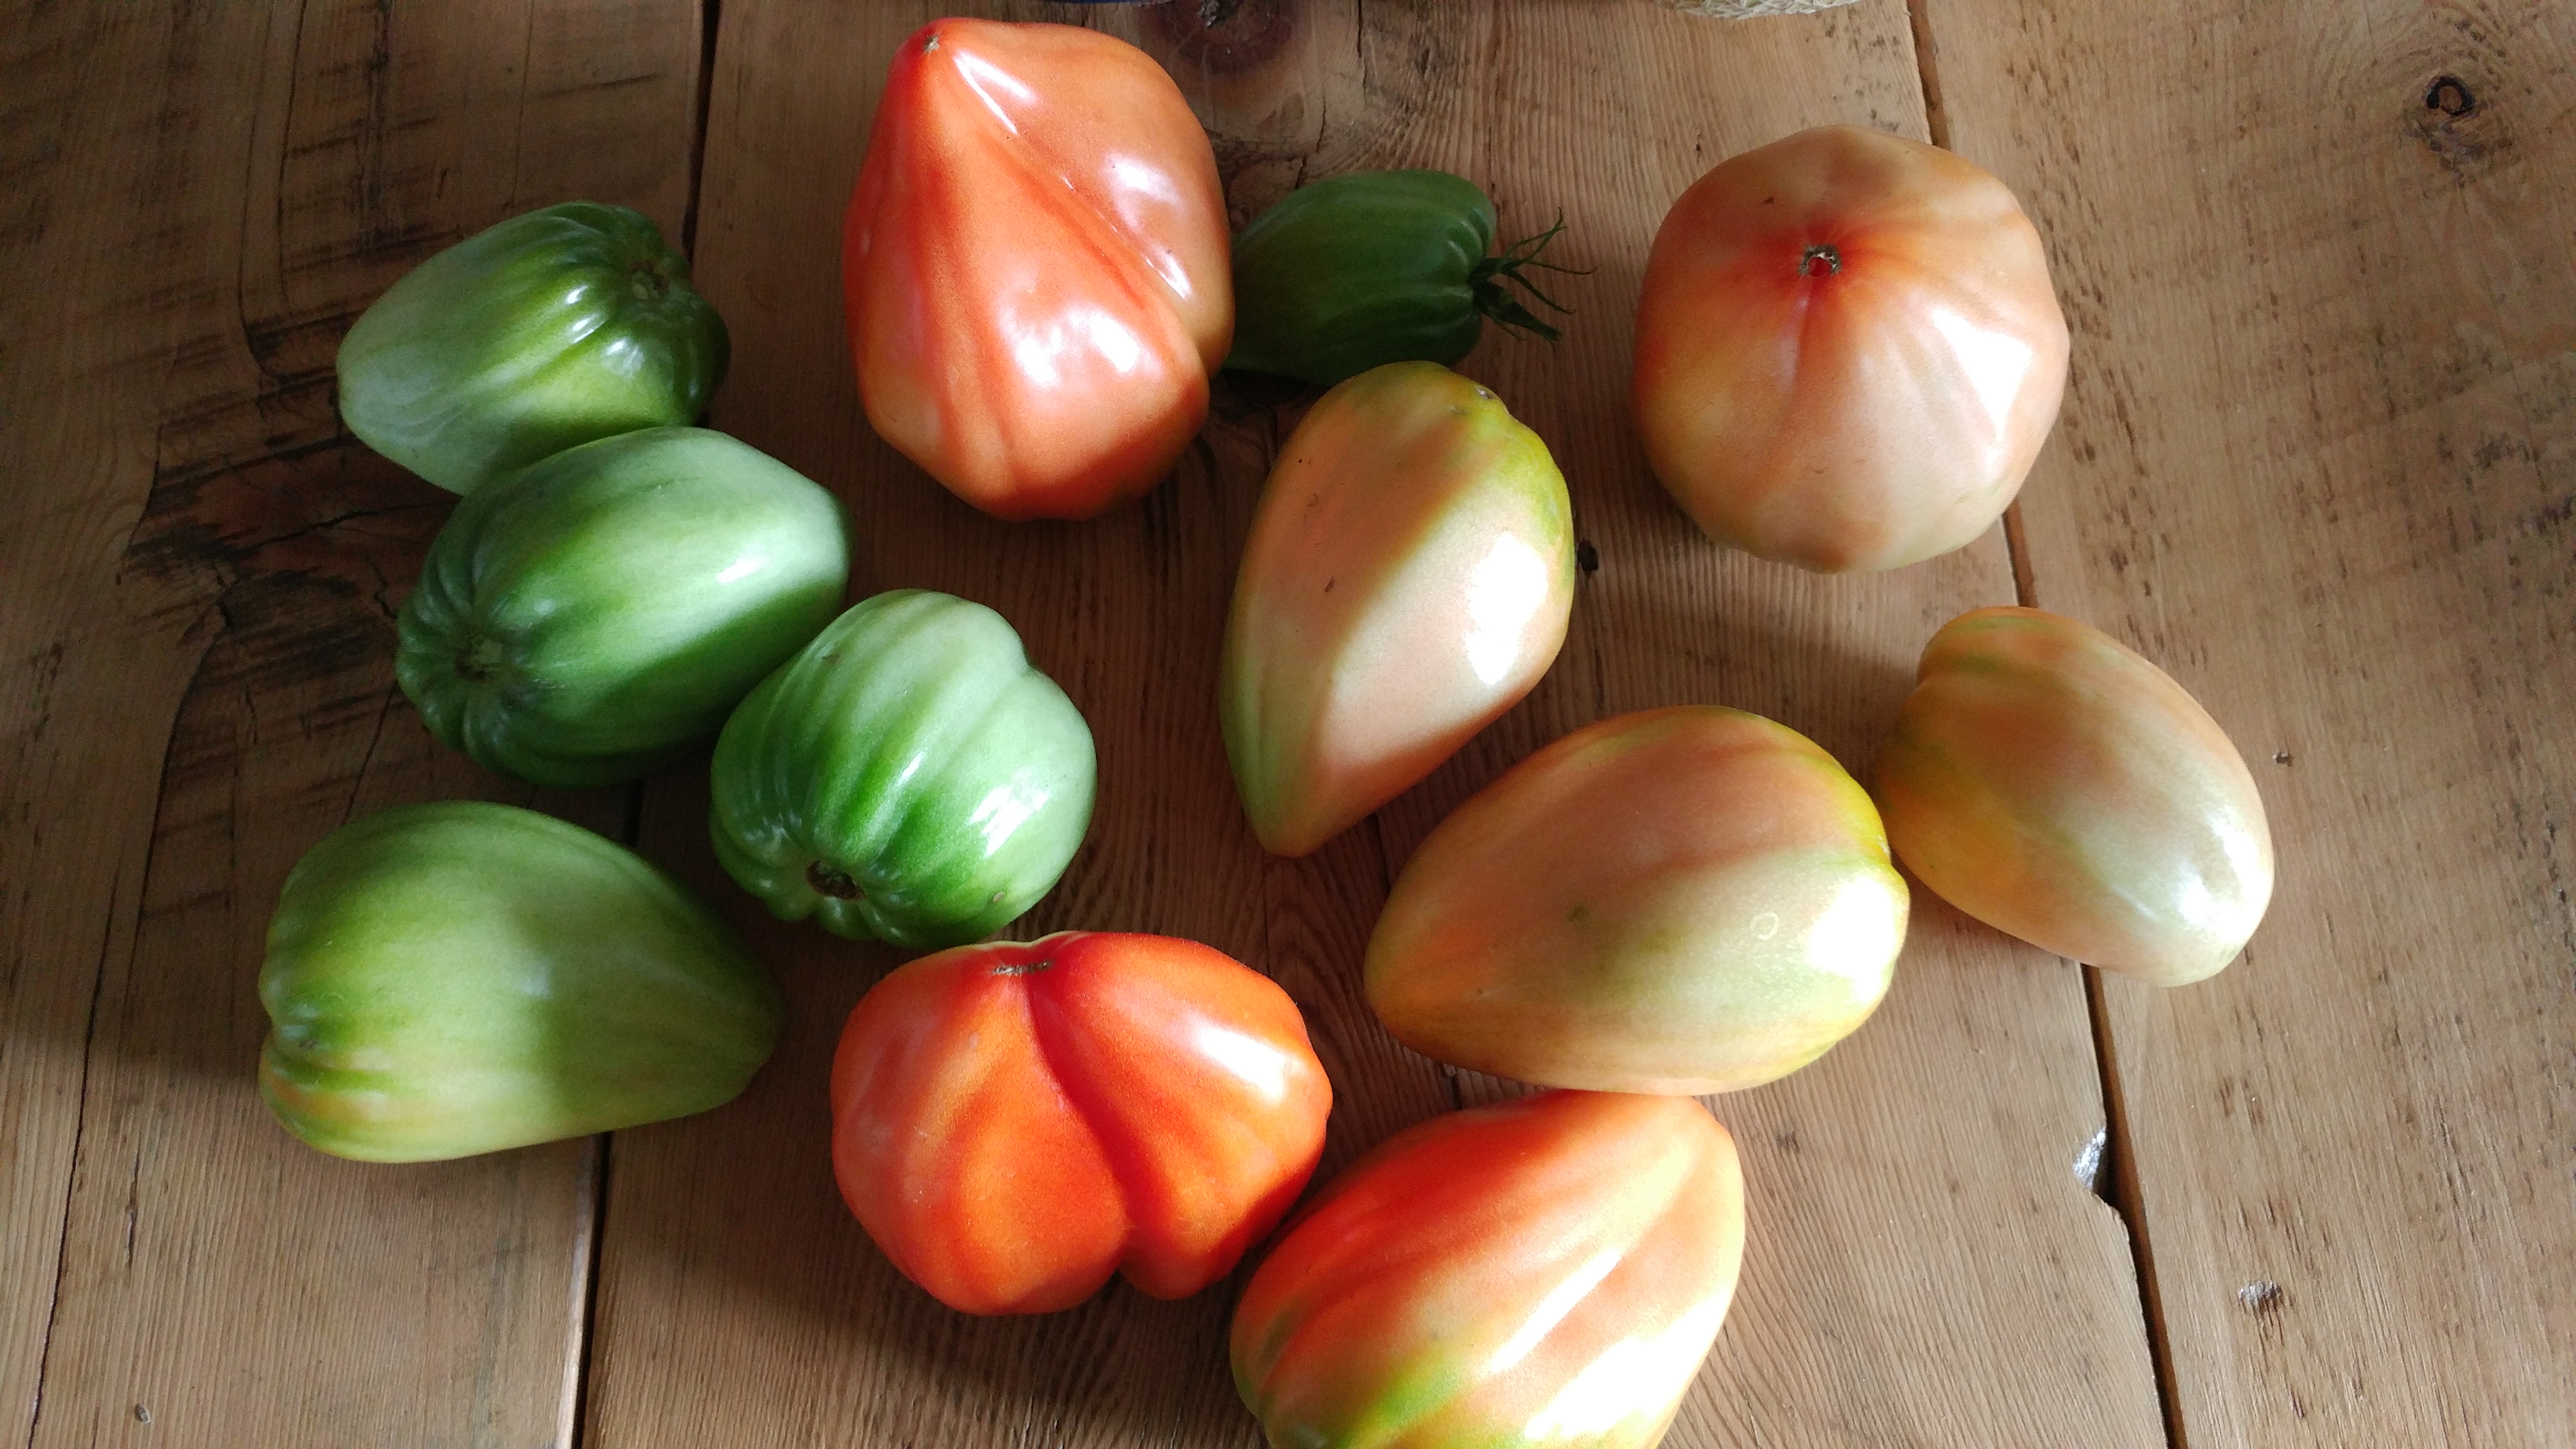
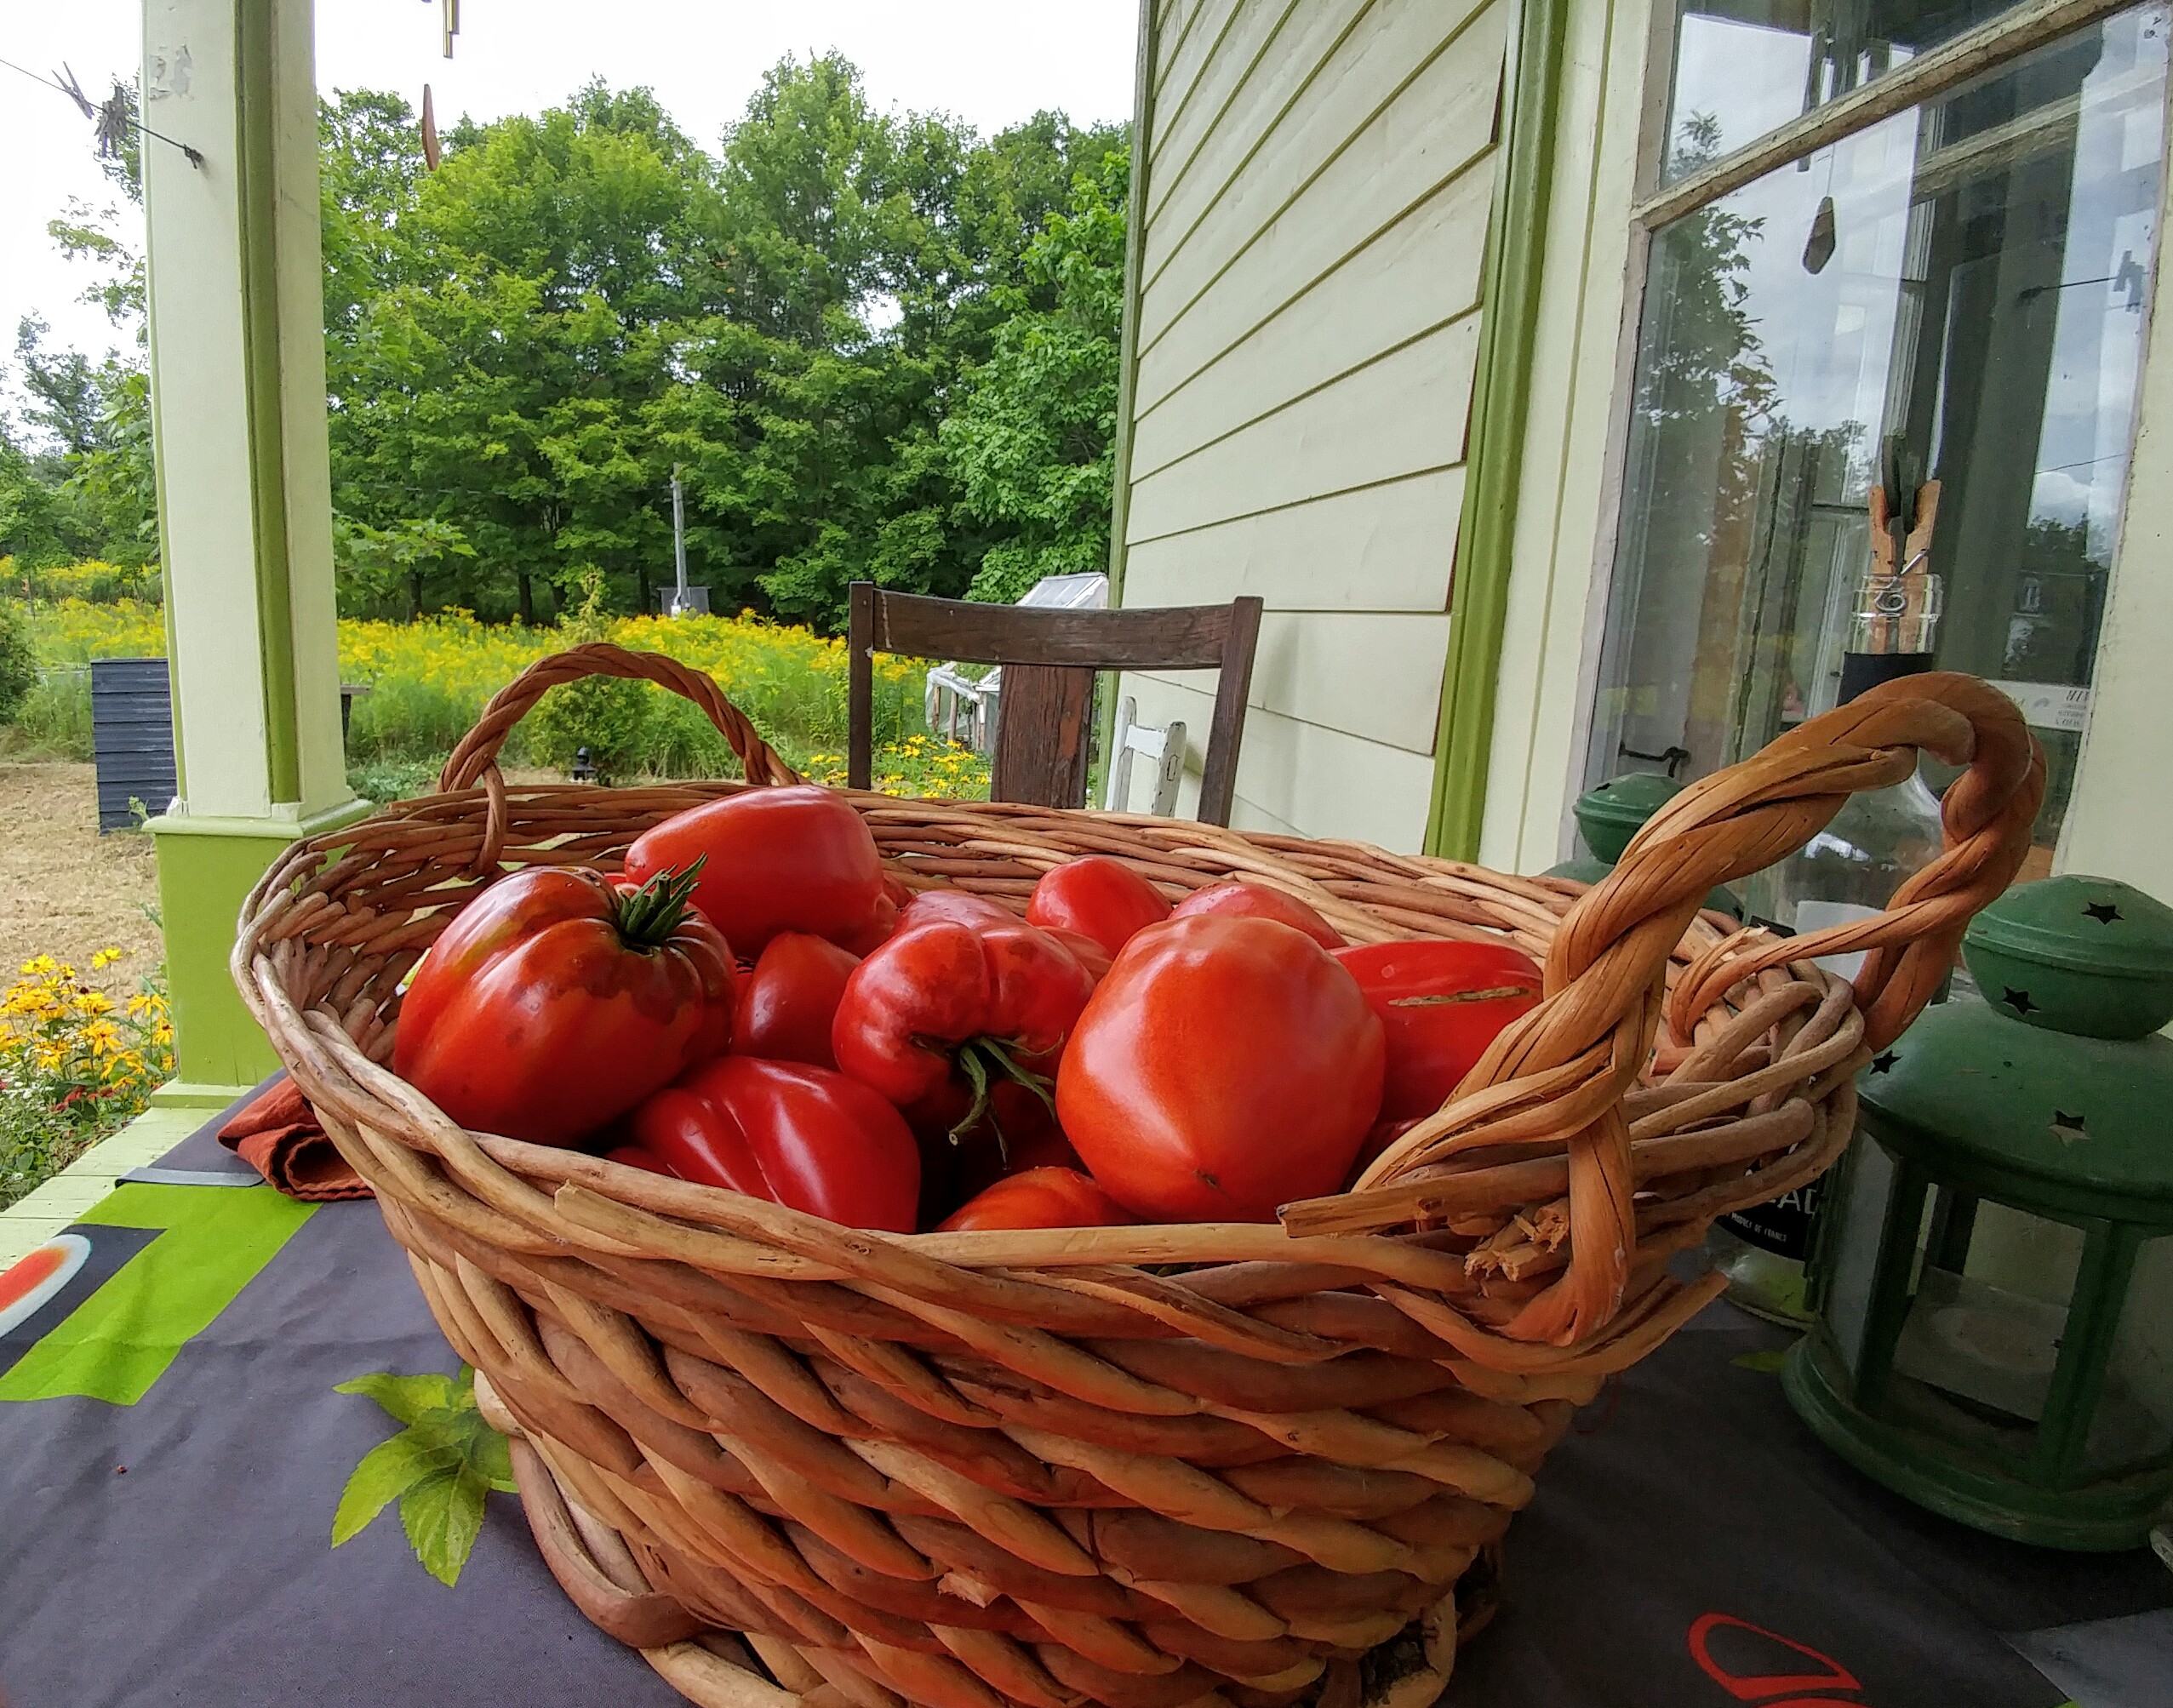
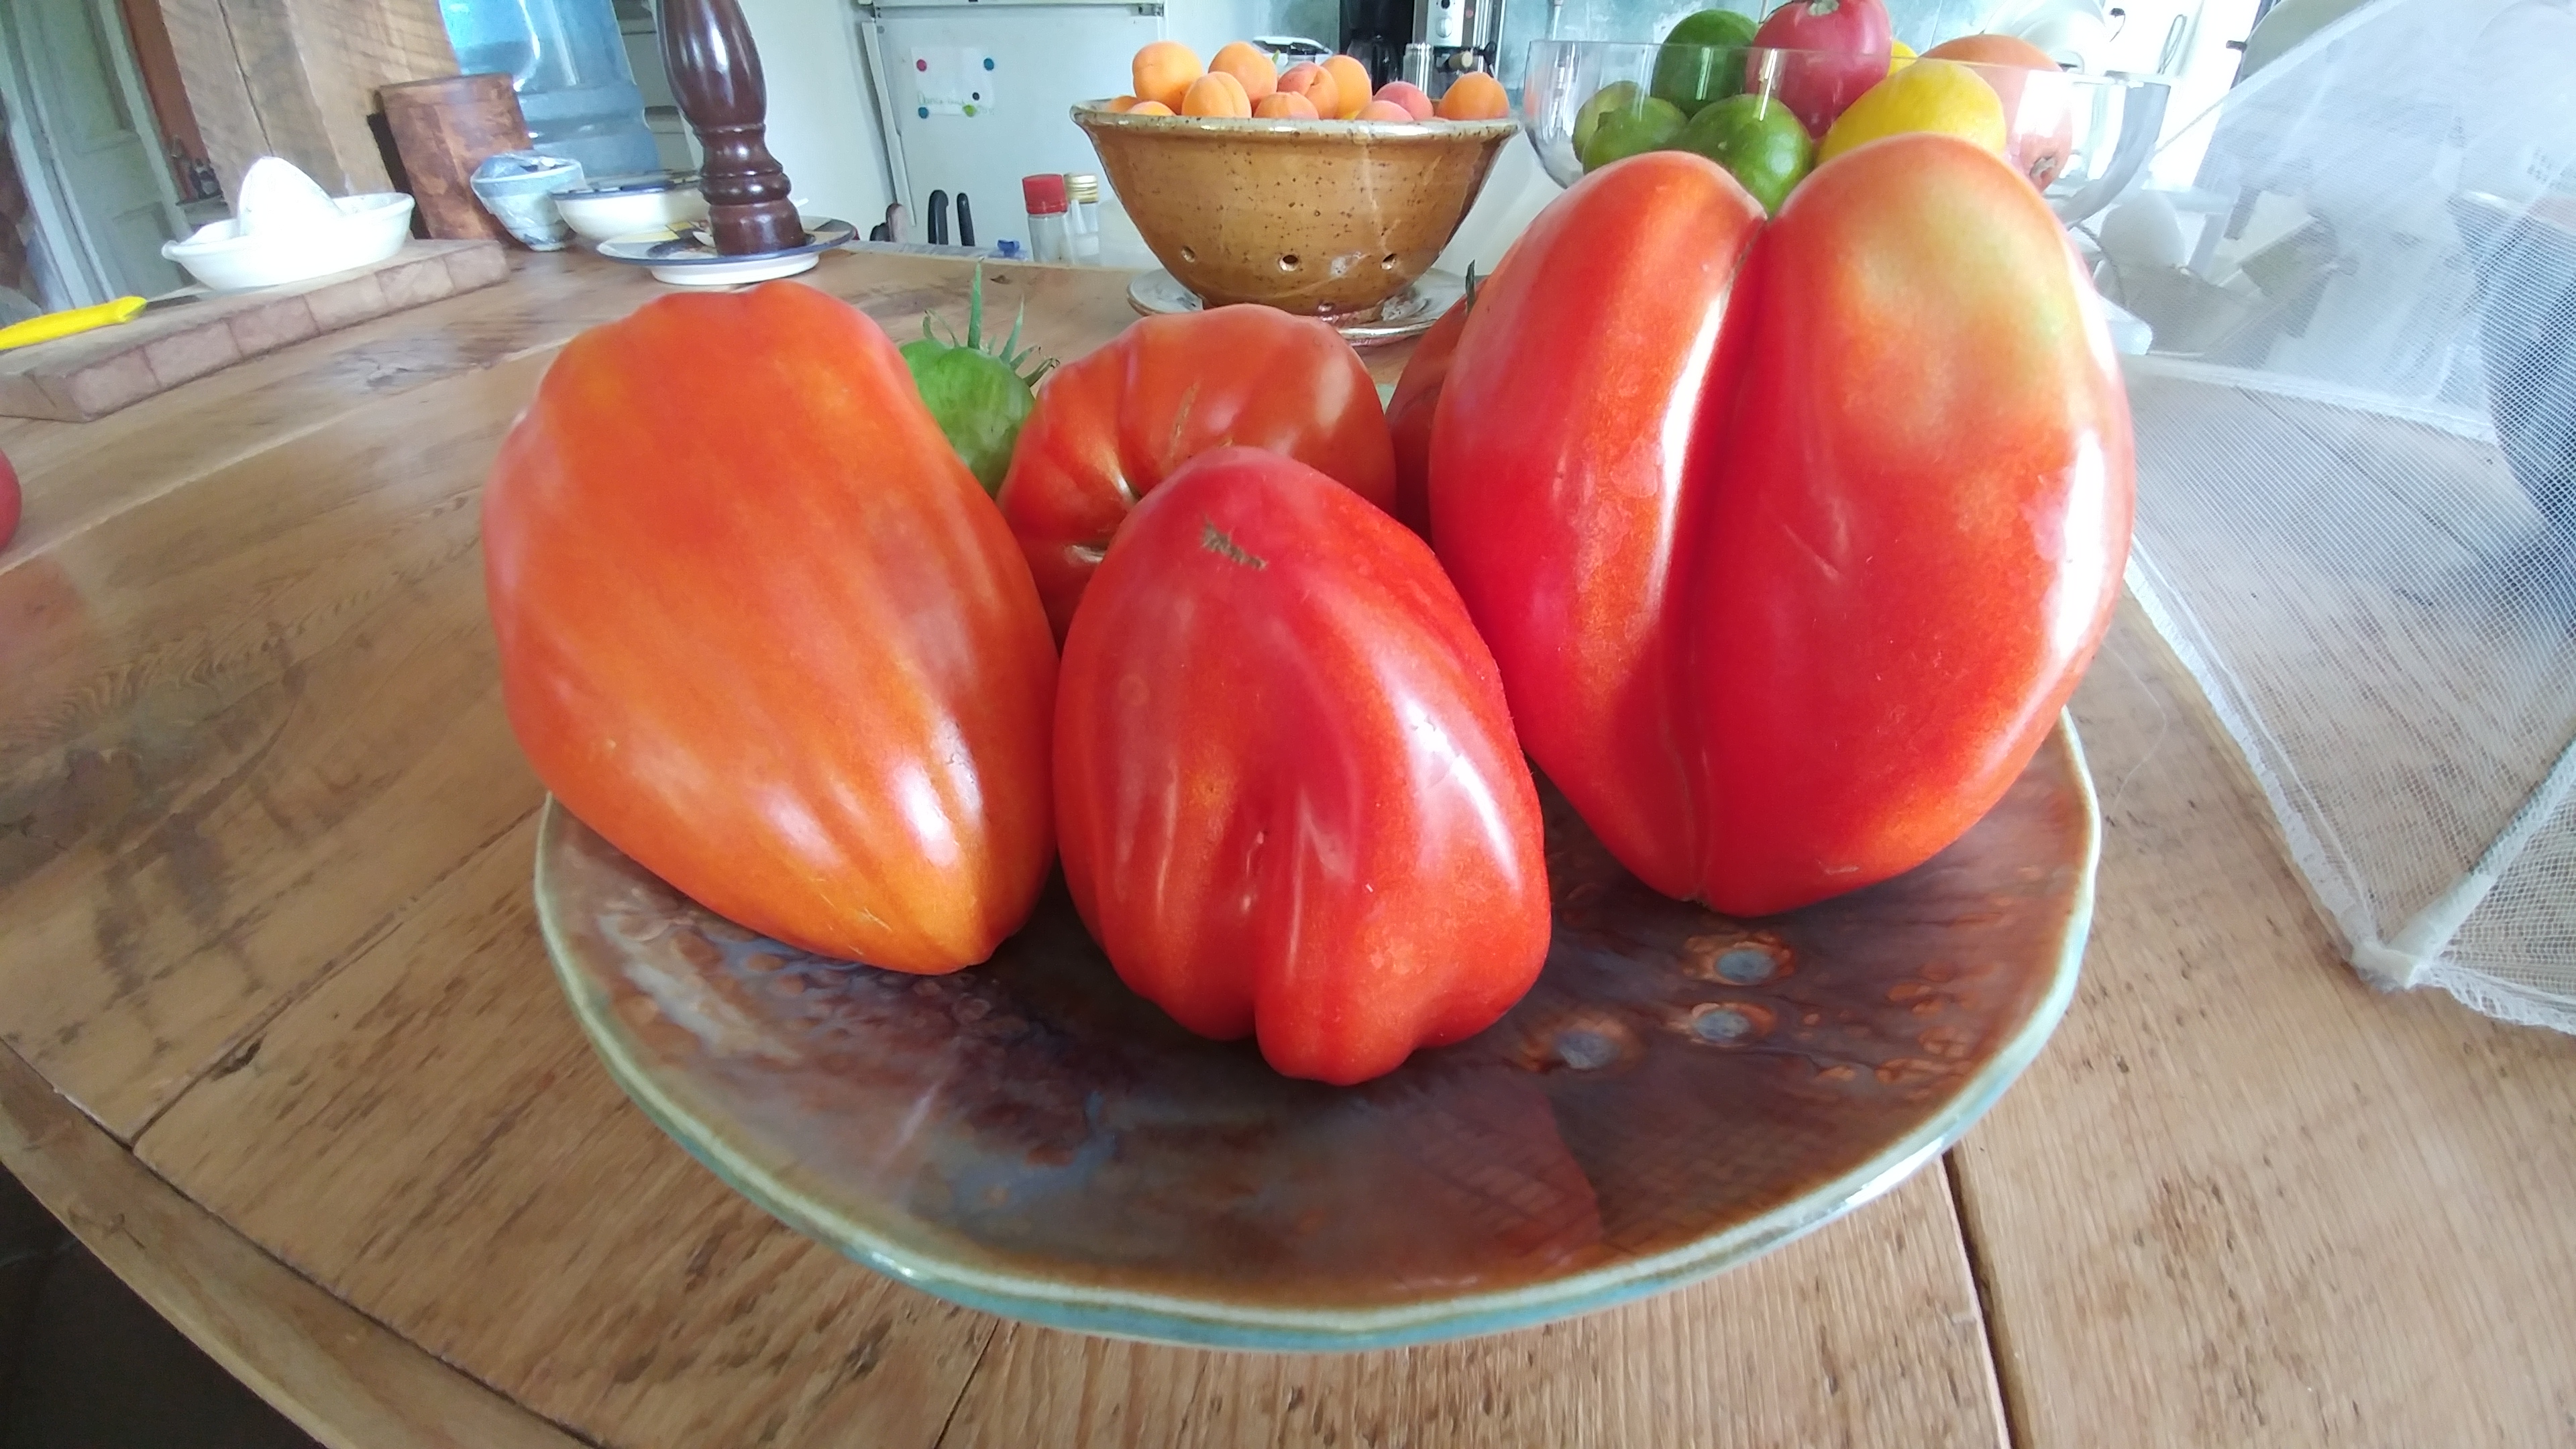
So anyway, back to the tomatoes. Anyone who knows us (or follows me) has heard of François’ famous tomatoes. They are an old heirloom variety whose name eludes us, from seeds passed down generations in Pasquale’s, (one of his Italian mushroom pickers) family. His great grandfather brought them over here like a century ago. François kept the seeds from the tastiest of his specimens and started them this winter, moving them into a greenhouse in the spring, and he lovingly tends to them every day with water and suckering, tying them up (they are 9ft tall!) and etc. He has planted some in the garden too and distributed seeds to other gardeners as well, in hopes to keep the variety alive.

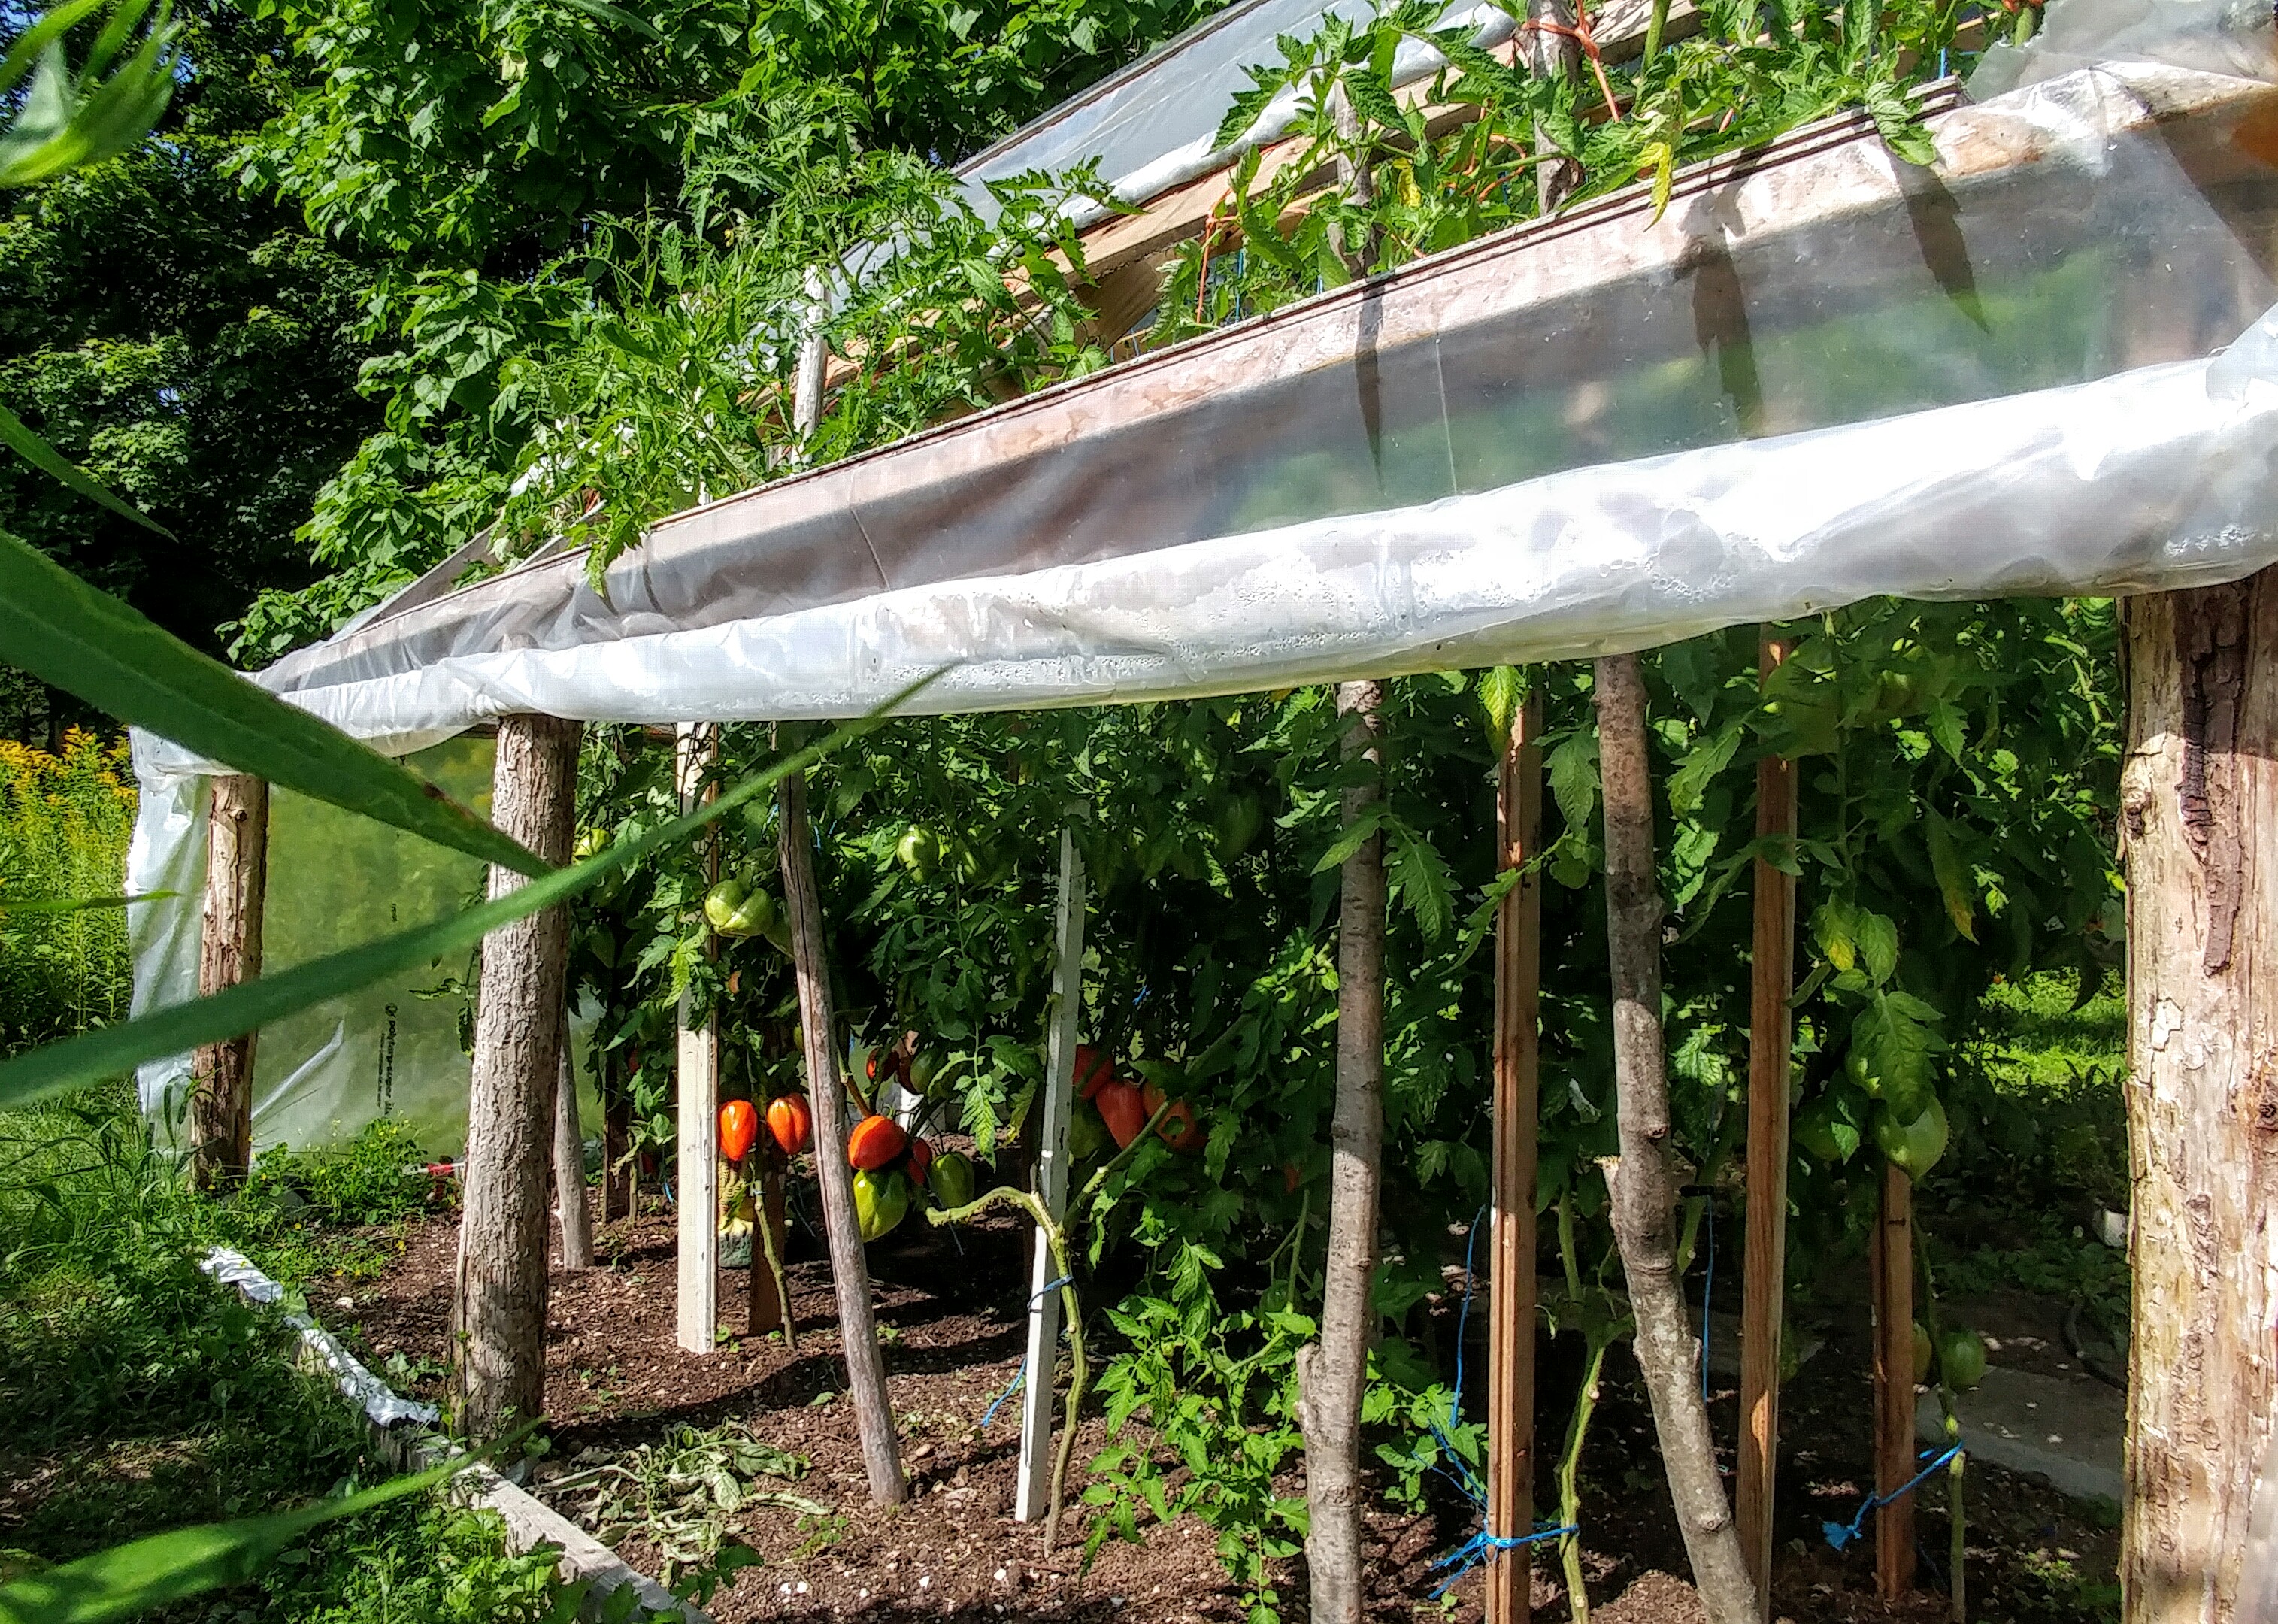 Greenhouse vs field, the taste test is on..
 Proud green thumb
I can’t tell you how important his tomatoes are to him, and hence what an exciting time it is in our household now that they are finally becoming ready. He lays them out on the counter in order that they will be eaten and for different uses.. Woe and behold if I take too many to the restaurant or if I chop up the one that was meant for a sandwich, or yikes, slice it ‘the wrong’ way - Watch out for the St-Roch tomato police!
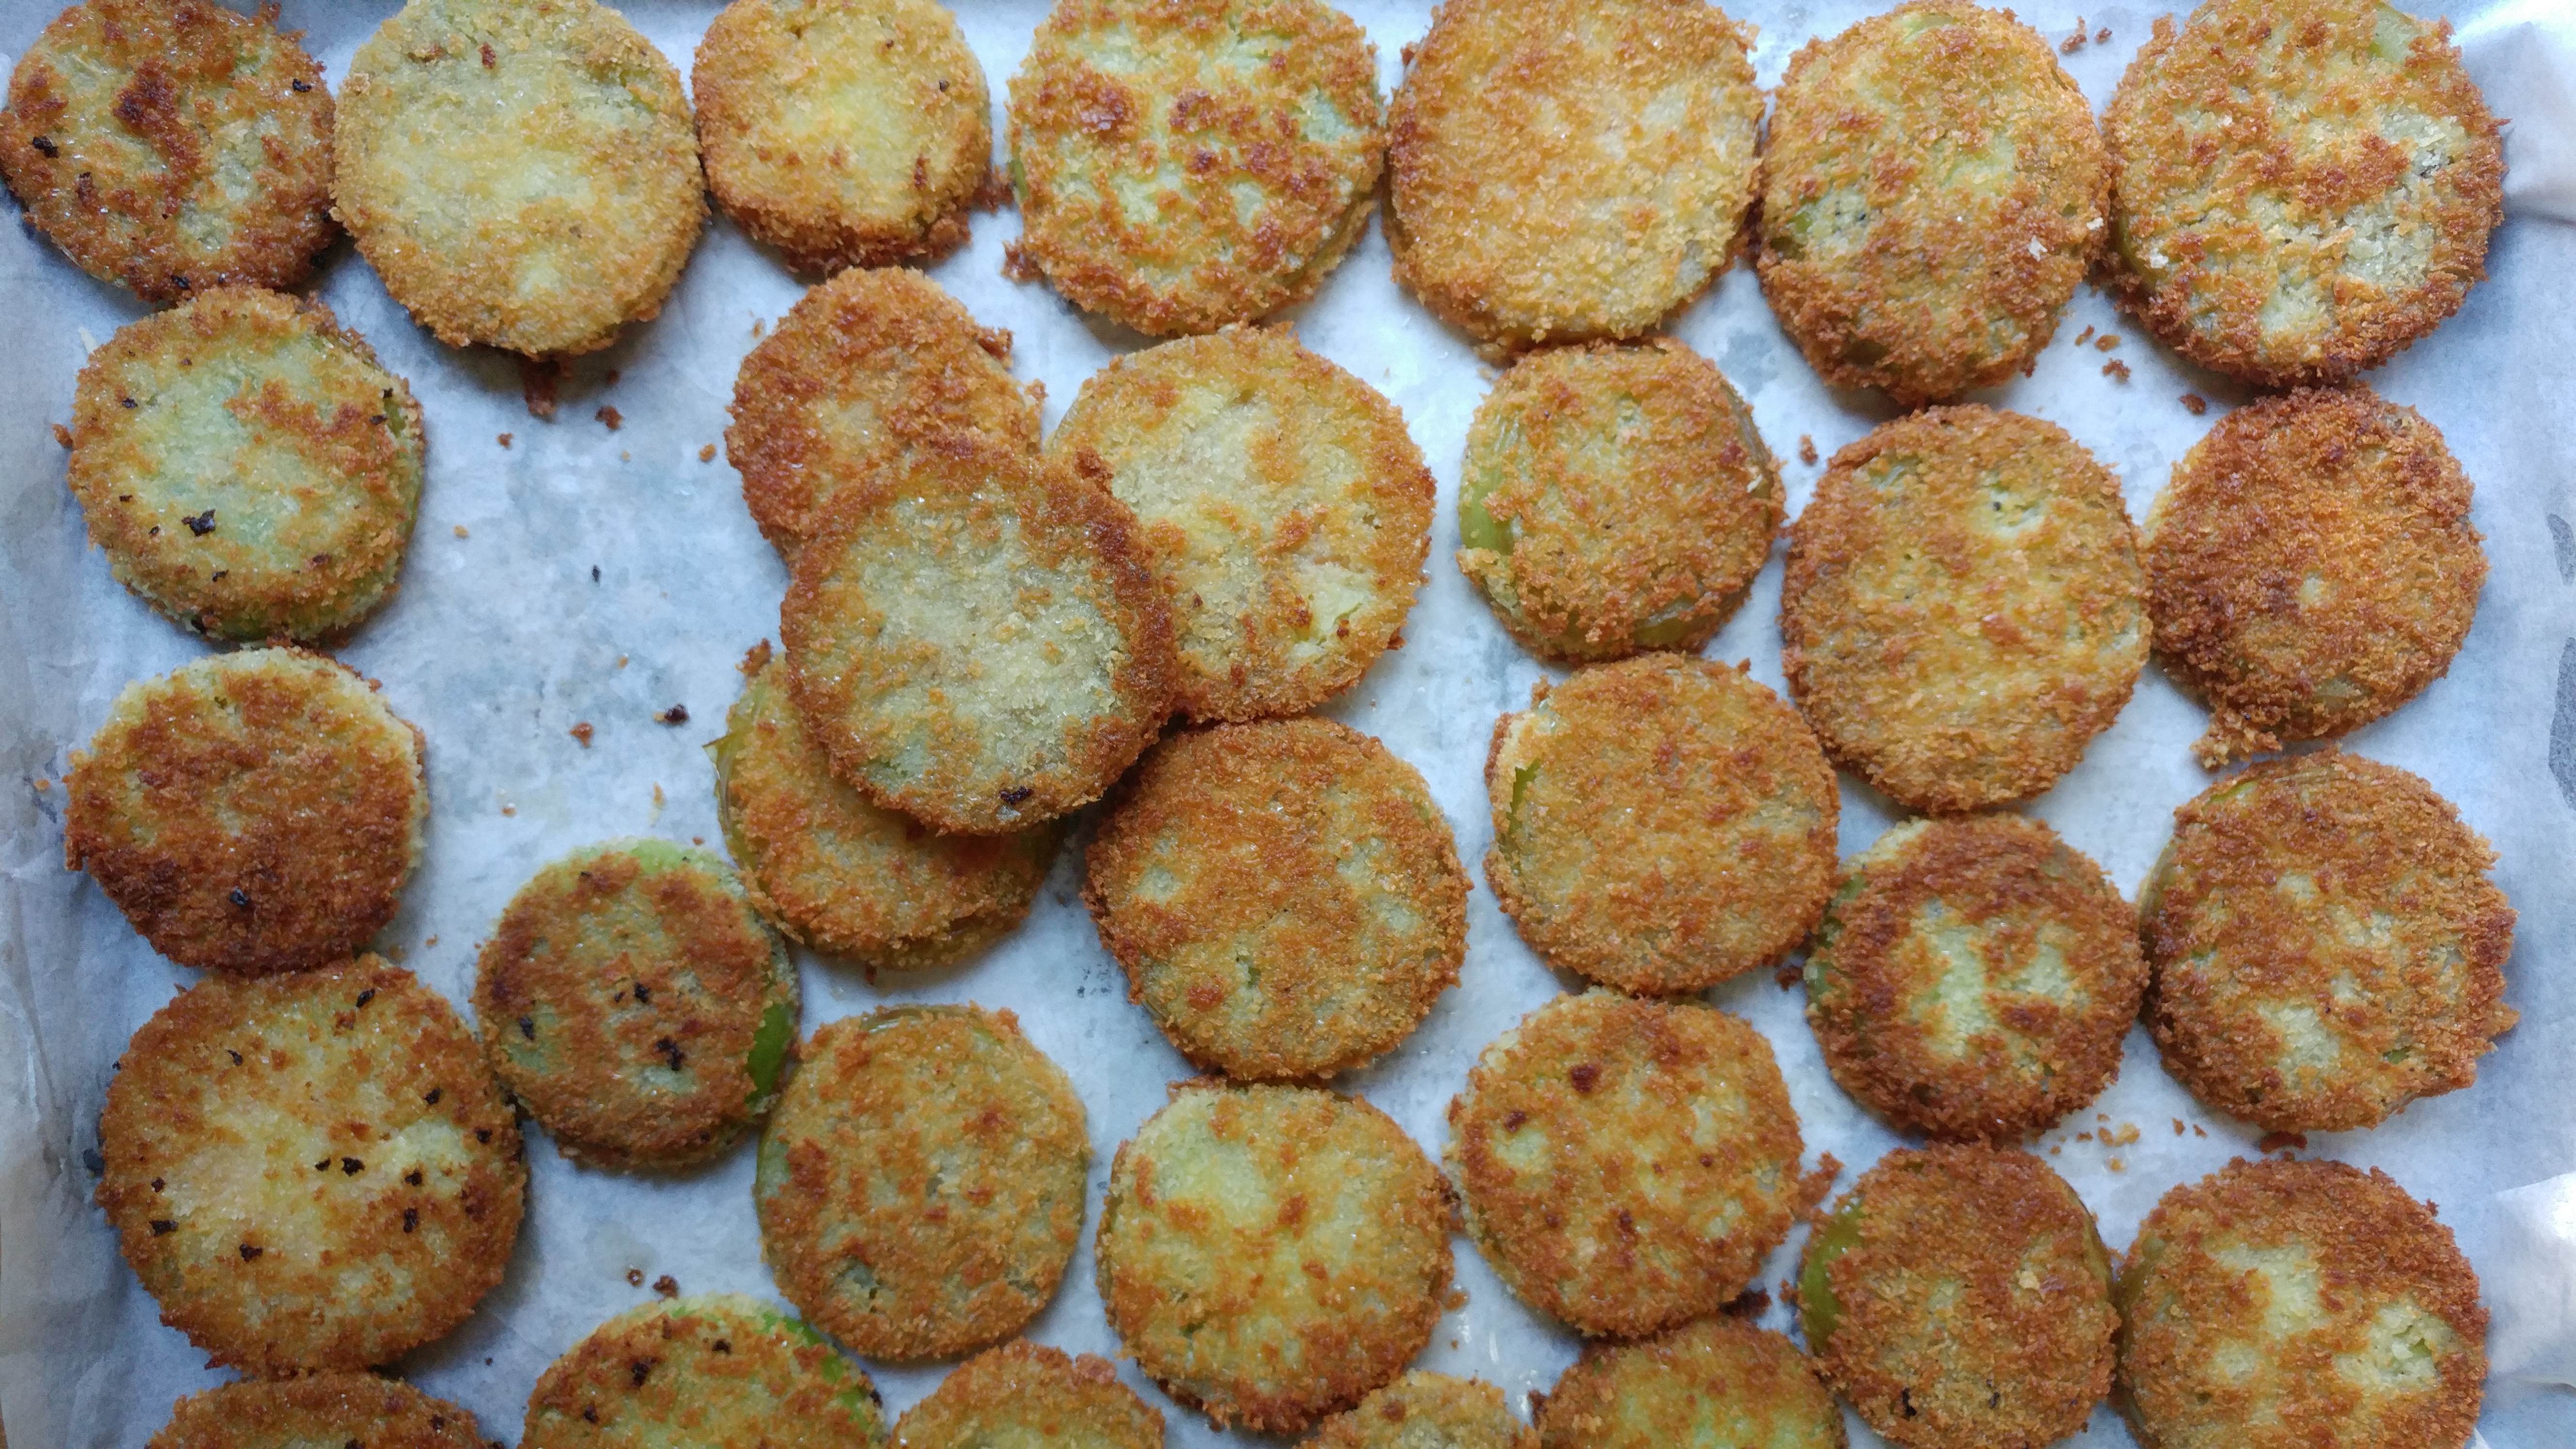
The first dish was of course Fried Green Tomatoes, which has become an annual ritual since we started making them (http://soupnancy.squarespace.com/blog-journalessays/2009/10/7/fried-green-tomatoes-finally.html), François just adores them. And besides, what else are you going to do with green tomatoes. Now that they are ripening, we are eating them in salads and salsa, with pasta and fish. They are meaty, not many seeds buy juicy, sweet and tomatoey, with a bit of tart. I like some acidity but François expects them to be succulent sweet and is banking on the garden ones.
He apparently has tomato tarts and pizza on the agenda, as he has ordered his dough (from me)..
At the restaurant – 1st entree of the moment: Fried green tomato with ripe and smoked tomato, corn, cucumber salsa, sea spinach and sea asparagus, crinkleroot lovage yogurt dressing, smoked eel, bee balm 
As the harvest really explodes later this summer/fall, I will be canning, smoking, making ratatouille and ketchup, etc..
;) François' tomato pie, yum!
François' tomato pie, yum!
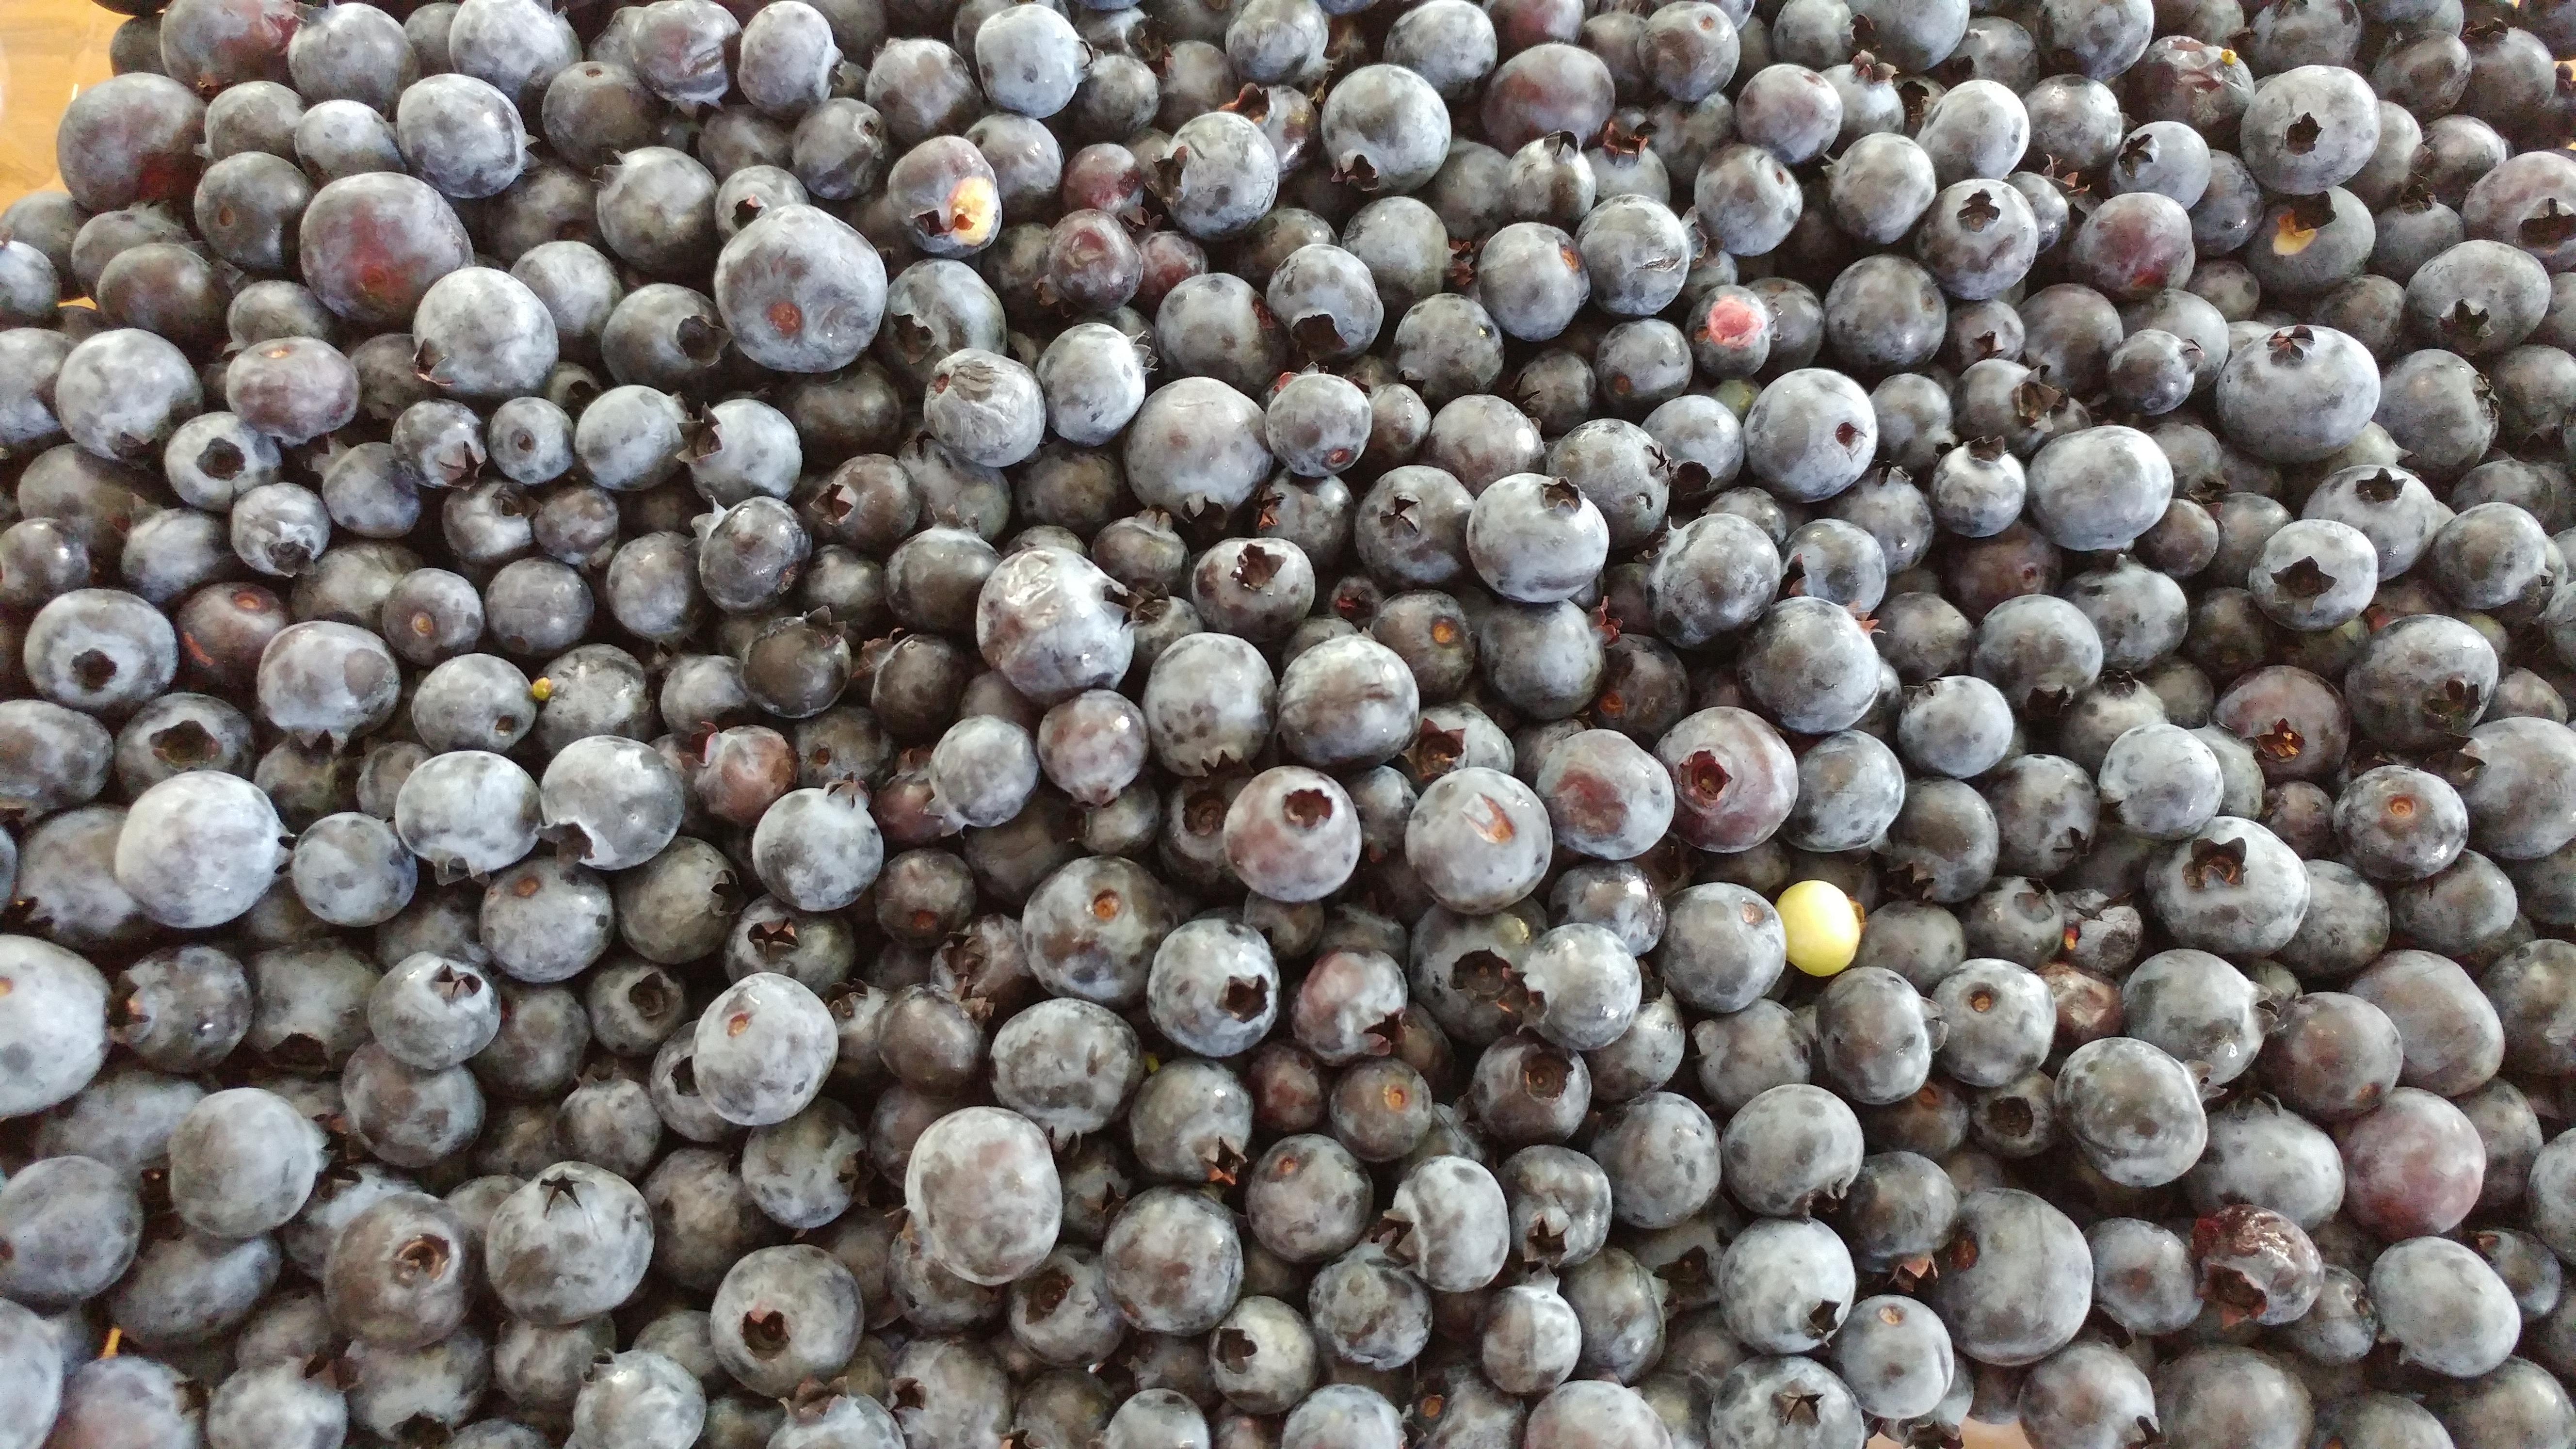
But it’s not all about tomatoes or even the wild edibles, with the corn and beans, peas, favas, zuchinni and peppers, garlic, kohlrabi.. Lettuces, herbs, Plums, melons and peaches.. Not to mention the wild blueberries! And it will only get better in the month ahead, alongside the mushrooms. September is the best month of the year for food!
Some other summer hits:
A vegetable stew thickened with bread: ribolita - panzanella meets ratatouille, just a different delicious way to use the garden bounty or what’s hanging out in your fridge. Stew onions with celery/leek, peppers, add zucchini and whatever other veg you like (corn, beans..) Herbs and spices, A bit of white wine and stock or just tomatoes with their juice. At the end, throw in some croutons or dry bread, season and serve on salad with a good oil, aged vinegar and cheese shavings. Good as is or as an accompaniment to sausage, chicken or steak. At the restaurant, I was serving it with confit rabbit. 
Fleur d’ail (Scapes) as a vegetable and as a condiment
In July when it’s scape time, we put them up for the year, alongside the wild stuff, a raw, green garlicky pesto. But it’s a beautiful time and a 2-3 week window (one for picking one, 2-3 for storing), when you can eat the scape as a vegetable, like an asparagus or green bean. It takes a 5 min. Boil. It is tender when it loses its bright green, sorry. Mildly garlicky, delish. Here the raw pesto is tempered into the hot potato mash, and the cooked scapes are a garnish. Alongside chanterelles which are in season at the same time. Just missing the corn, which would be perfect now. 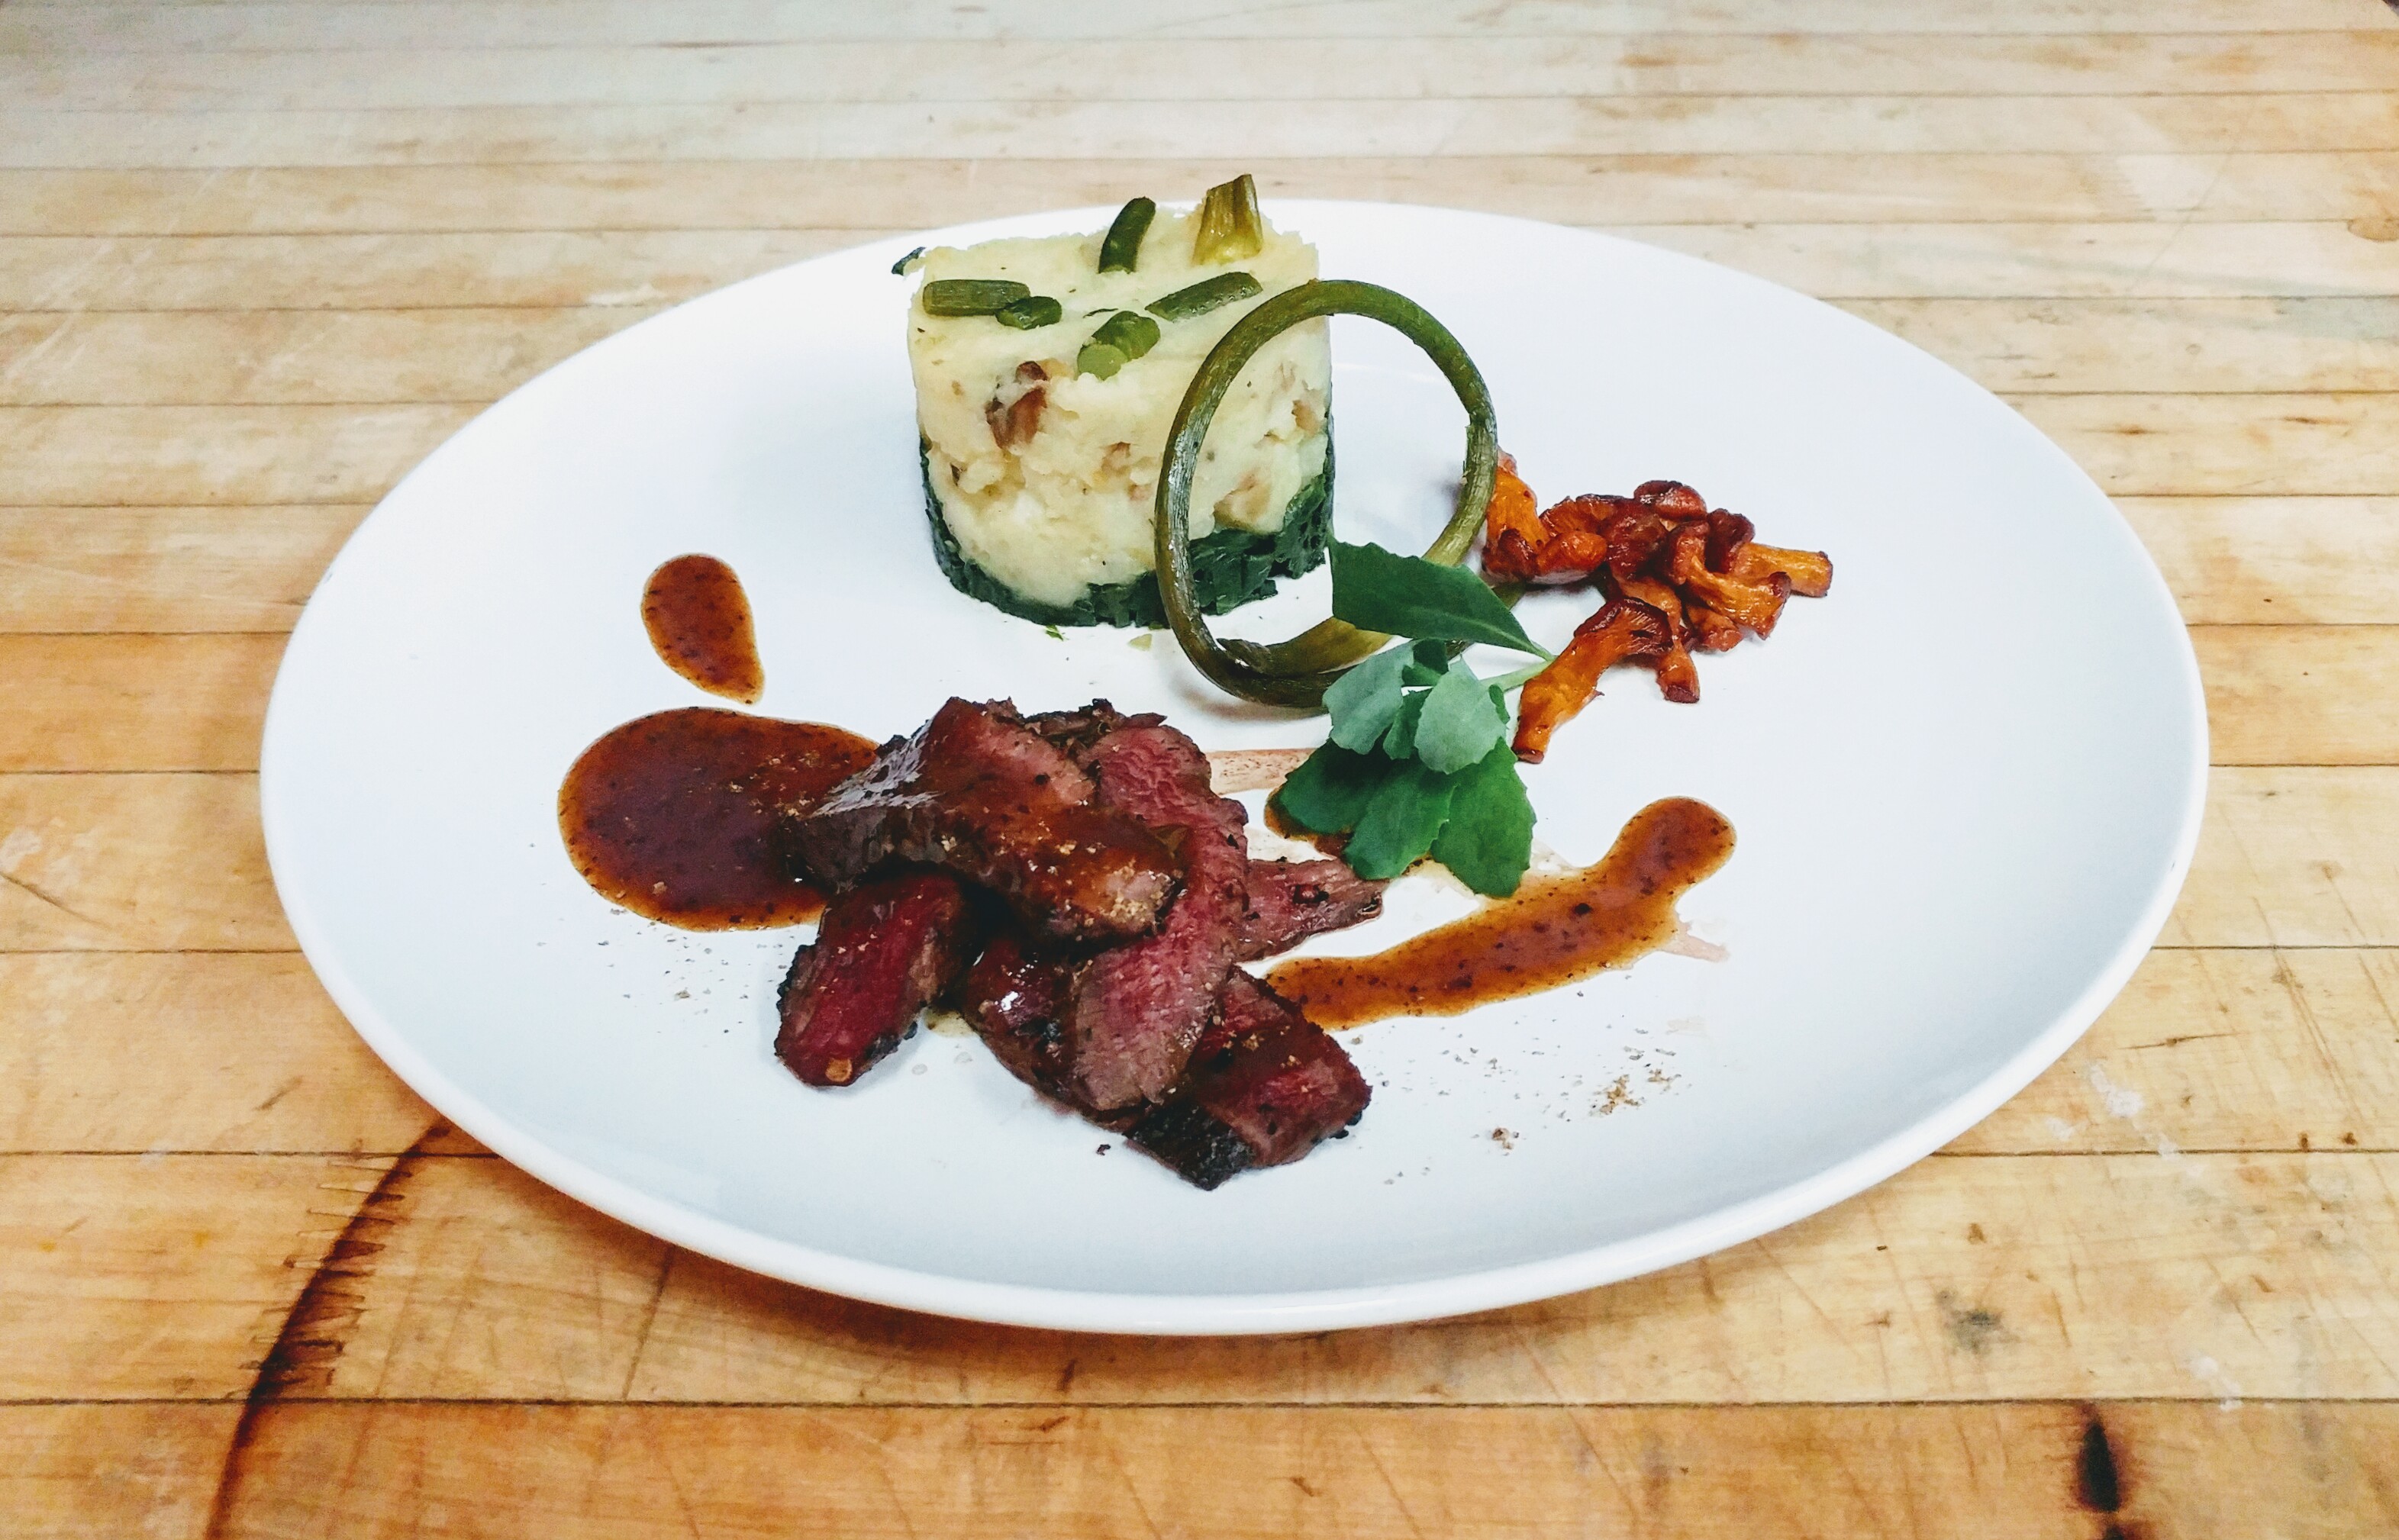
Vichyssoise (Stinging nettle)
Like a Parmentier or any puree/ green soup thickened with potato (so less cream). With stinging nettle and sea parsley, this soup is delicious, but it could be/is with many greens. I make a seasonal green soup with what is abundant, always good. Not only delicious, but nutritious. Served cold on a hot day or hot the rest of the time. Just a basic soup with onion, leek, celery, a touch of wine or vinegar, stock, herbs and spices, potato. Add wild greens. Finish with cream, milk. Tweak with salt, pepper, spice, acid, maple syrup.
Add a little garnish like this: cucumber, radish, lovage, sumac to lighten it up, or it could always be another to make it more hearty like bacon or smoked duck.

Mushrooms or not, it’s time to be hitting the market (and/or garden) and cooking up a storm!
 Lobster mushroom and lobster bisque risotto with beach peas, sea spinach and sea scallop
 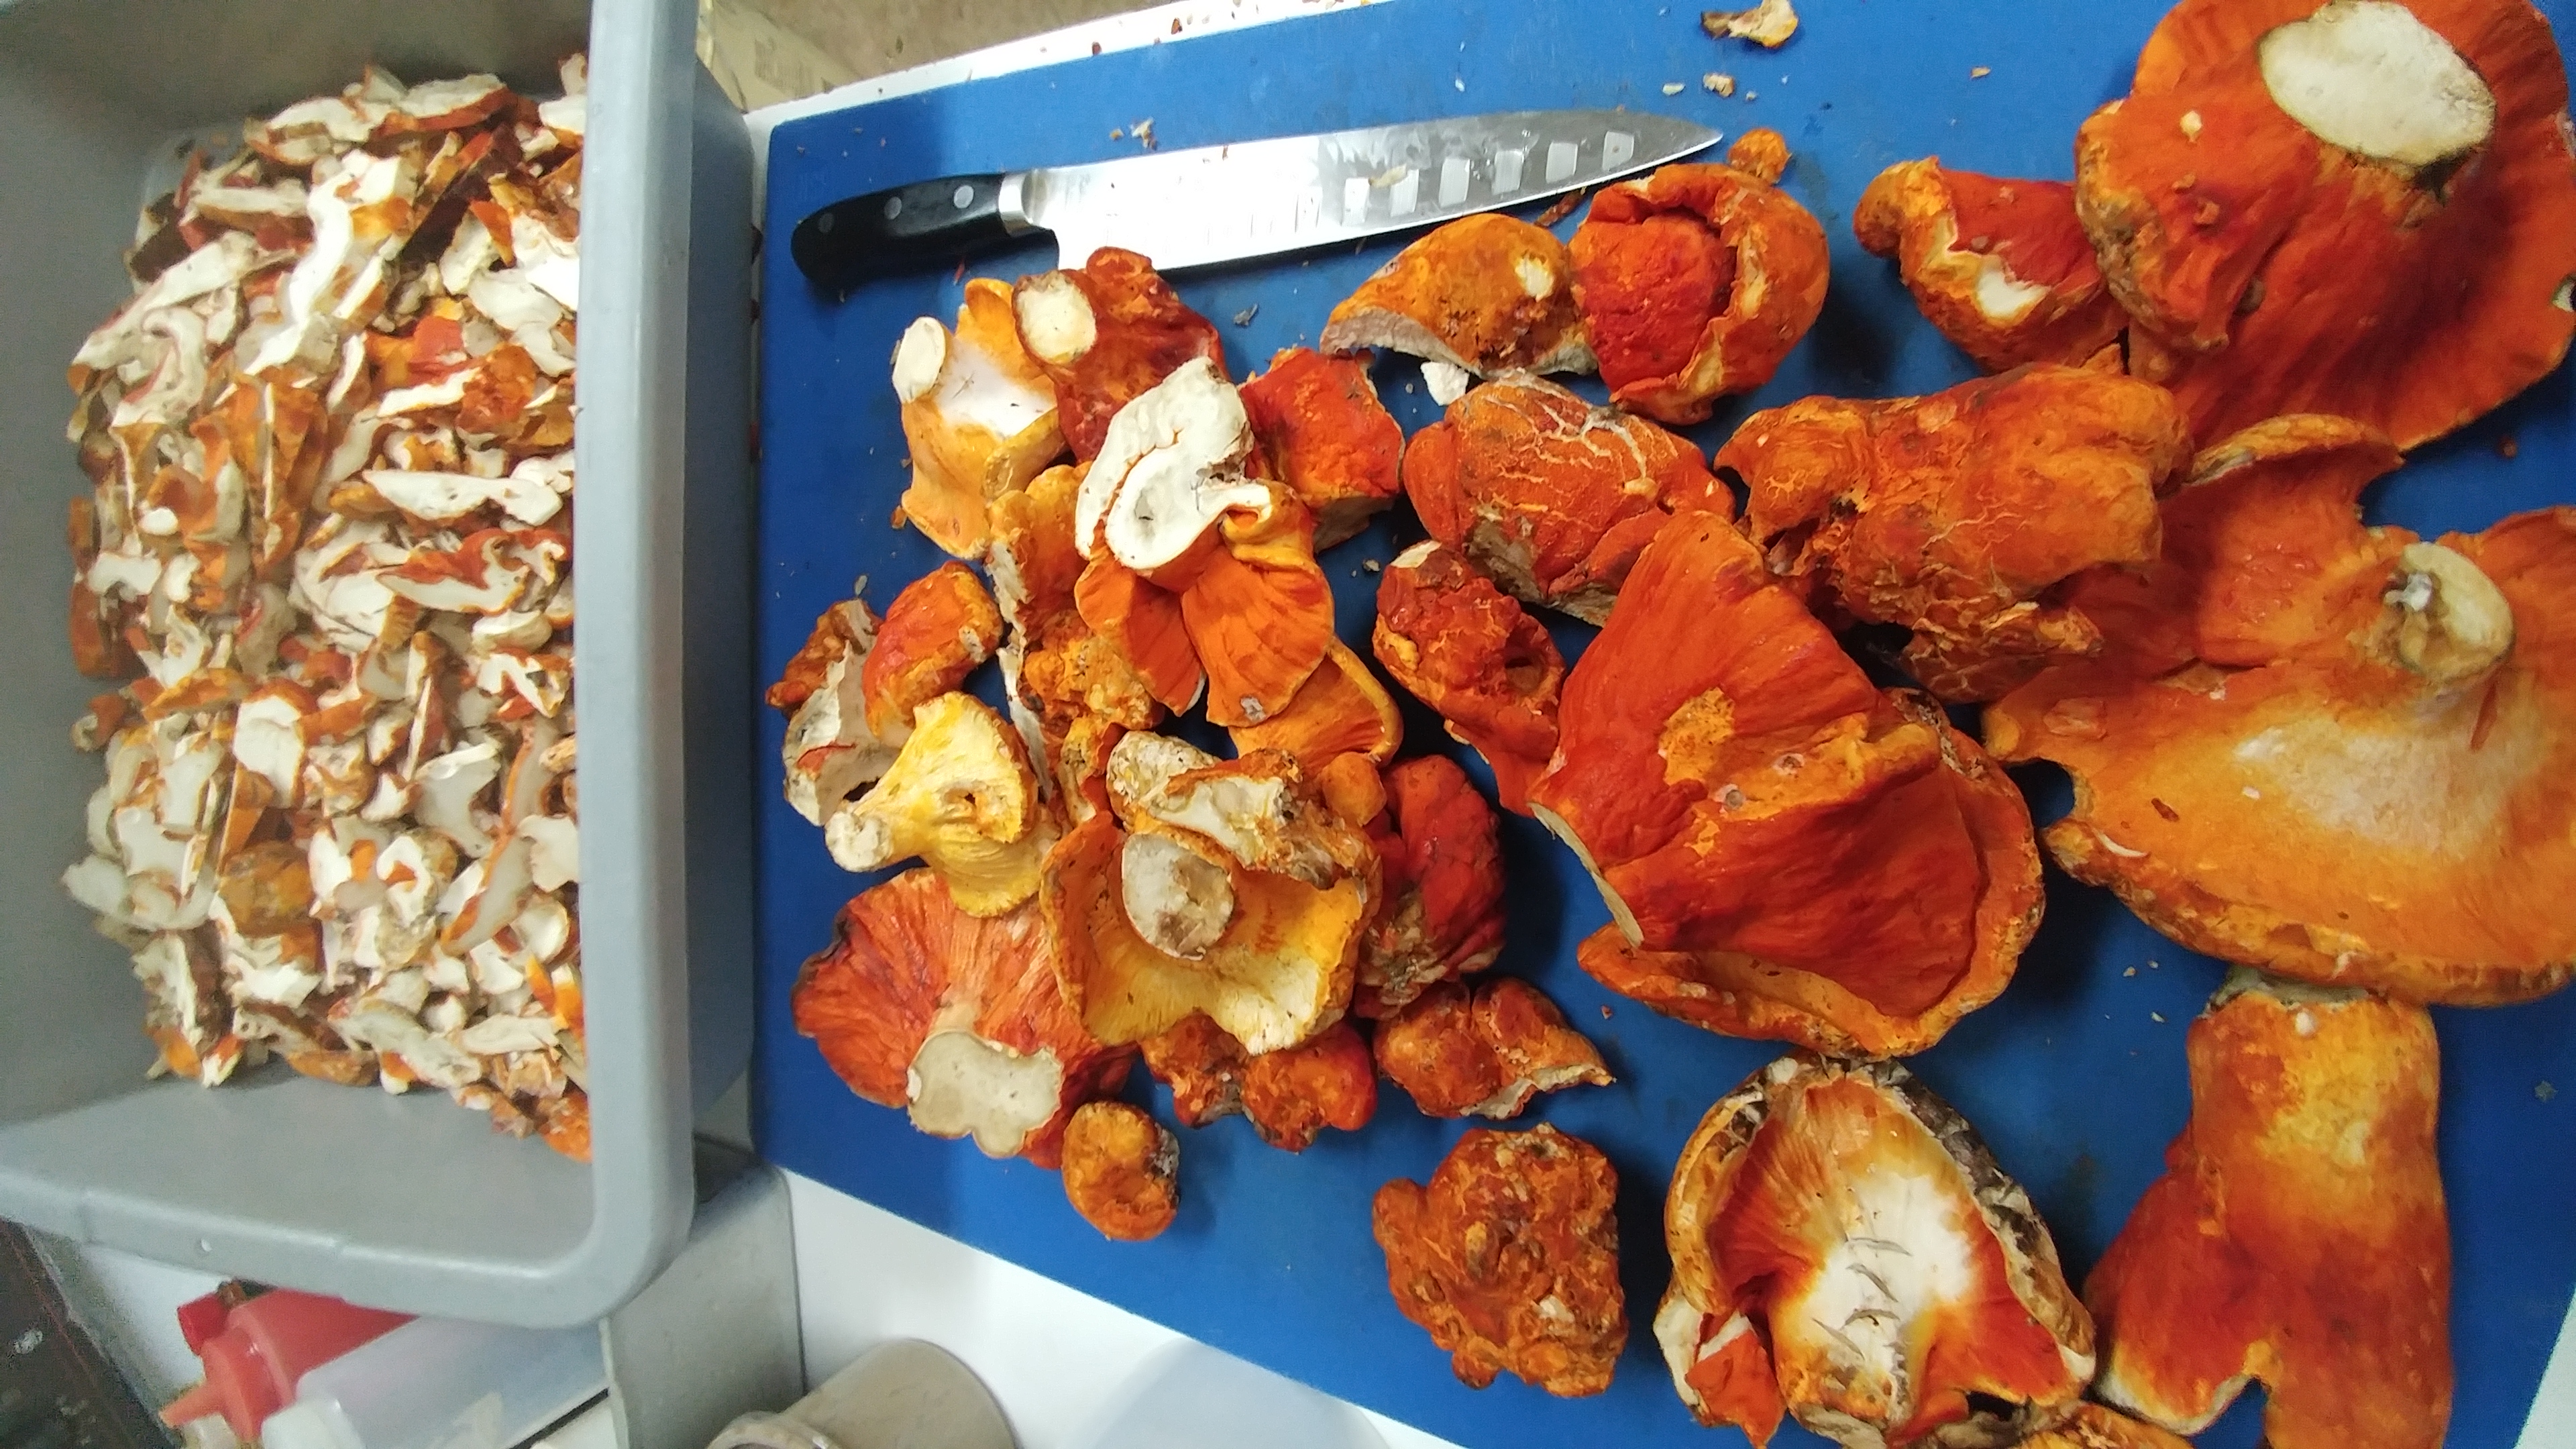 First significant harvest of Lobsters to put up
Nancy Hinton
in 2017, Wild edibles in season, heirloom tomatoes, ingredients, recipes, scapes, stinging nettle, summer, summer cooking, summer recipes, wild food, wild mushrooms
|
Post a Comment
My guilty foreign flour affair '00'
My guilty foreign flour love affair
If you love pizza as much as I do, and like to make it at home, read on..
Maybe I’m late to the game on this, but I’m in love with Italian yellow flour ‘00’!
If you like to play with dough, you NEED to try it out. It is just so fun to work with. And it tastes great. I just love the texture it lends to the dough too. Although it looks like finely ground cornmeal, it is indeed wheat flour but milled differently, very fine supposedly, I guess by Italian standards because it is coarser than ours.
Being a girl that promotes local food pretty religiously and for some time now, naturally I buy all my flour from the mill next door (Le Moulin Bleu, St-Roch de l’Achigan).
My guilty affair with this imported flour started with my first No.900 pizza a couple of years back in Quebec City. It was simply the best pizza! Even my fussy François agreed. Dressed only with good tomatoes, cheese and salami and dripping with olive oil, it was the thin, blistered but soft-chewy crust that made it extra-special. Maybe this would be an occasion to use the silly word ‘toothsome’.
Since my first year of professional cooking 24 years ago and early job in an Italian restaurant (Picolo Diavolo in the village), I have been making pizza. And I have the burn marks to show it on my arms. I don’t make it at Jardins Sauvages except for fireside friend parties, the occasional catering event as finger food, but yes, regularly for us at home, for me. It is never a meal, but the perfect snack, say late night or during a kitchen shift. I always have dough in the freezer, if not a ready-made pie. François likes it white, which is good especially loaded with wild garlic and crinkleroot and some wild greens (so green). I prefer it red with my put up tomatoes, cheese of course and something salty like a cured meat or olives, definitely some spice and occasionally maybe even something sweet like a pickled pepper or ratatouille. But only as a garnish, absolutely not too much topping. But I have a hard time not putting too much on the pizza, like on my plate.
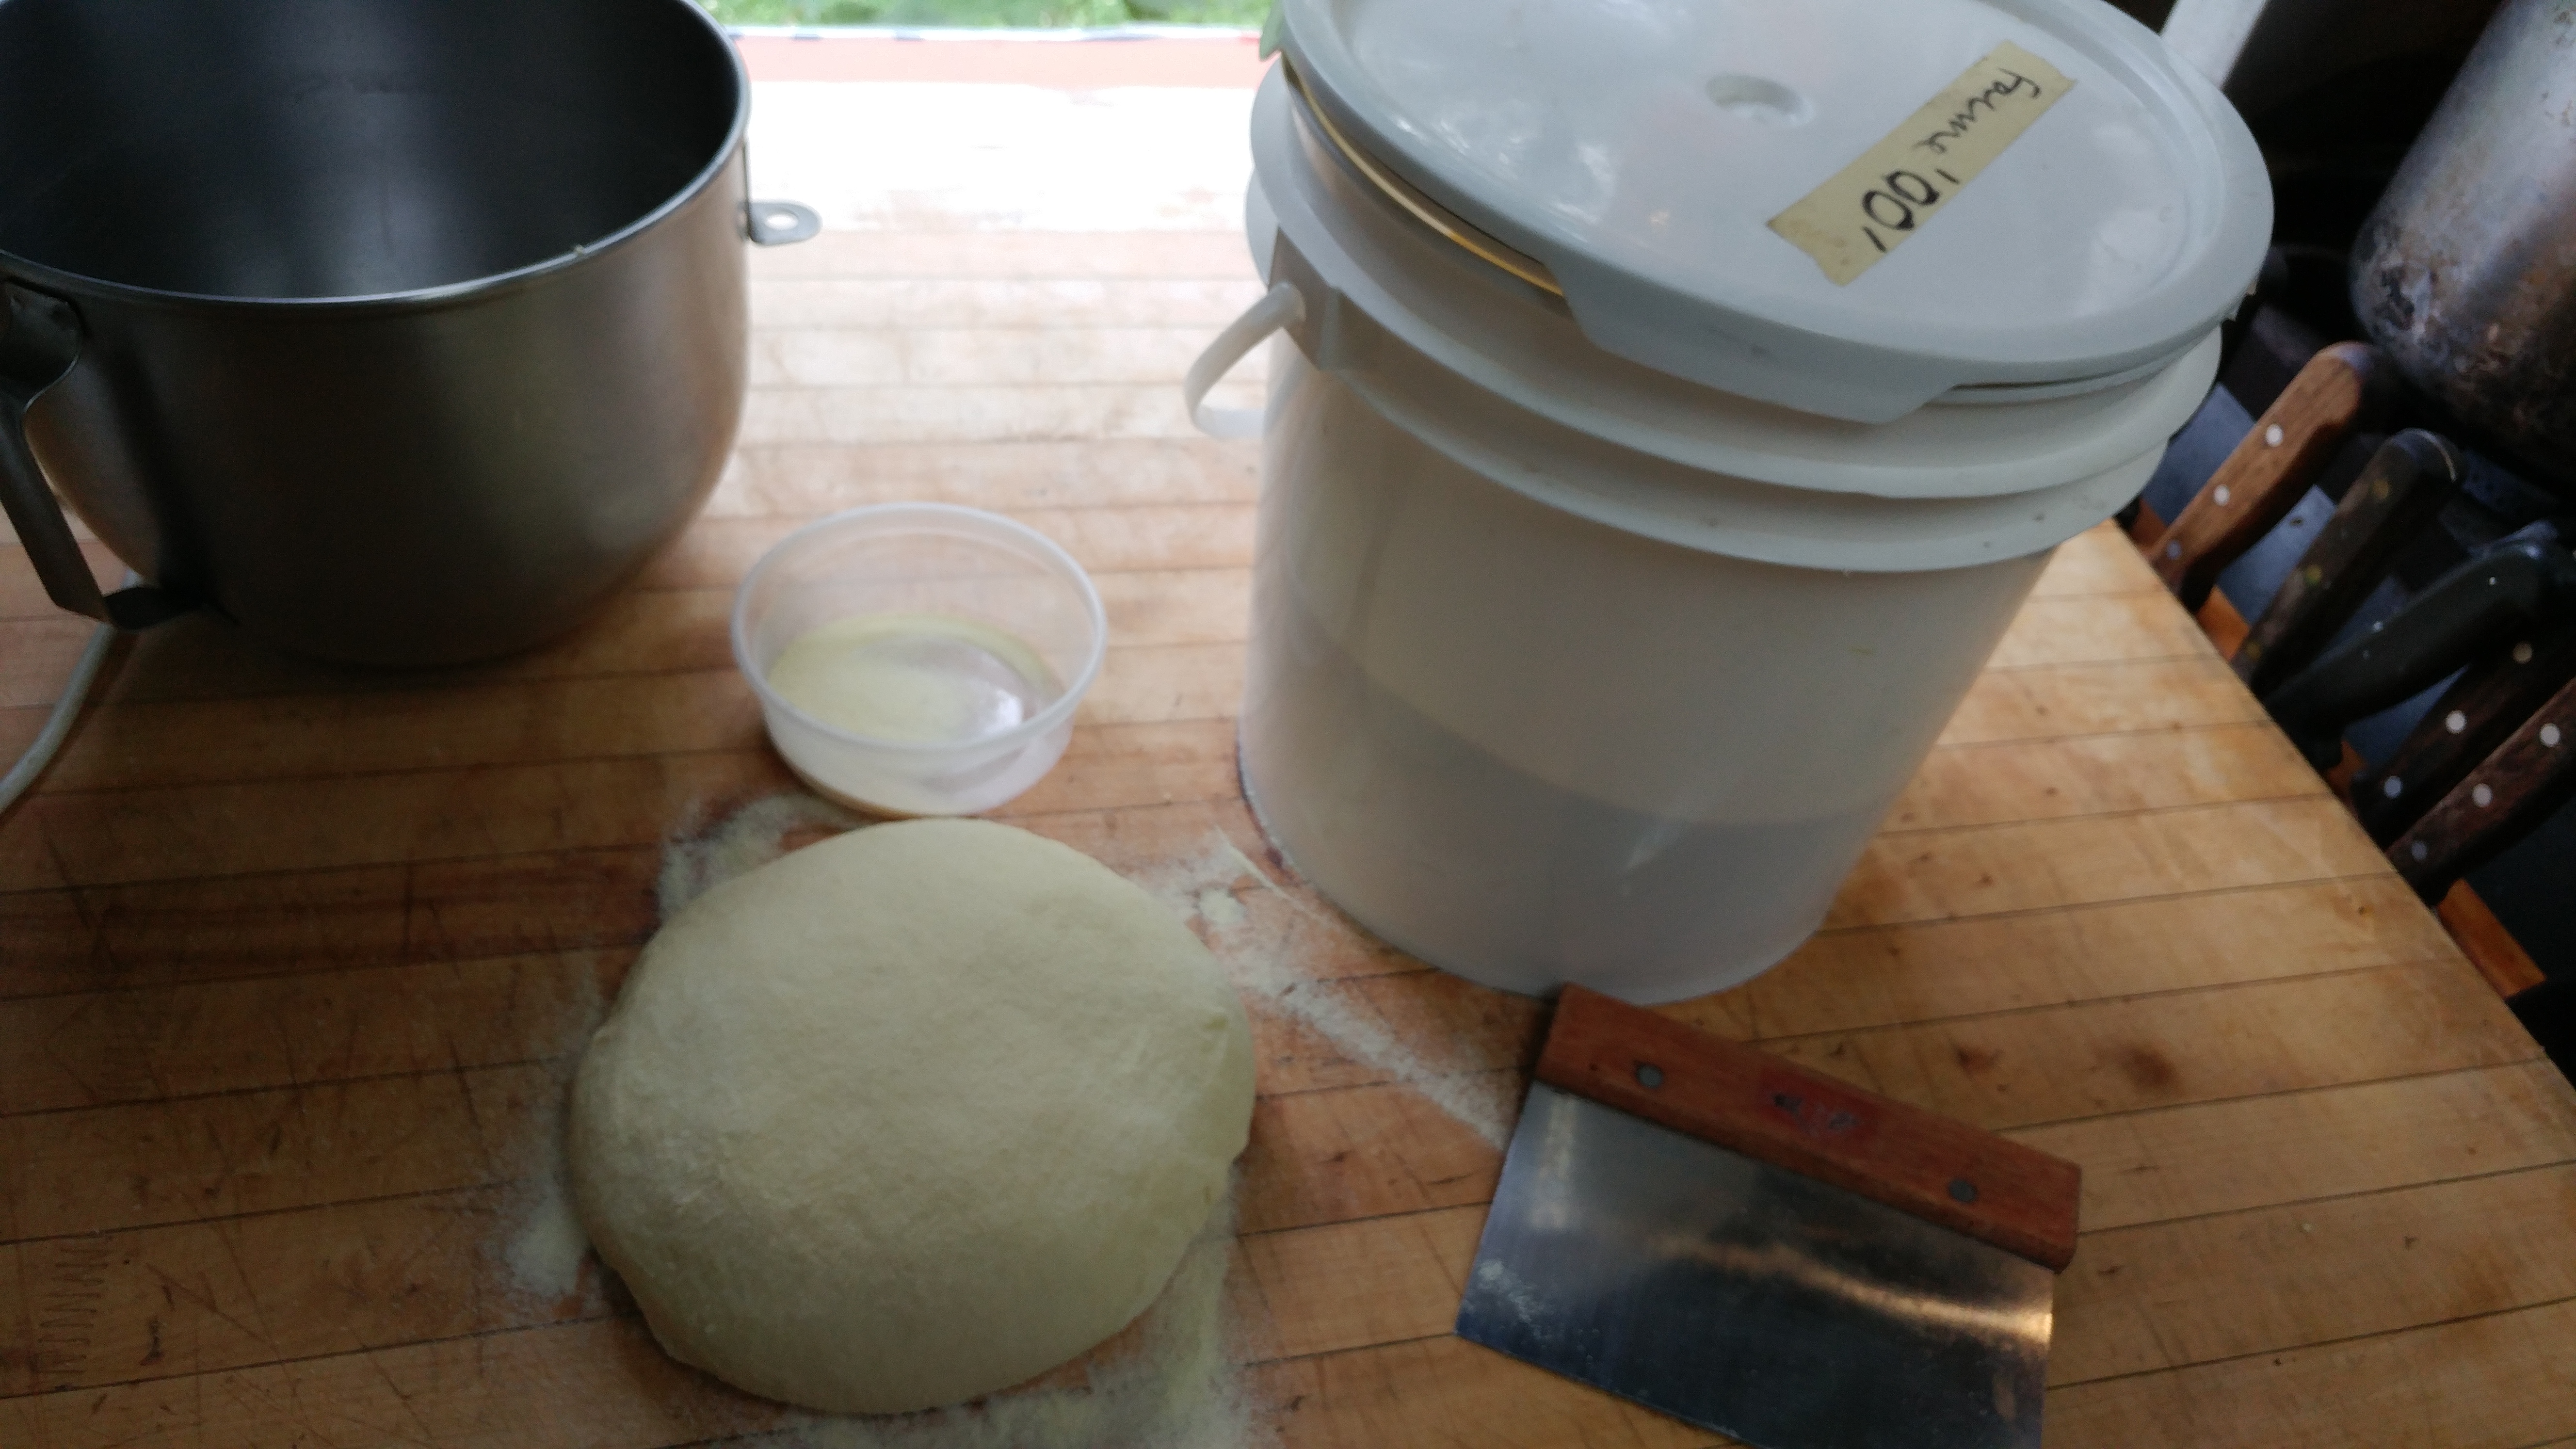
Anyway, the important thing is the crust. The dough at that first spot I worked was a thin crust baked in a wood oven, back when that was a new thing on the scene here; it was rich in that it had milk, eggs, a bit of sugar and all purpose flour, more crisp than chewy. I’ve come back to it several times over the years, after experimenting, but most often doing a simple basic 3hr affair with 65- 70% hydration, just salt, yeast and a touch of olive oil. But now, all while working on the chew, I do like to add one egg for the crisp/taste factor, otherwise a basic dough.

Of course, I went through the no-knead trend but although it’s a neat trick, you have to start the day before and it doesn’t really produce the best results. Especially with bread dough, I have ditched the no-knead laziness however often it saved my ass in the past (the Instadough recipe I learned at the Cordon Bleu was a go-to when busy).. No longer with Leonard (my beloved levain who passed a while ago), I now have a younger less complex starter that sometimes requires work in the days before, but I prefer to make the final dough same day and yes, knead. I make pretty good bread given my set-up, and I enjoy it. If I was in the city and had a fantastic bakery around the corner, I would probably outsource but here, it happily makes sense that I bake my own bread.
All that said, I have never been super ecstatic with my pizza dough, often settling, always fiddling. It’s also in my nature. I can’t just follow a recipe, always working on the ultimate one that I forget to write down. In any case, I know I don’t have the proper oven, can’t attain those ideal ultra-hot temperatures. And yes, I tried a baking stone, rocks from the river and etc. At one point (this must have been early in our relationship), François spoke of building me an old fashioned bread oven; he has the plans and the stones. But we both know that’s ridiculously inefficient in terms of the wood we would need to burn for our small, sporadic operation and a family of 2; ideally that sort of thing would be for a community of bakers or a full-time bakery/pizza place.
Besides the fancy 900 degree oven I will never have, I figured I might come closer to that crust I dream about by trying the famous yellow flour used at No.900 and by many Italian pizza aficionados..
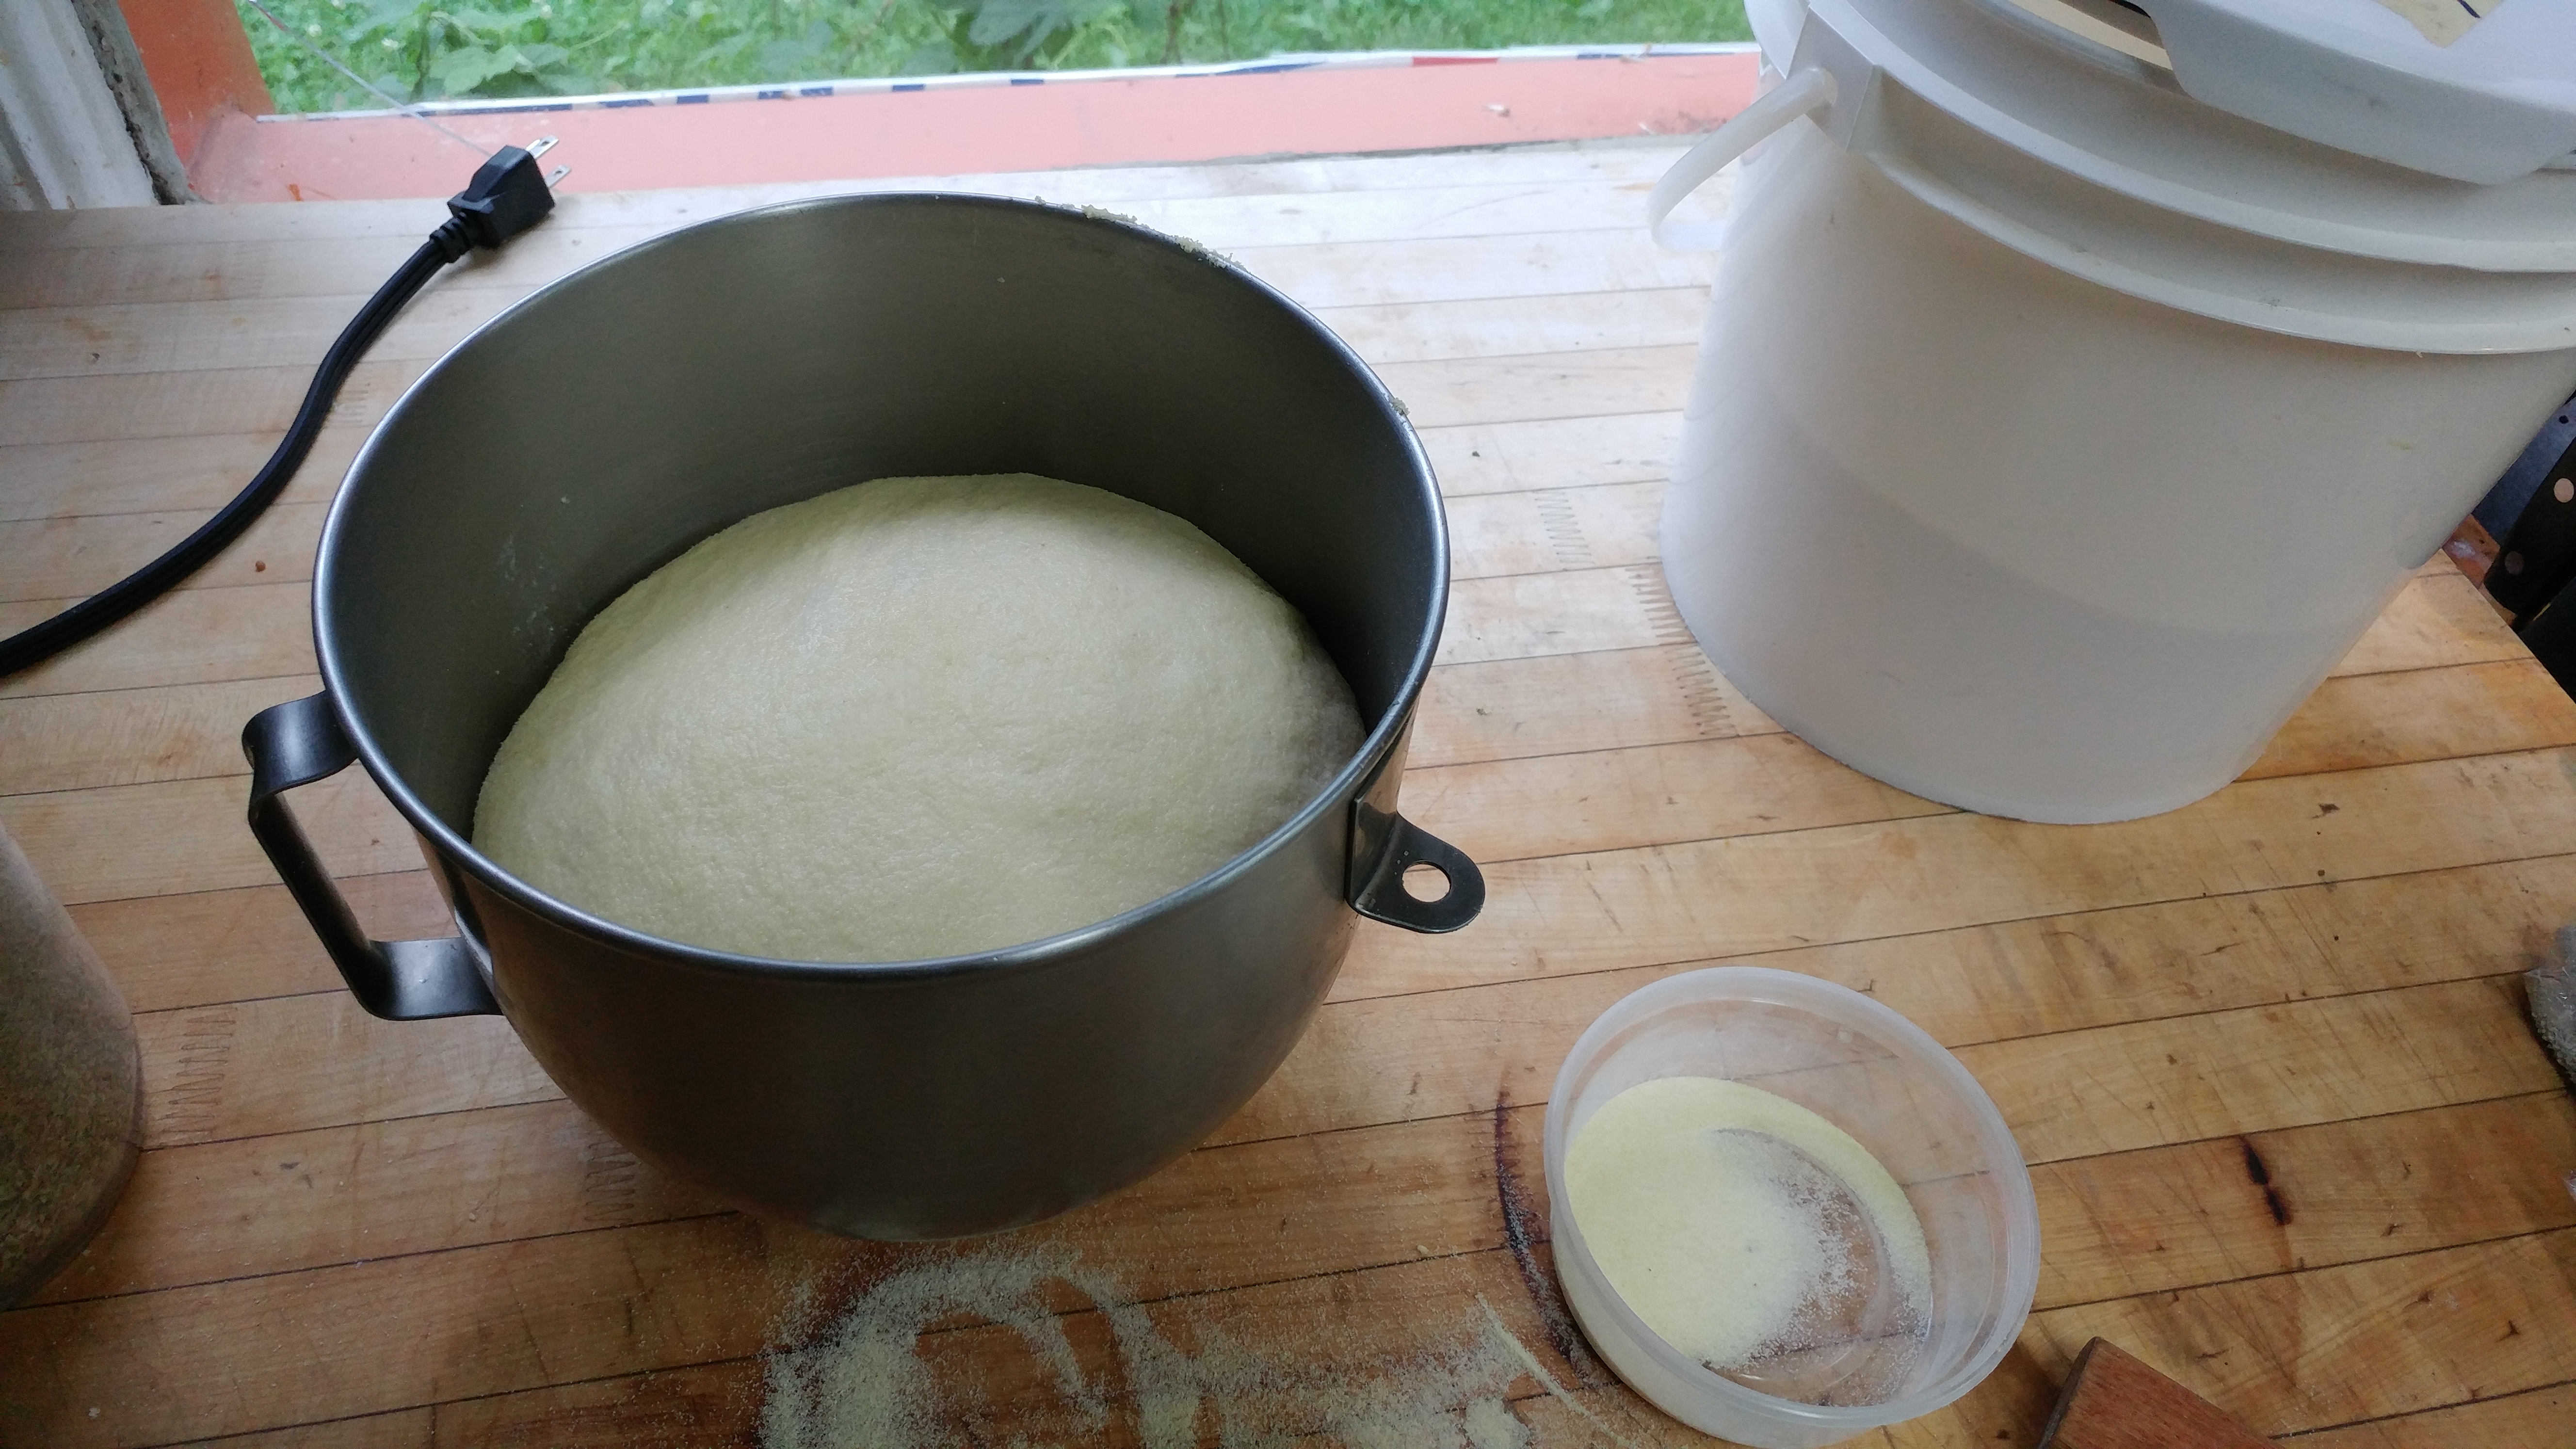
And yes, it is pretty amazing! Mind you, you can’t follow a regular recipe for it, but I just played within my ratios and added the flour needed. It’s incredible how elastic it gets. 1 cup of 00 weighs 200g compared to around 150g for most all-purpose or bread flours. But it absorbs less water, so you need more flour than you think. But if you’re working in cups, you end up not being too far off I realized.. Since I usually work with weights in bread, I stopped following any recipe, followed the feel and the fermentation. With the extra flour in weight, I saw I had to up the salt. I haven’t found that you need more yeast, but maybe a pinch. It depends again on if you’re using a starter or what your timeline is. If you have a starter or want to take it slow, you will add less yeast, say. Don’t be too harsh, punching down your dough and such, it’s good to be gentle. I am often tempted to roll out but stretching by hand apparently gives a better crust.
 Dough balls for the freezer. Takes no time to thaw for same day pizza if not overnight.
It’s still not perfect, but steps and bounds ahead, for a home kitchen. You can see my recipe template below and others too.
 This could have been rolled or stretched thinner, less topping. But it was still delish.
I said I would use the 20lb François gave me as a Xmas gift, because it was a super gift and I don’t want to be wasteful. I have been using it in my bread at la table too (along with Le Moulin Bleu, say 50:50 or just to feed the starter or just to finish) much to my waitresses’ bafflement, given our local credo. I told them it was just a fling. But I’m almost out, so I don’t know. Maybe more than a fling, because I might have to buy more, if only for my home pizza snacks. You can get it at specialty Italian stores or suppliers, not too hard to find in the big city or online I suppose.
And it makes the most fantastic pasta too! I use half Moulin Bleu bread flour and half '00'.
Fliing or not, the Moulin Bleu will remain my go-to and should be on your radar too. Local and organic, especially known for their buckwheat.. I don't know, but it doesn't really make much sense to import flour. So torn.
My more-or-less recipe (pretty darn good but still room for improvement)
2x large or 4 x medium 12’ pizzas:
10-15g yeast (1-2 Tbsp or 1-2pkg) active dry*
400ml water (slightly warm to body temp) or 1 egg + 350ml (total a little more than 1.5 c)
15g (1 Tbsp) sugar
700g+ 00 flour (around 3.5c), more like 550g of AP flour or Moulin Bleu bread flour+
20g (1Tbsp salt)
20ml olive oil (1 big Tbsp)+
Mix water, sugar and egg, add yeast. Add a third of the flour and mix. Allow to hydrate a little, say 20min. Add another third of the flour, salt, oil and start mixing. Once you have a sticky homogeneous mass, add the rest of the flour except for a bit, that you will add as need be. Knead at slow/medium speed, adding more flour as required until a uniform mass /loose ball forms, and then knead a little more, but not too much. Like 5 min total by machine. Until it is an elastic, stretchy, slightly but not too sticky ball that gently pulls off the dough hook or your hands (by hand it will be longer, more like 10min). Let rise covered for 1hr or until double. Cut into 2 or 4 portions and roll into balls. At this point, I put them on a greased tray and freeze, wrapping the next day for later use. Then you pull out a ball and let thaw in the fridge overnight or on the counter for a few hours, before rolling out/shaping. . If you are cooking soon, then let the dough rise another 30min-1hr before rolling out (onto a greased floured pan). Once stretched or rolled out, top and let sit while your oven heats up. Cook for about 10 min in a 450F oven. Go higher with a stone if you can. The hotter the better if your pie is thin, not too much topping. I have found that unrealistic in a home oven setting and with my pizzas. Because you want it to be cooked through and toasted, not burnt. Out of the oven, Brush with olive oil or good oil of choice.
*I find that if you’re not in a rush, it is best to use less yeast and take more time..
Our favourite toppings:
Tomato sauce (with garlic and oregano) spread very thin, you should see the dough through the sauce, cheese (ideally a blend of grated firm cheese like cheddar and/or parmesan-style, with some mozzarella or fresh cheese), prosciutto or salami, green onions, basil, hot pepper
Ratatouille spread very thin, cheese (same as above), olives
Bechamel or cream sauce or just drained fresh cheese with herb pesto (or a ton of chopped herbs and greens), some grated cheese, thinly sliced onions or wild garlic (optional: bacon)
Wild mushroom sauce, cheese
Wild Herb pesto, fresh tomatoes, cheese
3 Pizza dough recipes http://slice.seriouseats.com/archives/2012/07/print/the-pizza-lab-three-doughs-to-know.html
Nancy Hinton
in 00 flour, 2017, ingredients, journal, pizza, québec, recipes
|
Post a Comment
Easter Egg-spiration
Spring is in the air! Here is some egg-spiration including ever relevant prior posts and a few egg recipes for Easter (and year-round..)
As with most people, I am always inspired at Easter especially because the seasons are changing and it’s our new year! These guys take the cake though with their easter egg tree..
But wow, looking back at my blog, I’m extra inspired by how inspired I was in 2007 or 2008. It all still holds true, but let’s just say, the wonder of eggs and a ‘God’ we don’t understand are now givens; I am presently more focused on just getting a ton of mundane tasks done - like my cooking, paperwork and cleaning, maple soda and hiring, planning for the season. The greens will be sprouting soon enough, weehoo..
For Easter, On Eggs and God I really like this post (from 2008), which I also find amusing since I am even more of a witch now, fascinated by plant intelligence for instance. Once in a while, it’s important to stop, think and feel, question or accept, taking stock and ‘lacher prise’. Often time alone in the kitchen provides that space, like snowshoeing or running say, conducive to figuring something out and finishing off feeling good. A moment of peace and clarity can go a long way. There can never be too many elephants in the room. Besides, my dad the minister comfortingly told me once since that I am effectively praying to God by doing my thing the best I can, by practicing my craft and expressing myself in tune with nature, loving and doing and sharing, while being honest and true. My kind of religion. Scroll down to my Egg Epiphany. http://soupnancy.squarespace.com/blog-journalessays/2008/3/23/for-easter-eggs-and-god.html
My Easter Egg A quick ode to the egg and all its properties, from 2007. Kind of boring as in ‘duh’, but fact: eggs are truly amazing. How can you not find the phenomenon that is meringue extraordinary?! http://soupnancy.squarespace.com/blog-journalessays/2007/4/6/my-easter-egg.html
My Easter soup (from made with lamb lungs, a fun exercise in tribute to my producers and Greek tradition but not necessarily one to repeat. http://soupnancy.squarespace.com/blog-journalessays/2011/4/18/greek-easter-soup.html
These following recipes are more of a sure bet, like my eggs en cocotte (baked) with wild mushrooms and greens below.
First of all, a basic egg cooking guide is a good idea to share with your kids or to revisit if you’ve forgotten to cook eggs. Everyone should know how to cook eggs. http://firstwefeast.com/eat/complete-guide-to-cooking-eggs-at-home/ This overview covers basic egg knowledge; I just don’t agree with frying an egg in oil at high temp, but to each his own.. And for a hard-boiled egg, I stand by the method of putting them in cold water, bringing to boiling temperature, removing from heat and covering for 10min. Chill in running water while cracking the shells a bit and peel. When cooking in the pan, gentle/medium heat and butter, not oil. And I couldn't be bothered with the 62C degree egg. I prefer more texture, but mainly, why spend hours cooking an egg in a circulator, when 5 or 10 minutes with an old-fashioned technique works just fine.
An Italian Easter Ricotta pie https://www.theguardian.com/lifeandstyle/2017/apr/04/spinach-herb-and-ricotta-pie-recipe-rachel-roddy-torta-pasqualina
Egg toast Mumbai sytle https://mobile.nytimes.com/2017/04/06/magazine/egg-cheese-and-toast-mumbai-style.html
Pound cake An easy recipe to remember (approximately equal parts by weight of butter, sugar, eggs, flour), and a snap to make, it’s just plain good stuff. I had forgotten about this old classic, more often making a current lightened version using less eggs and butter, adding milk/yogurt and baking powder, vegetable oil for a fine cake or ‘quickbread’ (like banana bread), if not going all out to make a fancy dessert. I rediscovered pound cake this winter when my girlfriend was preoccupied with ensuring her athlete-daughter had enough energy for her competitions; pound cake was important filler. It was hanging around, we ate it. And then, I came back home to make it regularly. Bonus is that it keeps well on the counter for over a week, perfect with coffee or breakfast, or for a snack. Dress it up with coulis, fruit and whipped cream, caramel or chocolate it can be a swoon worthy dessert. While at JS, I would incorporate wild flavours such as mushroom powder or sumac, long pepper or sweet clover flower and maple sugar etc, this lemon poppyseed version at home is tough to beat. See recipe below.
Baked eggs with wild mushrooms and greens
Chef Nancy Hinton, Les Jardins Sauvages
4 portions
200g wild mushrooms (4c)
*(or 150g JS sousvide, cooked, frozen wild mushroom mix)
30ml (2 Tbsp) olive oil
15ml (1 Tbsp) butter
1 small onion, minced (1c)
5ml (1 tsp) minced garlic
45ml (3Tbsp) white wine
Pinch tarragon
125ml (1/2c) heavy cream
150g Blanched/Precooked greens (lambs’ quarters, wild mustard leaf, spinach fiddleheads, asparagus), chopped (2c)
4 eggs
drops to taste hot sauce or chilli flakes
drops worchestershire
to taste salt, pepper
100g grated cheddar cheese
option chopped cooked bacon
to taste maple syrup
Method:
Sauté mushrooms in a hot pan with oil. As soon as caramelisation starts, lower the heat a bit. Add onions and butter and cook over medium heat for a few minutes, add the garlic and lower the heat and cook 5-10 minutes more until the mushrooms are cooked through and tender, the onions translucent. You might want to add a squirt of water to finish the cooking (so it doesn’t dry out or fry). Season to taste with salt, pepper, worchestershire, herbs.
Deglaze with white wine and add cream. Remove from heat.
Add cooked greens, and make nests for the eggs.
Or divide mushroom mixture and greens into greased ramekins.
Crack the eggs into the nests. (You might want to break the eggs into a bowl first to make sure there are no shells).
Season again or add bacon, and a spoonful of pansauce or cream on top of the egg. Top with cheese.
Put in a hot 350F oven and cook for 10-20min until desired doneness.
*When it comes to small ramekins, it is often recommended to place in a pan of hot water which makes for a gentler heat but it takes a lot longer (like 30min) so your choice, after 10 minutes, you need to be checking.
*Serve with hot sauce and maple syrup or a tomato salsa. And good toast.
Œufs en cocotte aux champignons sauvages et légumes verts
Chef Nancy Hinton, Les Jardins Sauvages
4 portions
200g champignons sauvages (4t)
*(ou 150g Mélange Forestier JS blanchies congelées sous-vide hors saison)
30 (2 cu.à soupe) huile d’olive
15ml (1 cu.à soupe) beurre
1 petit oignon émincé (ou 1t)
5ml (1 cu.à the) d’ail émincé
45ml vin blanc
pincé estragon
125ml crème 35%
150g Légumes vert blanchis (chou gras, épinards de mer, feuilles de moutarde, têtes de violon ou asperges etc) et coupé grossièrement (2t)
4 oeufs
gouttes huile de piments/sauce au piments ou pincé piment broyé
gouttes worchestershire
au goût sel, poivre
100g fromage cheddar râpé
option bacon cuit et haché
au gout sirop d’érable
Méthode:
Faire poêler champignons dans l’huile à feu vif. Quand la coloration commence, baisser le feu et ajouter le beurre, les oignons et continuer la cuisson plus lente pendant 5 à 10 minutes de plus, ajoutant l’ail à la fin, jusqu’à temps que les champignons sont cuits au centre, tendre et encore juteux et l’oignon translucide. Rajouter un peu d’eau si c’est trop sec pour terminer la cuisson. Assaisonner les champignons à votre gout (sel, poivre, worchestershire, herbes..)
Déglacer avec le vin blanc, et réduire. Ajouter la crème et enlever du feu.
Garnir de légumes verts et faire quatre trous (nids) et placer les œufs.
Ou séparer les champignons et les légumes dans 4 cocottes individuelles beurrées et placer les œufs au centre.
Assaisonner et garnir de bacon si vous désirez.. Ajouter une cuillère de sauce/crème par-dessus l’œuf. Garnir de cheddar râpé.
Enfourner à 350F pour 10-20min jusqu’à la cuisson désiré.
Avec des ramekins individuels, on peut les mettre dans une plaque avec de l’eau chaude pour une cuisson plus douce (et plus lente). Peu importe, verifier la cuisson après 10min.
Servir avec un filet de sirop d’érable et sauce piquante.
Une salsa de tomate et du bon pain accompagne bien aussi.
Lemon-Poppyseed Poundcake
*I don’t remember where I got this particular recipe which uses cake flour, baking powder and an off kilter ratio with more butter, but I like it.
1 loaf (standard 9x5)
270g butter
1/2c each (230g total) brown sugar, white sugar
5ml (1tsp) vanilla extract
15ml (1 Tbsp) lemon zest
4 large eggs
2c (230g) cake flour
5ml (1tsp) baking powder
30ml (2Tbsp) poppy seeds
Method:
Have all ingredients at room temperature first of all.
Cream together the butter and sugars, lemon zest and vanilla (or whatever flavours you like) until light and fluffy.
Add in eggs one at a time, whipping well after each.
Combine dry ingredients and mix into butter-sugar-egg mixture, gently incorporating until homogeneous.
Bake at 350F in a greased/parchment lined loaf pan for 50min-1hr until a knife comes out clean.
Nancy Hinton
in 2017, God, Sprind, egg recipes, eggs, recipes, spring
|
Post a Comment
Minute sauce
I’m a sauce girl.
At work, I put lots of love into my sauces, starting with deer, duck or mushroom stock. At home, I like to keep on hand ready-to-use stock reductions, MEP to be able to make a quick and delicious sauce without too much work or planning ahead.
When cooking meat, I always prefer a pan to the grill, even in summer since I hate to miss out on deglazing the pan for sauce. I care more about the sauce than the meat itself.
I think everyone should have a few sauces under their belt for a life worth living.
When I was teaching this winter, after learning a few classic 'mother' type sauces, my students were pleased with this easy one, reminding me to share it.
In a pinch, it's a favourite one to whip up that requires nothing but a few pantry/fridge staples.. Particularly good with fish and poultry, it is quite passé-partout (versatile).
I call it my minute sauce because it literally takes a minute if you make a small batch, say for two. It’s a cross between a classic wine cream reduction and a sauce vierge/warm vinaigrette à la Anne Desjardins (Eau à la Bouche).
I remember seeing her make her 10 second sauce by combining lemon juice or a good wine vinegar, a good olive oil, a touch of cream and some fresh herbs in a mini copper saucepan, marvelling at the delicious simplicity - how dare she! (Not to mention that the broken emulsion look was not yet hip, seen as a flaw in classic cuisine). I like adding the shallot wine reduction and a mix of fresh and/or dry herbs. We have a salted wild herb pesto that keeps in the fridge year-round that’s got mustardy, garlicky kick with anise, parsley, celery notes -a life-saver and full of summer flavours, but any pesto or mix of chopped herbs (dill, tarragon, parsley, basil, chives..) will do..
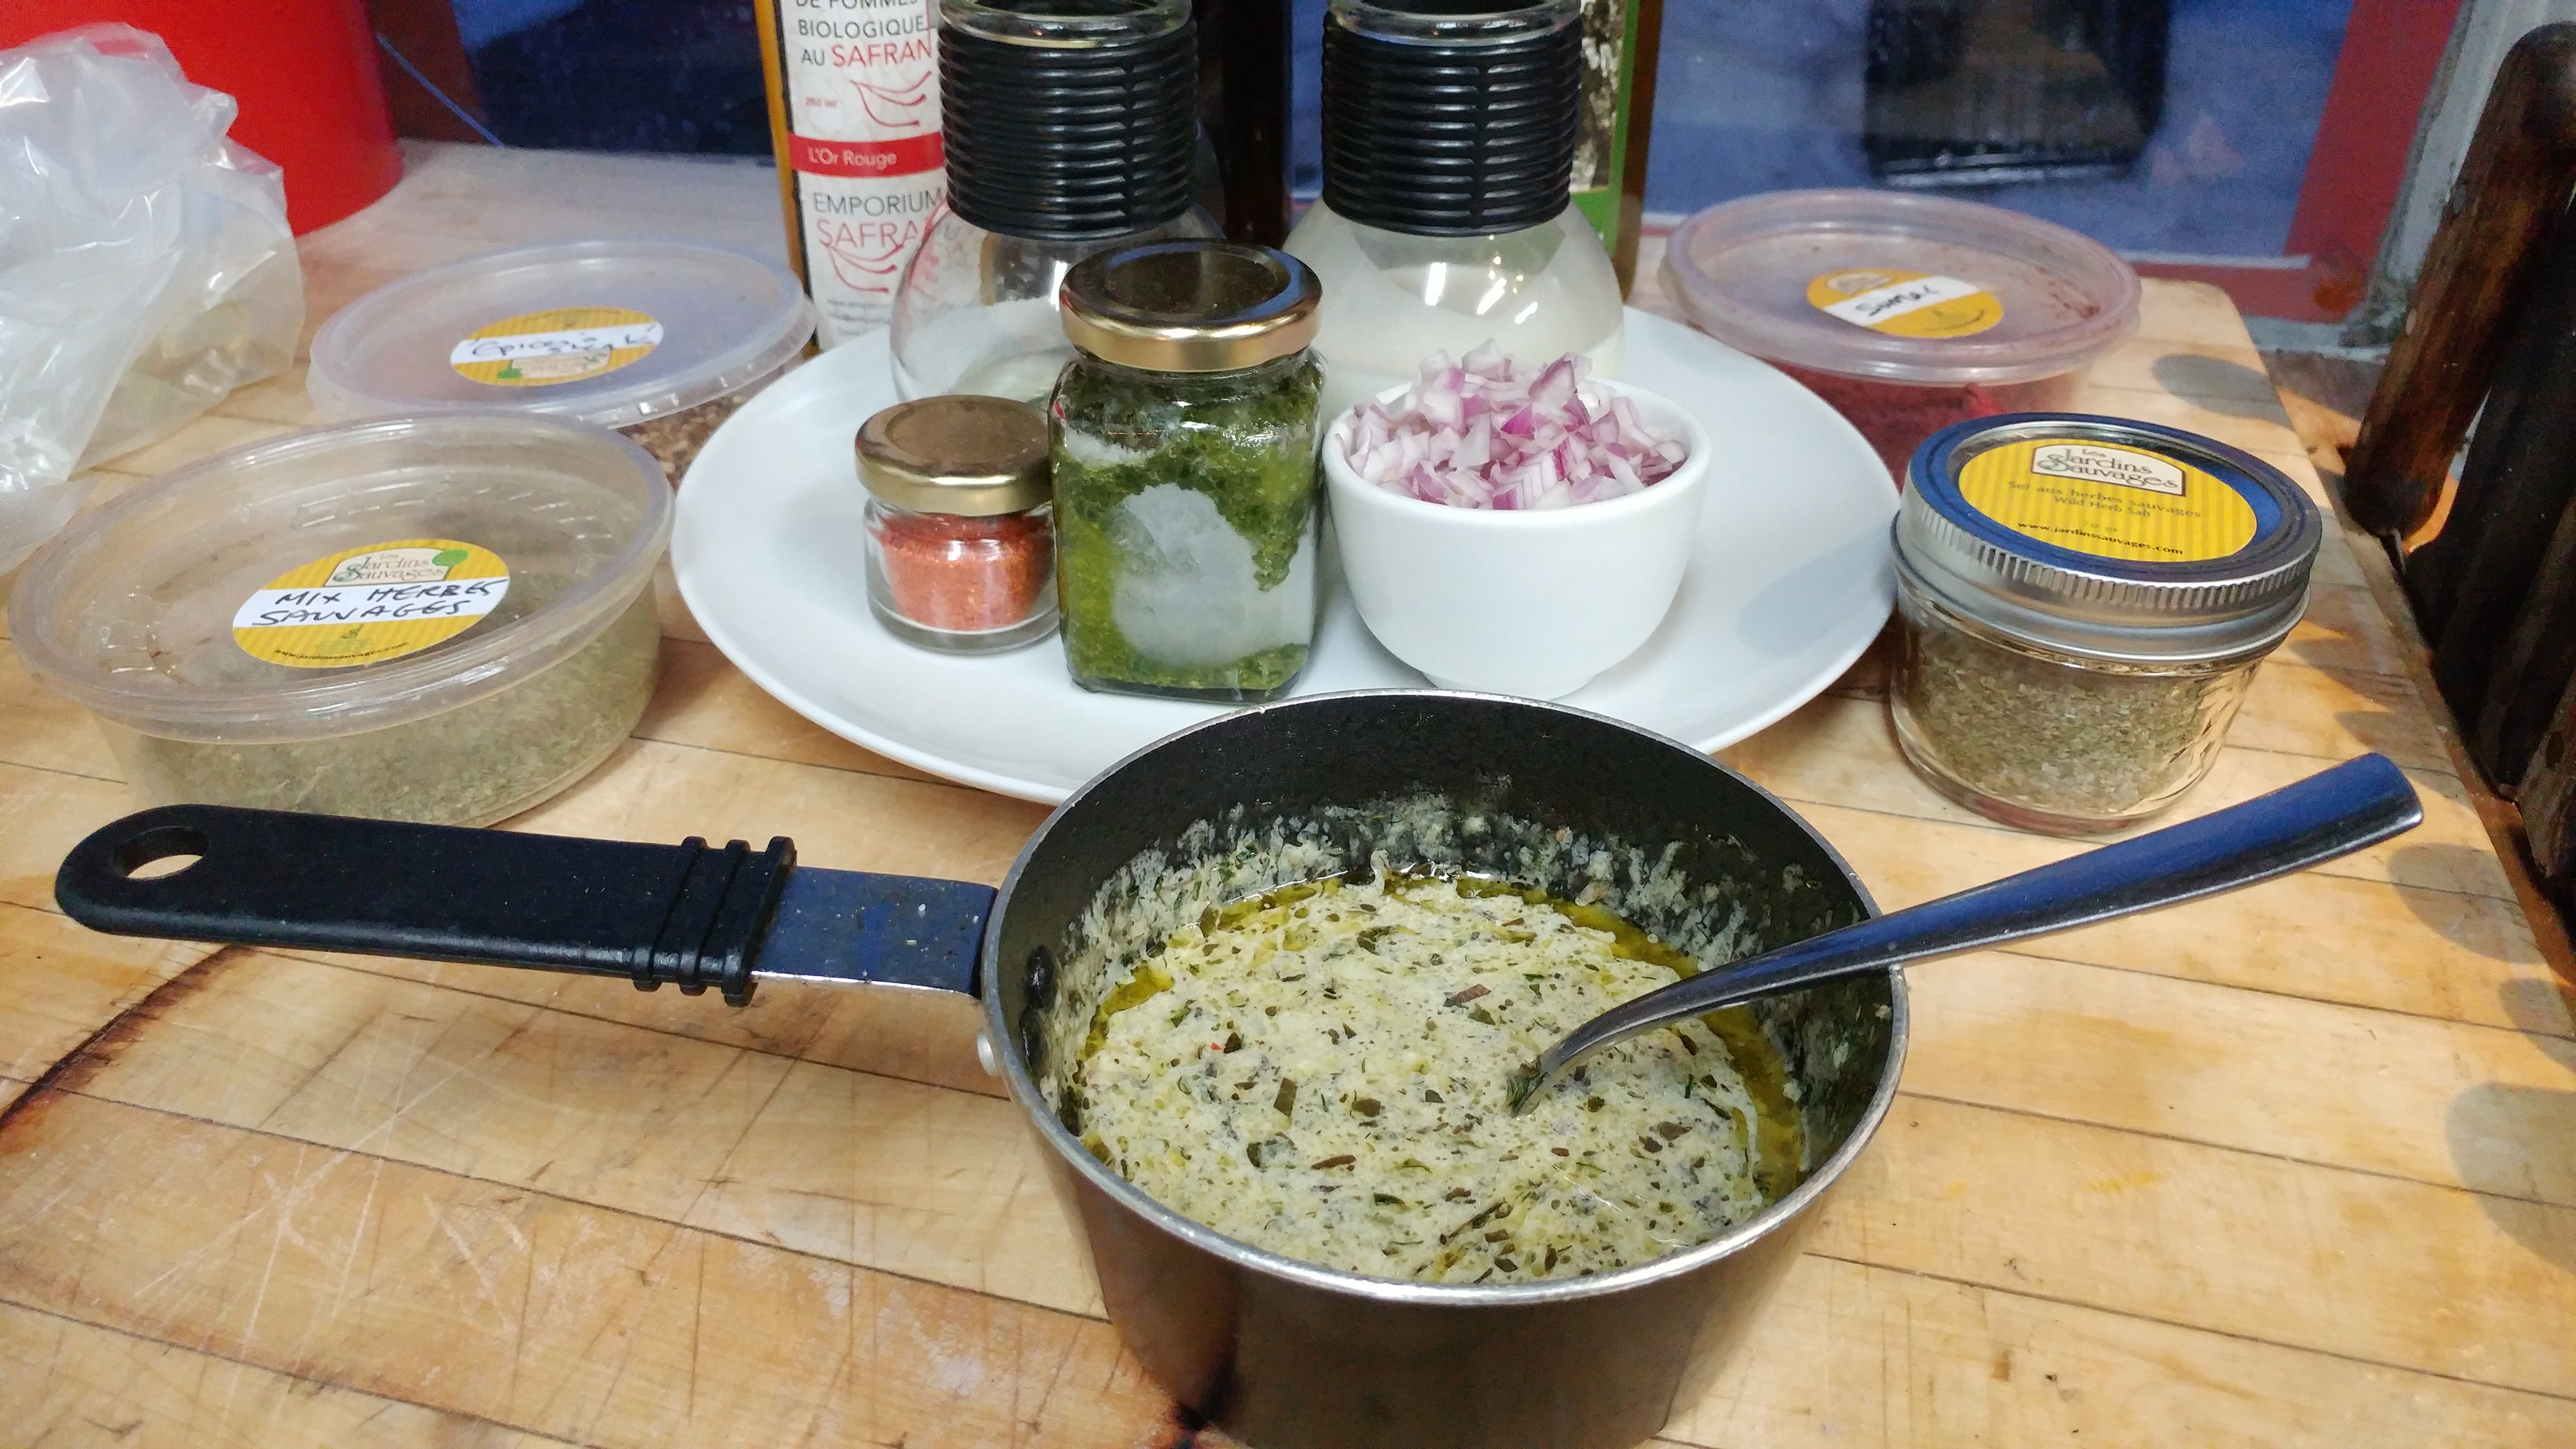
Wild herb minute sauce
Chef Nancy Hinton, Les Jardins Sauvages
4-8 portions
45ml (3 Tbsp) chopped French shallots (1)
30ml (2 Tbsp) good cold press olive, canola, hemp or sunflower oil (or JS wild herb oil)
2-5ml (1/2-1 tsp) minced garlic (optional)
60ml (1/4 c) white wine or cider
125ml (1/2 c) heavy cream 35%
30ml (2 Tbsp) Pesto or JS salted herb pesto
2-5ml (1/2-1tsp) good cider, wine or sherry vinegar or lemon juice
To taste sel, poivre
To taste hot pepper sauce
Method :
Sweat shallots (and garlic if using) in oil for a few seconds in a small pot or saucepan.
Add wine and reduce to a third, almost dry.
Add cream and herb pesto, reduce by half or to desired consistency.
Season to taste with a touch of acidity, spice and salt & pepper..
*Depending on pesto or salted herbs used, you might very well not add salt or garlic.
*Serve with fish, poultry, pork, red meat, eggs, vegetables/legumes or pasta..
Sauce minute aux herbes sauvages
Chef Nancy Hinton, Les Jardins Sauvages
4-6 portions
45ml (3 c.a.s.) échalotes françaises émincés
30ml (2 cu.à soupe) bonne huile première pression huile d’olive, canola ou tournesol (ou huile d’herbes sauvages JS)
2-5ml (1/2-1 cu.à the) d’ail émincé (option)
60ml (1/4 t) vin blanc ou cidre
125ml (1/2 t) crème 35%
30ml (2 c.a.s.) herbes salées/pesto d’herbes sauvages/pesto d’herbes au choix
2-5ml (1/2-1c.a.t.) bon vinaigre de cidre, Xeres ou jus de citron
Gouttes/au gout huile de piments/sauce au piments ou pincé piment broyé
au goût sel, poivre
Méthode:
- Ajouter vin blanc et réduire à un tiers, quasiment à sec.
- Ajouter crème et herbes salées. Réduire à moitié ou jusqu’à consistance désirée.
- Assaisonner au gout avec acidité, piquant, sel & poivre.
*Dépendant des herbes salées ou pesto choisis, probablement pas besoin de sel.
*Servir avec poisson, volaille, porc, viande rouge, œufs, pasta, legumes ou légumineuses..
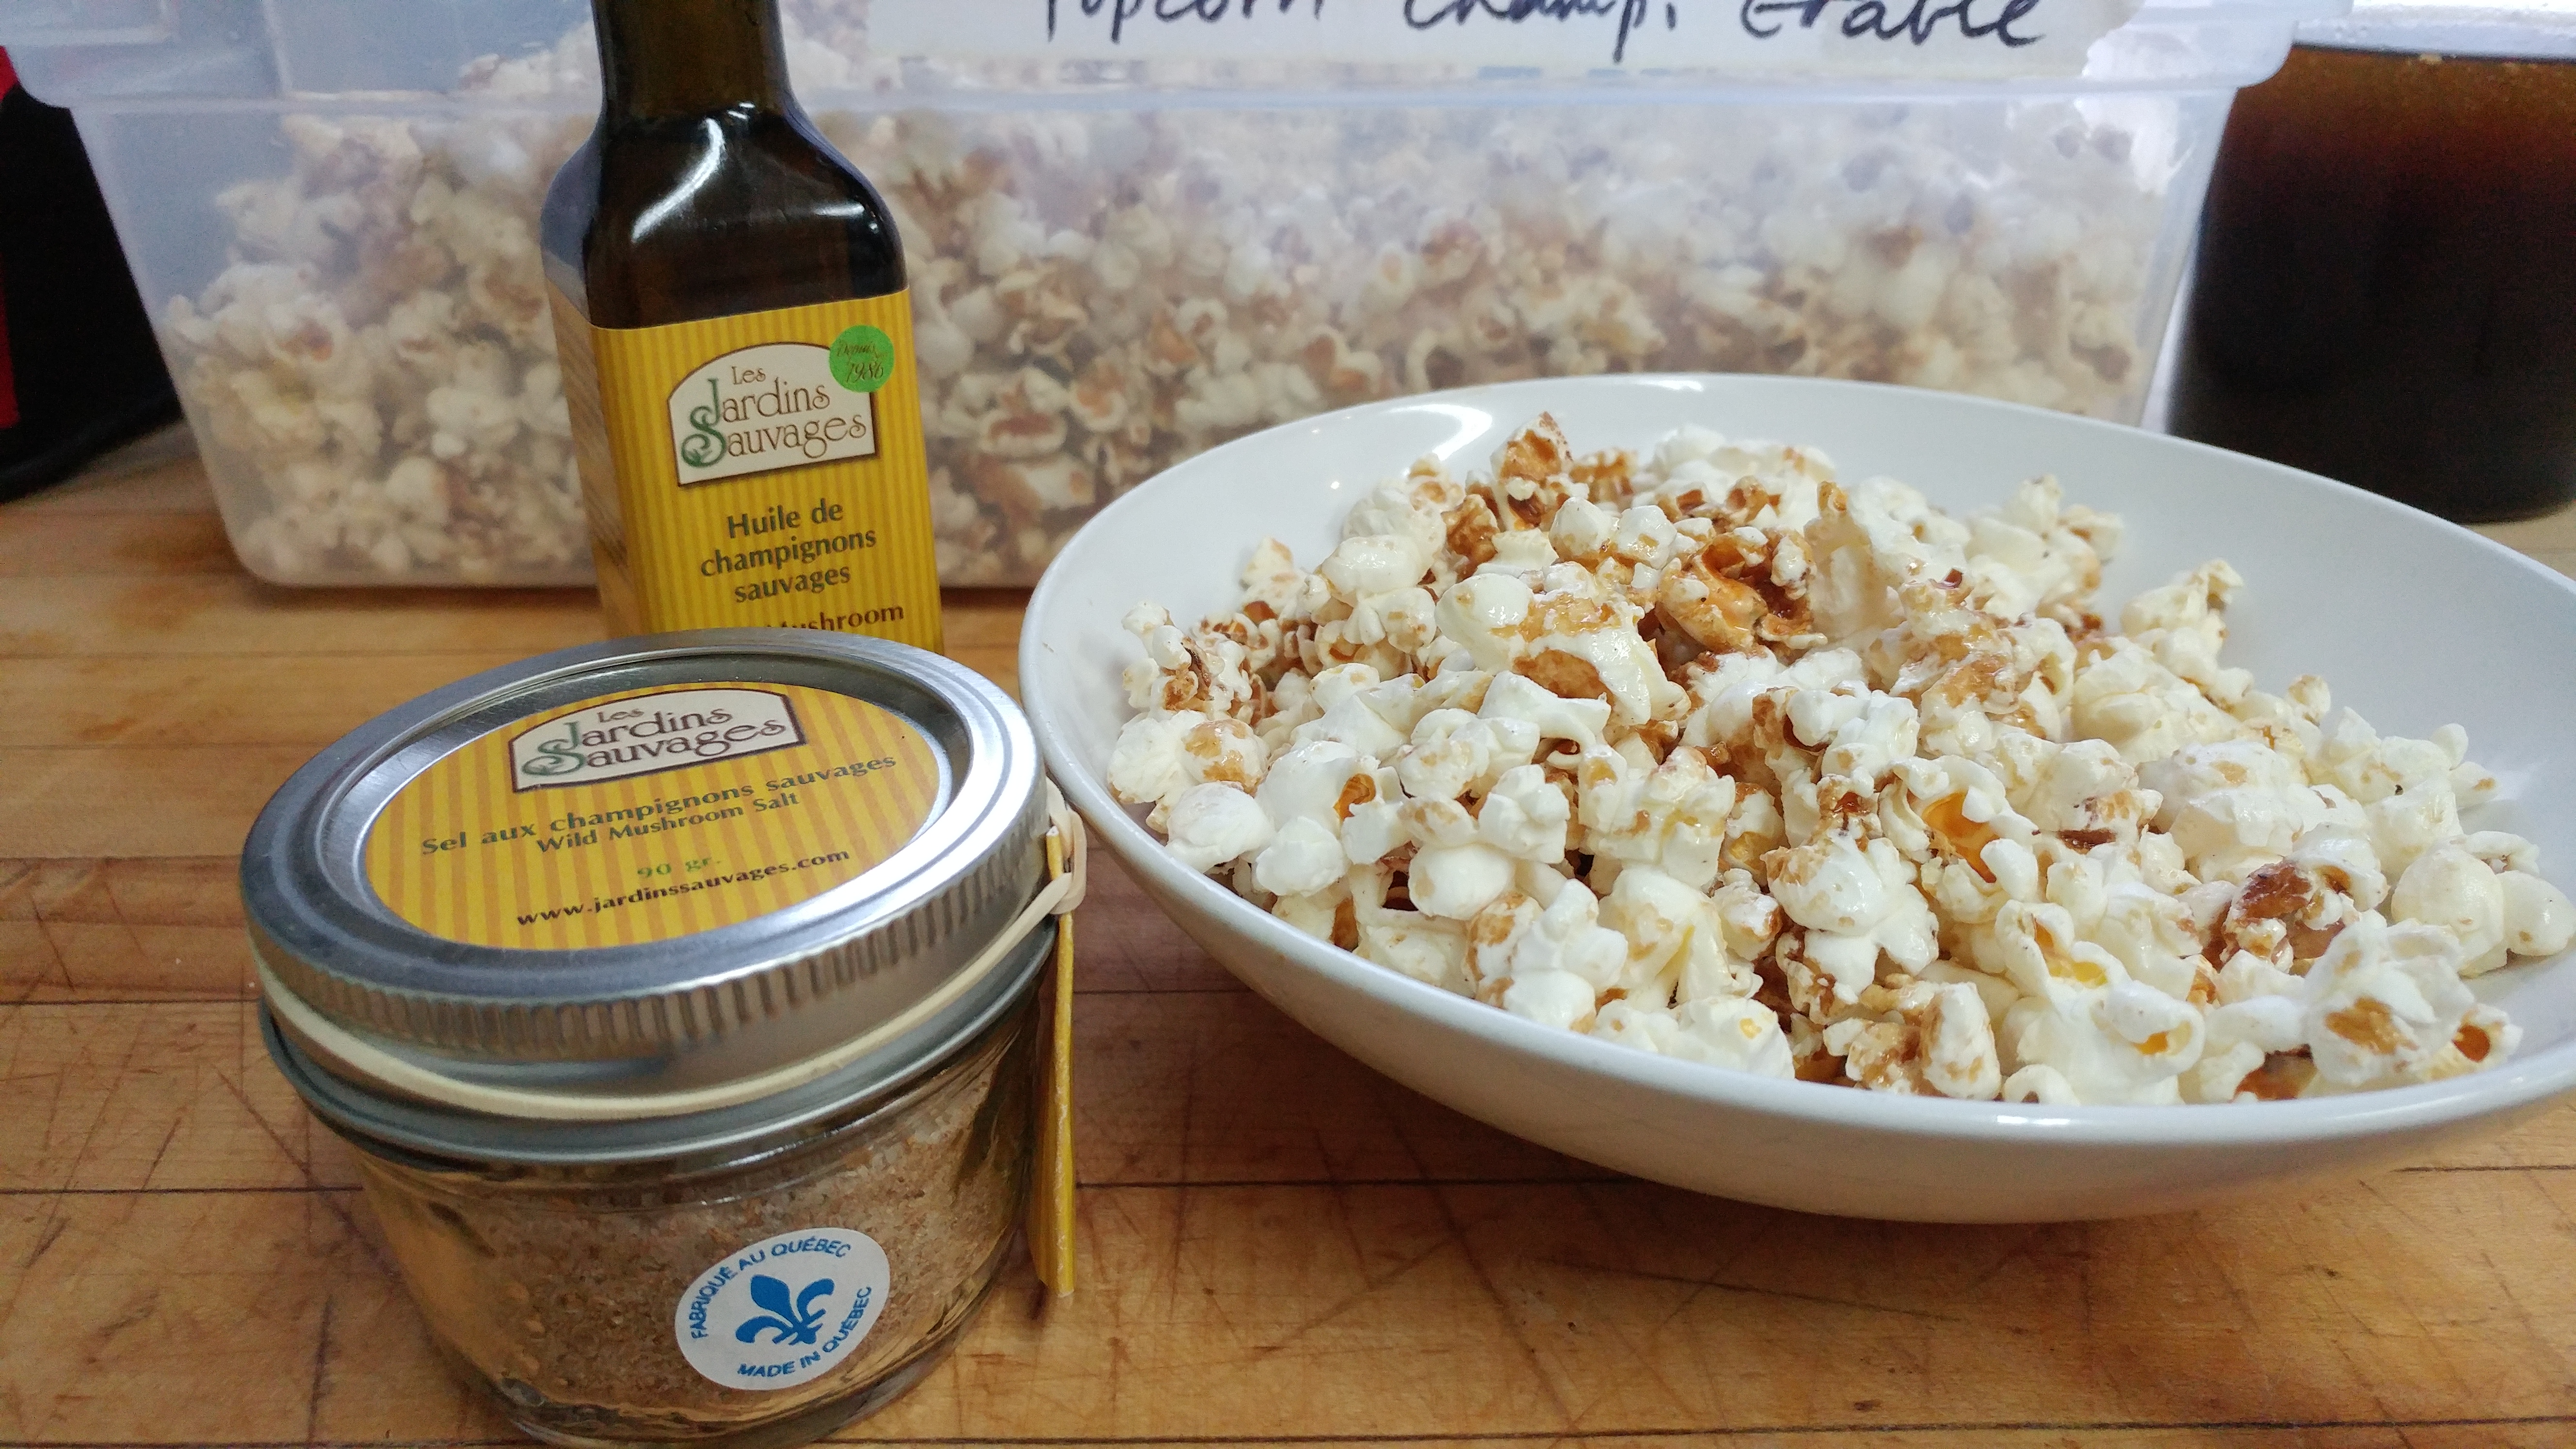
Mushroom Maple Popcorn
We serve this at the restaurant during our mushroom festival and so over the years, it has become a thing.. Full on umami, with mix of salty and slightly maple sweet, it’s hard to stop eating.
On offer at our Jean Talon Market stall Thursday March 23rd, 5à8 during the Market Maple event, and for our own Maple event in April (when the sap will actually be running)..
Or if you want to make it yourself, easy peasy; see recipe below.. When was the last time you made popcorn stove-top? It’s the best and really no trouble at all.
 https://goo.gl/photos/45n1g5BogWHFR6jX9
Mushroom Maple Popcorn
Chef Nancy Hinton, Les Jardins Sauvages
12 portions (6L)
1 c (200g) organic popcorn
2 Tbsp (30ml) corn oil or grapeseed oil (or other neutral cooking oil)
Topping :
1/4lb (120g) butter
1/4c(60ml) maple syrup
2 Tbsp (30ml) tamari (or soya sauce)
1 Tbsp (15ml) JS wild mushroom oil
1 tsp (5ml) JS wild mushroom salt (or pinch of sea salt)
Method:
Heat oil in a big heavy bottom pot that you have a tight fitting cover for. Add popcorn and stir to coat kernels evenly. Put the lid on and turn the heat to high.
Without removing the cover, shake the pot regularly. Once the corn starts to pop, you will have 2-3 minutes of more regularly shaking the pot so that the popped kernels don’t burn and the un-popped kernels fall to the bottom to pop.
When the popping stops, remove from heat and wait a minute or two.
Meanwhile or beforehand, prepare the topping by combining the ingredients in a little pot, bring to a boil and turn off.
Empty the popcorn into a big bowl. Add topping and mix well. Start with a tablespoon per cup and adjust to taste. Add extra salt to taste if necessary. **It’s best to add the topping at the last minute before serving or make and keep warm.
You can also dry toast it in a low oven (around 200F) for 30min to make it crunchy and so it holds well (say prep it in the afternoon for a dinner party).
Popcorn aux champignons sauvages et à l’érable
Chef Nancy Hinton, Les Jardins Sauvages
12 portions (6L)
1 t (200g) popcorn bio
2 c.a.s. (30ml) huile de maїs ou huile de pépin de raisin (ou autre huile de cuisson neutre)
Garniture :
1/4lb (120g) beurre
1/4t (60ml) sirop d’érable
2 c.a.s. (30ml) tamari (ou soya)
1 c.a.s (15ml) huile de champignons JS
1 c.a.c. (5ml) sel de champignons JS (ou pincé sel de mer)
Méthode:
Mettre l’huile de maïs/pépin de raisin dans un gros chaudron de 8L pour lequel vous avez un couvercle. Ajouter le popcorn, mélanger bien, mettez le couvercle et allumer le feu au max.
Brasser le chaudron sans enlever le couvercle régulièrement pendant quelques minutes. Quand le maïs commence à éclater, vous en avez pour 2-3 minutes à brasser le chaudron, toujours en gardant le couvercle étanche.
Quand vous n’entendez plus d’éclatements, arrêtez le feu et attendez quelques minutes.
Avant ou pendant ce temps, préparer la garniture en mélangeant tout dans un petit chaudron; amener à l’ébullition et arrêter le feu.
Videz le chaudron de popcorn dans un gros bol. Ajouter la garniture par-dessus et mixer. Allez y au gout (2 c.a.s.+ par portion de 2t ) ou 15-20ml par tasse.
Ajouter sel aux champignons de plus au gout.
**C’est mieux de mettre la garniture à la dernière minute ou garder le popcorn chaud. Ou si on veut le préparer à l'avance, on peut le passer au four pour 30min à 200F pour qu'il reste craquant.
Nancy Hinton
in maple, popcorn, recipes, snacks, wild mushroom
|
2 Comments
